
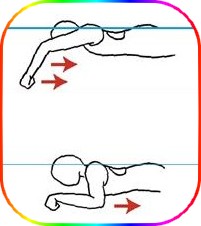
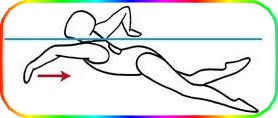
Downhill Float
THE PURPOSE OF THIS DRILL
- Learning to shift weight to achieve a downhill floating position
- Understanding the importance of a correct head position
- Feeling effective core tension and stability
HOW TO DO THIS DRILL
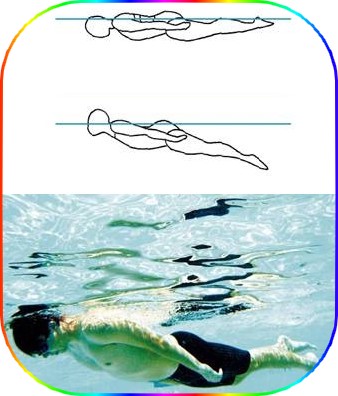
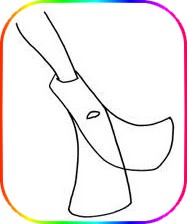
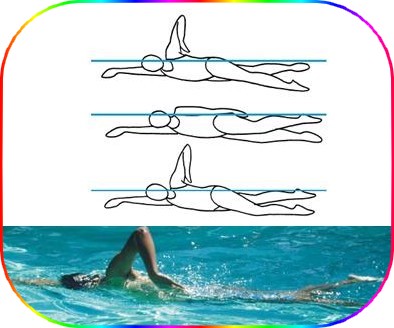
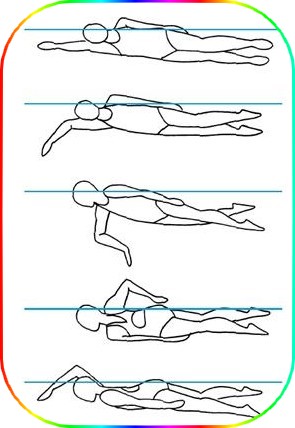
- Step 1 : - Float face down in the water, with your arms at your sides, in a head leading position. Don't attempt any forward motion.
- Step 2 : - Notice your body position. For most people, the legs will soon begin to sink, leaving the swimmer in an uphill floating position.
- Step 3 : - To begin correcting this disadvantageous floating position, lower your chin, so you are looking at the bottom of the pool, not forward. For many people, this simple action will have a positive effect on their float, including raising their sinking legs a bit.
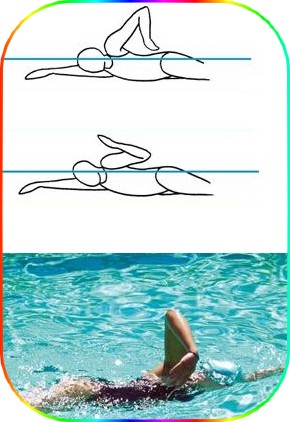
- Step 4 : - Now focus on your spine. Make it as straight as possible by contracting your abdominal muscles and pulling your bellybutton in. Learning to achieve and maintain a straight spine through core tension is an important skill that can be applied to all strokes.
- Step 5 : - While holding your core stable, lean forward on your chest. Doing so should allow your hips and legs to rise toward the surface of the water. This is the desirable downhill floating position upon which you can build a good freestyle.
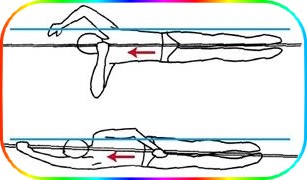
- Step 6 : - Stand, breathe and again lay horizontally in the water, face down, this time with your arms extended over your head, hands leading. Look at the bottom of the pool, achieve a straight spine and stable core. Shift your weight forward and feel the downhill float.
DRILL FEEDBACK CHART
| Problem | Modification |
| My legs still sink. | For some people, either because of densely muscular legs, or low body fat, their legs will tend to sink no matter what. For these people it is all the more important to learn to hold their core in a downhill floating position. |
| I can't balance on my chest. |
Try rotating your shoulders back, and rounding your chest out. Pretend you are standing at attention horizontally. Focus on your breastbone, moving it gently lower in the water. |
| I can't breathe. |
This drill requires you to hold your breath. When you run out of air, simply stand up and start again. |
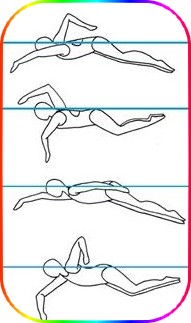
Log Roll
THE PURPOSE OF THIS DRILL
- Maintaining the horizontal axis while rolling
- Accessing power from your core
- Getting comfortable floating downhill in a non-flat position
HOW TO DO THIS DRILL
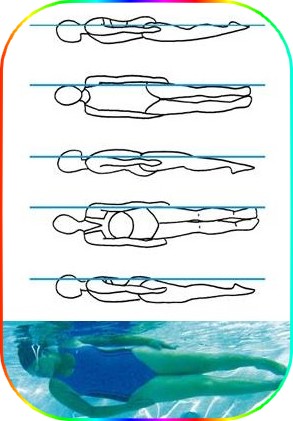
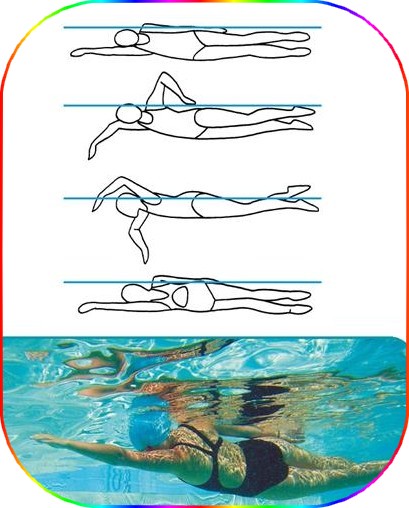
- Step 1 : - Float face down in the water, arms at your sides, head leading, without attempting any forward motion. Achieve a downhill float and position your head so you are looking at the bottom of the pool.
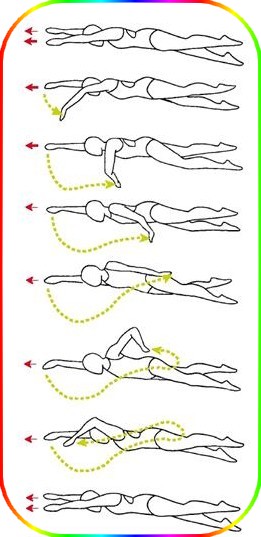
- Step 2 : - Maintaining your core tension and head position, roll onto your right side by rotating your right hip and shoulder one quarter turn clockwise. Hold for 5 seconds.
- Step 3 : - Maintaining your core tension and head position, roll onto your back by rotating your right hip and shoulder one quarter turn clockwise. Hold for 5 seconds.
- Step 4 : - Maintaining your core tension and head position, roll onto your left side by rotating your right hip and shoulder one quarter turn clockwise. Hold for 5 seconds.
- Step 5 : - Maintaining your core tension and head position, roll back onto your front by rotating your right hip and shoulder one quarter turn clockwise. Hold for 5 seconds.
- Step 6 : - Stand, breathe, then repeat this drill rolling counter clockwise.
Log Roll
DRILL FEEDBACK CHART
| Problem | Modification |
| I can't get a quarter turn. | Try initiating the turn from the hip and letting your shoulder follow. |
| My sinking legs get in the way. | You can do this drill with a very light kick if necessary. |
| I can't breathe. | You can catch a breath when you rotate to your back. |
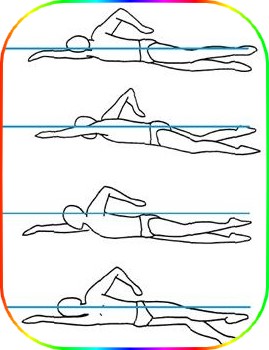
Twelve Kick Switch Freestyle
THE PURPOSE OF THIS DRILL
- Maintaining a downhill float while moving
- Beginning to feel leverage from the core
- Identifying the longest freestyle position
HOW TO DO THIS DRILL
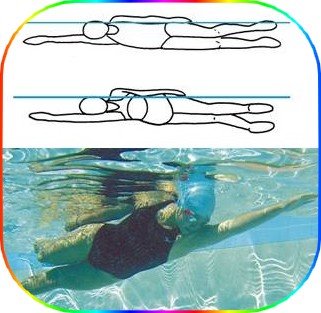
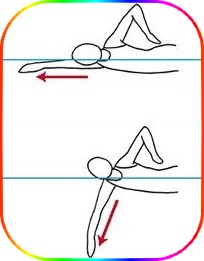
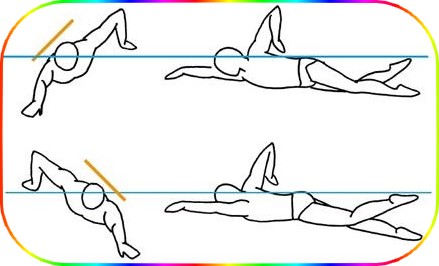
- Step 1 : - Float on your side in the water, arm towards the surface at your side, the arm closest to the bottom of the pool extended over your head. Engage core tension to achieve the downhill float.
- Step 2 : - Begin a gentle but continuous flutter kick, which should also be directed side to side, rather than up and down.
- Step 3 : - If you are properly aligned, your face will be mostly submerged. To breathe, maintain a stable head position and roll towards your back, breathe, then roll back to your original side position. Create a regular breathing interval.
- Step 4 : - Kick twelve times (each leg equals one kick).
- Step 5 : - Just as you finish the last kick, bring the side laying arm over the water to the front, and the forward reaching arm through the water to your side. At the same time, switch to the opposite side of your body to float.
- Step 6 : - Do twelve more kicks in this position. Repeat the switch with your arms and floating side. Continue to kick twelve times then switch to the far end of the pool.
Kick Switch
DRILL FEEDBACK CHART
| Problem | Modification |
| I go crooked. | Try to align your body and reaching arm. |
| My kick is not side to side. | This is usually a result of your hips not being aligned to the side with your shoulders. Use more core tension. |
| I can't maintain a downhill float. | Check your head position. During the twelve kicks, your lower ear should be resting on the shoulder of your reaching arm. |
KICK DRILLSA productive flutter kick is part of a good freestyle. It provides constant momentum, and counterbalance to the arm stroke. Because the legs require a disproportionate amount of energy, developing a relaxed, sustainable kick is important. The goal of the following freestyle kicking drills is to learn to use an economical flutter kick that will enhance the rest of the freestyle stroke. |
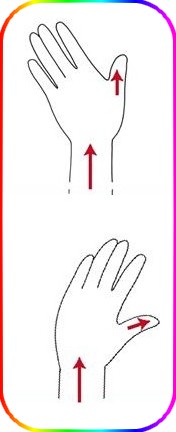
Toe Point Drill
THE PURPOSE OF THIS DRILL
- Understanding the importance of a pointed toe kick
- Experimenting with foot pitch
- Develop a centralized kick
HOW TO DO THIS DRILL
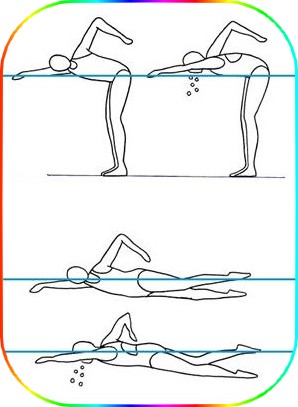
- Step 1 : - Lay horizontally in the water, face down, arms extended. To breathe, do a simple press outward on the water with your hands, and raise your chin gently to the surface, then to return your face to the water, and bring your hands back together in an extended position.
- Step 2 : - Begin doing the flutter kick, using alternating up and down motion with your leg. Kick to a depth of about twelve to fifteen inches, and up to the surface of the water. Kick briskly with relaxed, but fairly straight legs.
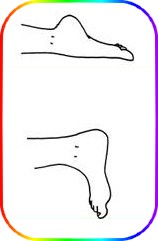
- Step 3 : - Focus on your foot position. To best engage the water, you must use the largest surface of your feet to push against the water. Position your feet so your toes are pointed. Kick briskly for 30 seconds. Feel the tops and the bottoms of your feet push the water as your feet sweep up and down.
- Step 4 : - Now, flex your feet at the ankles, setting them at right angles to your leg (the standing foot position). Kick briskly for 30 seconds. Feel the smaller surface with which you are pushing the water. Notice that you don't move forward well. Some people can even move backwards with this foot position!
- Step 5 : - Now, reposition your feet so your toes are pointed, and rotate your knees and feet inward, so that your toes are closer together than your heels. Together, your feet should form a point. Kick briskly for 30 seconds. Feel a larger foot surface pressing against the water. Notice that your kick is much more effective, with much less effort, and that there is one centralized splash at your feet.
- Step 6 : - Continue kicking with your toes pointed and your feet rotated inward. Kick briskly, with relaxed feet. Feel your kick move you forward as you sweep the water down with the tops of your feet, and up with the bottoms of your feet. Kick to the far end of the pool. Figure 4b Toes Not Pointed
DRILL FEEDBACK CHART
| Problem | Modification |
| My kick makes a huge splash, no matter what foot position I use. | Splash from your kick should be a result of your foot moving water, rather than your foot bringing air down into the water. Bend your knees less. Keep your feet connected to the water. |
| When I turn my feet inward, my big toes bump into each other. | You are fortunate to have excellent foot pitch! As you practice the drill more, adjust your knee rotation a bit to avoid your toes bumping, but do so as little as possible. |
| I get cramps in the arches of my feet when I point my toes. | Try pointing your foot and letting your toes be relaxed. As humans, this position is not natural for us. It can be improved as you practice more. |
Floppy Foot Drill
THE PURPOSE OF THIS DRILL
- Developing a relaxed kick
- Experiencing fish-like propulsion
- Learning to conserve energy
HOW TO DO THIS DRILL
- Step 1 : - Observe a fish swimming. Any fish will do: your pet gold fish, or a shark at the aquarium. Notice the tail as the fish swims. It is not rigid, rather it moves back and forth in the water like a flag in the breeze. It is fluid. The movement is not frantic, rather, it appears to be an effortless action for the fish.
- Step 2 : - Put on a single, long swim fin on one foot and stand in the water, and stand in the water with your back against the wall, submerging the entire fin under the water. Sweep your leg up and down in the water covering about twenty four inches of distance each way. Use enough speed so you feel the resistance of the fin against the water. Notice how the water bends the fin as it moves. Notice how when your leg sweeps in the one direction, the fin bends the opposite way. The movement is fluid, like the tail of the fish.
- Step 3 : - Now, take off the fin and float face down in the water, arms extended. Begin kicking briskly, keeping your feet connected to the water, moving within about fifteen inches of depth. Point your toes, but relax your feet so the water bends them like it did the fin. Kick briskly for 30 seconds. Think about the effortless and fluid motion of the fish tail. Let the water move your foot as if it was a flag in the wind. Rest, then practice again.
- Step 4 : - Once you develop a fluid, floppy foot kick, notice that the splash from your kick is much more compact, and your kick is more productive. Practice for several lengths of the pool.
DRILL FEEDBACK CHART
| Problem | Modification |
| My feet are stiff. | Try achieving the feeling on land to start. First try it with your hand. Relax your wrist and flop your hand back and forth. Now stand on one leg and relax your other ankle. Shake your other foot until it flops like your hand did. Next, sweep your leg forward, as if kicking a ball, foot relaxed. Watch your foot. By the farthest extent of the movement, your relaxed foot should flop forward. Now try it in the water. |
| I don't feel resistance on my feet. | Kick more briskly. Try changing the depth of your kick. It should pass through about fifteen inches of water. Relax your ankles. |
| I get tired too quickly to notice a floppy kicking motion. | Give it time. Remember using the large muscles of your legs to initiate the kick will initially use more oxygen than a less effective kick, thus making you feel tired and out of breath. The muscles adapt relatively quickly as you practice. |
Vertical Kicking Sequence
THE PURPOSE OF THIS DRILL
- Understanding the importance of foot speed
- Engaging the correct muscles for flutter kick
- Feeling the water with your feet
HOW TO DO THIS DRILL
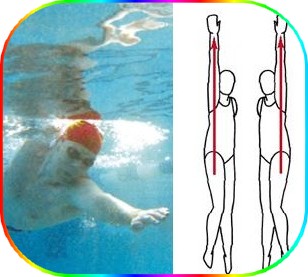
- Step 1 : - In water at least as deep as you are tall, get into a vertical position. Engage your core. Begin a gentle sculling action (tracing side to side underwater figure eights with your hands) to keep your head above water.
- Step 2 : - Without producing forward or backwards motion, begin kicking the flutter kick, moving your extended legs in a sweeping motion alternately so that when one foot is forward, the other is back, within a range of approximately twelve to fifteen inches. Your toes should be pointed towards the bottom of the pool, and your feet and knees should be rotated slightly inward.
- Step 3 : - Focus on the muscles you are engaging. They should be the large muscles, high in your legs. As you move your leg forward, you should be feeling your quadriceps. As you move your leg back, you should feel your hamstrings and glutes working.
- Step 4 : - Your legs should be fairly straight, yet not locked at the knee as you kick. As you increase the speed of your kick, forward and backward, avoid raising your knees as if marching or bicycling. It should feel like your legs are sweeping back and forth, like a broom through the water.
- Step 5 : - Kick even faster. Try to achieve a fluid motion that makes your legs feel as if they have no bones. Try to maintain your head up while kicking for 30 seconds.
- Step 6 : - Once you have achieved a fluid, comfortable kick, it is time to check its effectiveness by stopping the sculling action with your hands. Cross your hands over your chest positioning your left hand on the right shoulder, and your right hand on your left shoulder. Kick, keeping your head above water. Maintain for 30 seconds.
- Step 7 : - When you are able to keep your head up without the help of arm movements, try the advanced version of this drill: position your arms so they extend side to side at the surface of the water. Now raise your hands out of the water, bending at a right angle at the elbow. Kick! Can you keep your head up for 30 seconds?
DRILL FEEDBACK CHART
| Problem | Modification |
| I sink even when I am sculling. | Use straighter legs. Point your toes. Kick faster. |
| I bounce up and down. | Use a narrower, quicker kicking motion, rather than a scissor type kick. |
| I feel the kick in my calves. | Relax your feet more. Use less knee bend. Try to initiate the kick from higher on your leg, where the muscles are larger and stronger. |
Single Leg Kicking
THE PURPOSE OF THIS DRILL
- Developing an effective, full leg kick
- Feeling a continuous kick
- Keeping the foot connected to the water
HOW TO DO THIS DRILL
- Step 1 : - Position a kick-board under your arms, hands at the far end, to support your upper body and keep your face out of the water. Hold the kick-board flat on the water.
- Step 2 : - Begin kicking the flutter kick with your right leg only. Allow your left leg to simply float. Kick briskly for 30 seconds. Rest.
- Step 3 : - Try again. Use your whole leg to kick, not just from the knee down. Notice that as you begin to perfect this skill, your kicking leg is moving very quickly, with no pause at the top or the bottom of the kick. Notice too, that you are pushing water in both directions: up and down.
- Step 4 : - Rest, then try it with the other leg for 30 seconds. Notice that if you allow your foot to come out of the water at the top of the kick, it is less effective than when it stays connected to the water.
- Step 5 : - Once you are able to create forward motion with one leg, try the advanced version of this drill. Bend your left leg at the knee, raise your heel, and hold it out of the water at a right angle. Kick very briskly with your right leg, with no pause at the top or the bottom of the motion. Use your whole leg to sweep the water. Kick for 30 seconds. Switch legs and kick for another 30 seconds.
- Step 6 : - After you rest, then kick regular flutter kicks with both legs, trying to simulate the same kicking you just finished with a single leg. Use your whole leg to kick to the same depth and same height. Use the same muscles and the same kick rate. Use the same continuous motion only this time alternate legs with each kick.
DRILL FEEDBACK CHART
| Problem | Modification |
| I seem to go uphill with the kickboard. | Press down on the kick-board with your arms and chest. Hold it parallel to the surface of the water. |
| I don't move. | Try kicking with a bit more force, not necessarily a larger kick, just stronger. Don't stop the kick at the top or the bottom. |
| I am making a lot of splash. | Use less knee bend. Move the water both up and down. Keep your feet connected to the water. |
ARM STROKE DRILLSWith the long, sweeping, alternating arm action of the freestyle stroke, humans are capable of producing the most potential speed of all the strokes. To develop an efficient freestyle, the swimmer must be concerned with three things. First, achieving correct alignment is crucial to begin the stroke from a position of strength. Second, maintaining a high elbow position is important to hold on to the water. Third, accelerating through the arm stroke is necessary to fully benefit from the stroke action. The goal of the following arm stroke drills for freestyle is to develop a productive arm stroke, to make the most of the power phase of the stroke. |
Pull/Push Freestyle
THE PURPOSE OF THIS DRILL
- Feeling the path of the freestyle arm stroke
- Achieving a high elbow position
- Using the full length of the stroke
HOW TO DO THIS DRILL
- Step 1 : - Push off the wall, face down, arms extended, core engaged, looking at the bottom of the pool. Establish a continuous flutter kick.
- Step 2 : - Do a freestyle arm stroke with your right arm. Start by pitching your fingertips and the palm of your hand down slightly, adjusting them to press back on the water, instead of pressing down. Allow your forearm to follow, but keep your elbow high and firm. Sweep your hand slightly outward and down, then inward until it lines up under your shoulder. At this point, your elbow should be in line with your hand and shoulder, but sticking out as if you were trying to nudge someone. This is the pull portion of the freestyle arm stroke.
- Step 3 : - From there, press back quickly on the water with your hand. Feel your hand pass your elbow. Adjust the pitch of your hand to maintain pressure back on the water. Sweep your hand back until your arm is straight. Your hand should pass your hip and finish with your thumb touching your thigh. This is the push portion of the freestyle arm stroke.
- Step 4 : - Return your hand over the water to the front reaching position. When it passes your shoulder, begin the arm stroke with your left arm, pitching your fingertips and hands downward and allowing your forearm to follow. Press back on the water until your hand lines up under your shoulder, with your elbow pointed out to the side. Then press back quickly past your elbow until your arm is straight, past your hip. Notice that as your stroke goes from pull to push, it also goes from deeper to shallower.
- Step 5 : - Bring your arm left back to the front over the water, starting the next stroke with your right arm when the left arm passes your shoulder out of the water. Continue stroking. Use the full length of each arm stroke. Maintain a high elbow position. Feel the pull and the push of each stroke. Practice for several lengths of the pool until you can clearly distinguish the pull and the push motions of the freestyle stroke.
DRILL FEEDBACK CHART
| Problem | Modification |
| I don't feel the pull. | Keep your elbow still while you start the stroke with your hand. Pitch your fingertips and palm downward. Press back on the water, not down. |
| I don't feel the push. | Keep your elbow high and firm. Allow your hand to push past it. If your elbow drops back, you won't be able to accomplish the push well. Accelerate the motion toward your hip. |
| I can't do many strokes because I have to stop and breathe. | Take a big breath and do four to six long strokes, then stand, breathe, and start again. |
Catch Up
THE PURPOSE OF THIS DRILL
- Practicing a long stroke
- Feeling acceleration in the arm stroke
- Developing a high elbow underwater arm stroke
HOW TO DO THIS DRILL
- Step 1 : - Push off the wall, face down, arms extended, core engaged, looking at the bottom of the pool. Your arms should be aligned in front of your shoulders, not in front of your nose. Establish a continuous flutter kick, which should be maintained throughout the drill.
- Step 2 : - With your right arm still extended and aligned with the shoulder, perform a single freestyle arm stroke with your left arm. With your fingertips and palm pitched down slightly, press back on the water, not down. Keep your elbow high and firm as your forearm follows your hand. Pull then push, sweeping your hand from deep to shallow toward your hip, accelerating the motion from front to back, until your arm is straight at your side.
- Step 3 : - From this position, your right arm extended in front of you, and left arm at your side, feel the full length of your stroke. Return the left arm over the water to the starting point, so both arms are again at full extension. Then, perform a single stroke with your right in the same manner.
- Step 4 : - This sequence continues as one arm catches up to the other at the front of the stroke. Breathing is performed as needed, toward the moving arm, as the hand accelerates to the back of the stroke. Roll your face to the side to get a new breath. Keep the reaching arm extended and aligned with the shoulder as you inhale. Return your face to the water as your arm passes over the water.
- Step 5 : - Continue for several lengths of the pool. Feel the momentum of each arm stroke as you press back on the water, accelerating through the pull, then push to full extension. Notice that there is always one arm leading and one arm stroking.
DRILL FEEDBACK CHART
| Problem | Modification |
| My arm gets stuck underwater at the end of the stroke. | Begin the stroke by moving the hand, while the elbow remains still and high. Your hand should pass your elbow and extend to a straight arm position at the back, enabling you to clear the water. |
| I'm not moving. | Position your hands to press back on the water, not down toward the bottom of the pool. Pull then push the water toward your feet, accelerating through the stroke. |
| My arm sinks when I breathe. | When turning, breathe, reach forward with extended arm instead of pressing down. |
All Thumbs Drill
THE PURPOSE OF THIS DRILL
- Learning to avoid over-reaching to the center at entry
- Practicing aligned extension
- Initiating the arm stroke from a position of strength
HOW TO DO THIS DRILL
- Step 1 : - On land we point at things using our pointer finger. Try it. Notice that this is largely a hand only position, and that the rest of the arm is not involved in the pointing motion. In swimming, because the purpose of pointing is to align our stroke forward, we use the whole arm. To best accomplish this, we have to learn to point with our thumbs.
- Step 2 : - Standing in the water, extend your arm fully in front of you. Use your thumb to point to the far end of the pool. Notice when you point with your thumb, your shoulder, the inside of your elbow, and your thumb all align and aim forward. There is no bending at the wrist or elbow that makes a swimmer over-reach to the center, aim off course. Notice how your fingers are pitched outward, creating a wonderful paddle to catch water.
- Step 3 : - Now try it while swimming. While your arm enters the water and extends forward, point in the direction you are going with your thumbs. Reach to full extension by pushing your elbow and wrist in a straight line. Notice the alignment: shoulder, the inside of your elbow, and your thumb all line up straight ahead. You should feel like you are almost gliding forward directly toward your destination. Swim, thumbs leading to the far end of the pool.
- Step 4 : - Continue to practice beginning your stroke aligned forward with your thumbs. Pitch your fingertips and palm downward, your thumb slightly lower than your pinkie. Feel the water against your fingertips take hold of the water like a handle. Move your body forward past your hand. Notice that when you begin the stroke from a well aligned position, you are able to feel more of a handle on the water.
- Step 5 : - Practice more, beginning each new stroke from this position of strength with your thumbs leading. Feel the length of your stroke increase. Feel yourself move through the water farther with each stroke as you access more power.
DRILL FEEDBACK CHART
| Problem | Modification |
| It feels awkward. | It probably feels much wider than you are used to. Remember, over-reaching to the center at entry is a big contributor to shoulder pain in swimming. Practice more. Align your reaching arm and thumb with the line on the bottom of the pool. |
| I don't feel the water against my fingertips. | Adjust the pitch of your hand. Keeping your thumb forward, allow the tips of your fingers to enter the water slightly before the heel of your hand. Slide your hand into the water, and forward as far as it will go. |
| I can't feel the alignment. | Push your elbows forward to align with your thumb. Maintain your downhill floating position. |
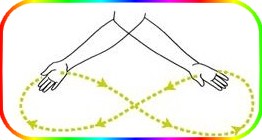
Sculling
THE PURPOSE OF THIS DRILL
- Developing feel for the water
- Learning to hold on to the water
- Practicing changing hand pitch
HOW TO DO THIS DRILL
- Step 1 : - Standing in shoulder-deep water, position your hands completely underwater, palms facing each other, about 24 inches apart. Hold your elbows firmly against your body. Sweep your hands towards each other. Just before they meet, sweep your hands down and back away from each other about 24 inches apart. Notice your hands have gone from a thumbs-up to a thumbs-down position.
- Step 2 : - Upon reaching the widest point, again sweep your hands down and around until they are moving towards each other. Notice that your hands have gone from a thumbs-down position to a thumbs-up position. Continue this action until you feel you are tracing a sideways figure eight with each hand.
- Step 3 : - You should be feeling that your hands are holding something of substance. Some swimmers describe the feeling of holding gelatin, others refer to pressing against something solid. Hold on to this substance in both directions, and as you turn the corners of your figure eight. This is sculling.
- Step 4 : - Now lay in the water, face down, in a hand lead position. Accompanied by a light flutter kick, begin sculling with your arms extended. Adjust your hands so they remain completely submerged. Press outward with your thumbs down, and inward with your thumbs up. Hold on to the water throughout the sculling action. Attempt to create forward motion for 30 seconds.
- Step 5 : - In the same floating position, move your hands under your belly, and using your sculling action, attempt to create forward motion in this position for 30 seconds.
- Step 6 : - In the same floating position, move your hand to your sides, and using your sculling action, attempt to create forward motion in this position for 30 seconds.
- Step 7 : - Once you have developed the ability to hold on to the water while sculling, try it when swimming freestyle. As your arm accelerates from front to back, feel the elongated sculling action. Hold on to the water throughout the whole path of the stroke. Adjust your hand as it sweeps through the stroke to maintain your hold on the water.
DRILL FEEDBACK CHART
| Problem | Modification |
| I don't feel a thick substance in my hands. | Make sure your hands are completely submerged in the water. Use a quicker sweep. Hold your wrists firm. Experiment with pitching your hands slightly downward from the wrist. |
| I don't move anywhere. | Use a quicker sweep in both directions. Avoid pressing the water inward and outward on the same path. Trace a figure eight. |
| The scull at my sides doesn't work. | Make sure that your elbows are not moving too much. Hold them firm and press outward and inward quickly with your hands. |
Fist Freestyle
THE PURPOSE OF THIS DRILL
- Learning to feel the water with the forearm
- Understanding the importance of a stable, high elbow
- Appreciating the role of the hand
HOW TO DO THIS DRILL
- Step 1 : - Push off the wall preparing to do regular freestyle. Before the first stroke, form closed fists with each hand.
- Step 2 : - Start the arm stroke. At first it may seem impossible to make forward progress without the paddle of your open hand. Keep sweeping through the path of the stroke, positioning your arm so your forearm works as your paddle to press against the water. To achieve this, you must keep your elbows high and stable, and to move your fists past your elbows.
- Step 3 : - Use the whole length of the stroke, front to back. Align the entry. Keep your elbows high. Accelerate the underwater stroke. Adapt your stroke to the handless paddle. Continue to the other end of the pool.
- Step 4 : - Now push off again, this time with open hands. Swim regular freestyle, using your hand as well as your forearm to press against the water. Align your entry. Keep your elbow high. Accelerate your stroke.
- Step 5 : - Continue alternating lengths of fist and open hand freestyle until you are feeling the water with a paddle that includes both your hand and your fore- arm.
DRILL FEEDBACK CHART
| Problem | Modification |
| I am not moving. | Reposition your forearm so when your arm moves through the stroke, it quickly becomes perpendicular to the surface of the water. |
| I am feeling a lot of bubbles. | Entering the water with your fist will bring more air down into the water than your open hand. Perform the entry gently, and extend fully before you start the underwater arm stroke. Leave the bubbles behind as you change directions when your arm begins to press back on the water. |
| My elbows keep moving. | Try sticking your elbows out through the beginning and middle of the underwater arm stroke, as if trying to nudge someone. Hold them there while you move your hand past them. |
RECOVERY DRILLSAlthough there are many effective styles of freestyle recovery, they all have common aspects of technique. They all release the water. Each balances the stroking arm. All of them use a relaxed hand that is higher than the shoulder. The goal of the following freestyle recovery drills is to develop a recovery that maximizes rest while complementing the rest of the stroke. |
Floppy Hand
THE PURPOSE OF THIS DRILL
- Practicing a relaxed recovery
- Learning to rest the arm during recovery
- Maintaining a high elbow recovery
HOW TO DO THIS DRILL
- Step 1 : - Push off the wall and begin to do the Catch Up drill. As one arm remains reaching, the other will perform the underwater stroke. When the stroking arm reaches full extension to the rear, deliberately relax that hand.
- Step 2 : - To transition to recovery, lift your elbow and slide you hand out of the water. It should feel as if you are pulling it out of your front pocket. Once your hand is clear of the water, your elbow should remain higher than your hand throughout its path over the water.
- Step 3 : - Perform the recovery in slow motion focusing on relaxing your hand the whole time. As your arm travels toward the front, begin shaking your hand gently. Your hand should feel floppy and relaxed, as if you have no bones in your wrist. Your fingertips, hand and forearm should hang loosely from your elbow, pointing down toward the surface of the water, not forward. It should feel as though there is a puppet string pulling your elbow up, and everything else is dangling from it.
- Step 4 : - When your recovering hand nears the front, flop it forward into the water. Your elbow should enter the water after the hand. When you have achieved the full extended position, begin stroking with the other arm.
- Step 5 : - Continue shaking your floppy hand during each slow motion recovery. Allow your hand to hang loosely from your elbow as it travels over the water and back to the front. Let your elbow follow your hand back into the water in front. Practice for several lengths of the pool.
DRILL FEEDBACK CHART
| Problem | Modification |
| My hand carries water into the recovery. | Remember to push the water back in the direction you came from. Avoid lifting it up. The stroke should finish by your hip. |
| My hand isn't floppy. | Raise your elbow to begin the recovery and allow your hand oughout earm time hang loosely from it throughout the time over the water. |
| There isn't time to get my hand to be floppy | Perform the recovery in slow motion. There is no hurry. Focus on the over-the-water part of the stroke. As in the Catch Up . drill, the other arm should wait until your recovering arm finishes. |
Shark Fin
THE PURPOSE OF THIS DRILL
- Practicing a relaxed, high elbow recovery
- Achieving a high elbow recovery by floating on your side
- Practicing the release of the water
HOW TO DO THIS DRILL
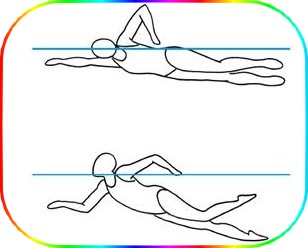
- Step 1 : - Float in the water on your side, the arm near the surface at your side, and the other arm extended in front. Kick productively. To breathe, maintain core stability and roll towards your back, breathe, then roll back to your original side position.
- Step 2 : - While maintaining a continuous kick, slide the hand at your side up to your waist, raising your elbow up to a point, like a shark's fin. Your elbow should be pointing to the sky. Hold this shark fin position for five seconds, allowing your hand to hang relaxed. Slide your hand back down to full extension at your side.
- Step 3 : - Repeat this action with the same arm, trying to make the most impressive shark fin possible. Notice that to make the highest shark fin, you have to float completely on that side of your body, and allow the other side of your body to float low. Return your arm to your side.
- Step 4 : - After ten shark fins, then switch sides. Continue to the other end of the pool.
DRILL FEEDBACK CHART
| Problem | Modification |
| It is hard to get my elbow up. | Make sure you are floating on your side. Unless you are unusually flexible, the human shoulder cannot make a shark fin unless you are floating on your side. |
| I am sinking. | Try kicking a bit more to produce more forward movement. |
| My hand is not relaxed. | Practice more. Get comfortable on your side. Lift from the elbow. |
BREATHING DRILLSIntegrating the act of breathing into the stroke is a challenge. By timing the breath to the natural roll of the stroke, a swimmer can breathe rhythmically while continuing the forward line of the stroke. The goal of the following freestyle breathing drills is to address issues of timing and alignment, and, to learn to use the core for better breathing technique. |
Inhale Arm/Exhale Arm
THE PURPOSE OF THIS DRILL
- Learning the correct timing of the freestyle breathing
- Using a regular breathing pattern
- Maintaining a relaxed, rhythmic stroke with breathing
HOW TO DO THIS DRILL
- Step 1 : - Choose a side that you will turn toward for breathing. The arm on that side will be called your inhale arm. The other arm will be called your exhale arm.
- Step 2 : - Standing in waist deep water, bow forward until your face is submerged. Extend your arms forward, aligned with your shoulders to do the freestyle arm stroke in the standing position. Do several strokes, saying to your self inhale, as you are stroking underwater with the inhale arm, and saying, exhale, as you are stroking with the exhale arm.
- Step 3 : - Now try to actually get a breath. Stroke first with your inhale arm. As you begin to press back on the water, start turning your face to the side toward the inhale arm. Turn your face until your mouth clears the water, but keep your lower cheek in the water. Inhale as your hand reaches the back of the stroke. Inhale deeply through your mouth. Then, as the inhale arm returns over the water to the front, allow your face to follow it, arriving back into the water by the time the inhale arm passes your shoulder. Look at the bottom of the pool.
- Step 4 : - When your face returns to the water, begin stroking with the exhale arm. As you begin to press back on the water, look down at the bottom of the pool and exhale. Exhale through your mouth and nose. You should see an abundance of bubbles as you exhale. Continue exhaling throughout the length of the stroke, and as the exhale arm returns over the water to the front.
- Step 5 : - As your exhale arm passes your shoulder, again begin stroking with the inhale arm. Continue stroking rhythmically, inhaling with the one-arm stroke, and exhaling with the other. Maintain the full length of each stroke. Do a quick, deep inhale through your mouth. Do a long, thorough exhale from your mouth and nose, producing bubbles. Practice until you can breathe rhythmically with the rhythm of the stroke.
- Step 6 : - Now try breathing while swimming freestyle. Start slowly. Stroke several times saying to your self inhale and exhale as the designated arm strokes through the water. Then try turning your head toward the inhale arm as it strokes. Turn to the point that your mouth clears the water but your cheek remains connected to the water. Inhale as your arm reaches the back of the stroke. Then, allow your face to turn back into the water, following your inhale arm as it recovers back to the front. Exhale as the exhale arm strokes.
- Step 7 : - Practice several times then rest. Practice again. Be patient and set the rhythm of your arm stroke to your inhale and exhale.
DRILL FEEDBACK CHART
| Problem | Modification |
| I lose the rhythm after a few strokes. | It takes practice. Keep each stroke long. Cue your inhale and your exhale with the movements of the corresponding arm. Stop when you get off time. Rest, then start again. |
| I don't seem to have time to inhale. | Make sure you are exhaling thoroughly before you turn to inhale. There is not time to both exhale and inhale when you are turned to the side. If you spend the time exhaling, you will miss the opportunity to inhale. Exhale thoroughly while the exhale arm is stroking. |
| I run out of air before it is time to inhale again. | Make sure you are exhaling thoroughly before you turn to inhale. There is not time to both exhale and inhale when you are turned to the side. If you spend the time exhaling, you will miss the opportunity to inhale. Exhale thoroughly while the exhale arm is stroking. |
The Weightless Arm
THE PURPOSE OF THIS DRILL
- Maintaining the full length of the arm stroke while breathing
- Learning the correct timing of the freestyle breathing
- Using your core to breathe, not just your head
HOW TO DO THIS DRILL
- Step 1 : - Push off the wall for freestyle. Achieve a firm core and look at the bottom of the pool. Swim to the far end of the pool. Begin swimming freestyle. Establish a relaxed stroke and regular breathing rhythm. Inhale with one arm, exhale with the other.
- Step 2 : - When you have reached about the halfway mark to the other end of the pool, at the exact point when your mouth clears the water to inhale, freeze in that position. Identify precisely where the arm is that you are turned away from when breathing. Has it left the fully extended position? Is it under your chest? If the answer to either of these questions is yes, you have a heavy arm. As this heavy arm presses down on the water in an attempt to lift you up to breathe, it works like an anchor. When your arm sinks, you lose half of your next stroke that could have moved you forward in the water.
- Step 3 : - To avoid a heavy arm, float on your side, with your breathing side higher in the water. Extend your lower arm fully in front of you. Position the higher arm at your side. Begin a gentle flutter kick. Holding your core firm, roll your face, shoulder and hip as a unit back until your mouth clears the water. Inhale. Roll back down. Practice several times, maintaining the position of your extended position of your lower arm throughout your roll and inhale.
- Step 4 : - Now, try it while stroking. Again float on your side, breathing side high. Stroke through the water with your lower side arm, and recover over the water with your higher side arm. Once you have switched floating sides and switched arm positions, prepare to breathe on the next stroke. As your arms again begin to switch positions, hold your core firm, roll your face, shoulders and hips up in unison towards the stroking arm. By the time the stroking arm reaches the back of the stroke, you should be floating on your other side with your mouth clear of the water to inhale.
- Step 5 : - Notice the position of your lower arm. It should be fully extended throughout your breath, reaching toward the far end of the pool, fairly close to the surface of the water...as if weightless. Practice again. Continue practicing until you can inhale as the lower arm reaches forward, instead of pressing down.
- Step 6 : - Once you are comfortable with this breathing position, begin to swim regular freestyle. Go slowly and focus on reaching forward with your lower arm as you roll your face, shoulder and hip up to the high side for each breath. Keep reaching forward throughout your inhale. Practice until you achieve a weightless reaching arm.
DRILL FEEDBACK CHART
| Problem | Modification |
| My mouth does not clear the water to breathe. | Roll the low hip and shoulder down more. Keep kicking when you are breathing. |
| My reaching arm is still heavy. | Slow down your stroke. Practice the 12 Kick Switch and Catch Up drills to get comfortable with this floating position. |
| I don't seem to have time to fit the breath into my stroke. | Focus on initiating the roll early in the stroke. Keep practicing. This is a difficult skill. |
Temple Press
THE PURPOSE OF THIS DRILL
- Practicing the correct head alignment while breathing
- Learning to use a low profile breathing technique
- Experiencing the bow wave when inhaling
HOW TO DO THIS DRILL
- Step 1 : - Stand in waist deep water. Bow forward at the waist and submerge your face in the water. Look at the bottom of the pool. Extend your arms in front of you on the surface of the water. Bring one arm back toward your hip underwater, and turn to that side, as if breathing in freestyle. Freeze in that position. What parts of your head are connected to the water? Your jaw bone? Your cheek? How about your temple?
- Step 2 : - Adjust your head position so that your temple is pressing down on the water. Notice that by doing so your cheek and your jaw bone automatically connect to the water. Your mouth might not clear the water as much as you are used to. That is fine.
- Step 3 : - Now begin to swim regular freestyle. Roll up to breathe and reach forward with your lower arm. While turned for the inhale, press your temple into the water. Feel that your cheek and your jaw bone connect to the water as well. Notice that as you are moving forward during the breath, the water parts around your head, like it does at the bow of a moving boat. With your temple pressed into the water, this bow wave will create a sort of pocket of air for you to inhale, even if your mouth is very close to the water.
- Step 4 : - Continue swimming, using the low profile breathing technique by pressing your temple into the water, and breathing within the bow wave.
DRILL FEEDBACK CHART
| Problem | Modification |
| I can't get my temple down when swimming freestyle. | Work on your floating position. Start by looking at the bottom of the pool. Get your chest down and float downhill. |
| My face doesn't clear the water. | Roll the breathing side hip and shoulder up more, and the other side hip and shoulder down more. |
| I am getting water in my mouth. | Create more forward motion with a stronger kick. The more forward momentum you have, the greater that bow wave will be, making the water go around you, not in your mouth. |
Dead Arm Freestyle
THE PURPOSE OF THIS DRILL
- Feeling the core involvement in breathing
- Reaching forward while breathing
- Experiencing the correct timing of the breathing
HOW TO DO THIS DRILL
- Step 1 : - Push off the wall as if preparing to swim freestyle. Bring one arm to your side and hold it there motionless. Engage your core tension.
- Step 2 : - Swim freestyle with the other arm only. Before each stroke, focus on aligning your moving arm forward, directly in front of your shoulder. When you stroke, maintain a high elbow position, and use the full length of each stroke to accelerate through. Pull then push from front to back.
- Step 3 : - Breathe towards the side with the motionless arm. Without moving your head independently, turn to breathe using your hips and shoulders to initiate your roll to breathe. Time your inhale to begin when the moving arm is reaching for the front, just as your finger tips touch the water. Keep reaching forward throughout the inhale.
- Step 4 : - As you inhale, you should be able to see the shoulder on your breathing side out of the water. As you return your face to the water, feel that shoulder and same side hip roll down.
- Step 5 : - Continue swimming with one arm to the end of the pool, focusing on breathing with your body roll. Switch arms. Repeat. Continue practicing until you can achieve balanced breathing by rolling with a firm core.
DRILL FEEDBACK CHART
| Problem | Modification |
| I can't get a breath. | Roll the hip and shoulder down with the stroking arm. You won't be able to get a breath if you are flat. |
| I have to stretch my neck and raise my chin to get a breath. | Establish and maintain a downhill float. Accelerate your one arm pull toward your hip. Kick more. |
| It feels awkward. | This is an advanced drill! It will take time to master it. Practice more. |
LEVERAGE DRILLSUsing leverage gives freestlyers an advantage. Instead of swimming flat, and depending on the small muscles of the arm, swimmers can use the body to roll into and out of each stroke. Doing so accesses more power from the core. By engaging the large muscles of the core it is possible to travel more distance per stroke, with the same amount of energy. The freestyle becomes more productive and more sustainable. In addition, using core leverage avoids injury to vulnerable shoulder joints. Long term flat freestyle is responsible for many swimmers being out of the water for extended periods of time, with bursitis or rotator cuff problems. By using core leverage, the shoulders can be spared of the entire burden of freestyle. The goal of the following freestyle leverage drills is to create a more sustainable and injury-free freestyle by using available leverage to the fullest. |
Three Stroke Switch Freestyle
THE PURPOSE OF THIS DRILL
- Practicing the roll into and out of the stroke
- Accessing your core strength
- Transferring power from the core to the limbs
HOW TO DO THIS DRILL
- Step 1 : - Push off the wall preparing to do freestyle, core engaged, perform three freestyle strokes (one arm = one stroke), accompanied by a productive flutter kick. As your arm approaches your hip on the third stroke, roll onto your side and float and kick with the arm that just finished stroking at your side, the other arm fully extended. The arm at your side should be closer to the surface, and the arm lower in the water should be extended over your head. Holding this position, do six good kicks (one leg = one kick).
- Step 2 : - With your sixth kick, roll your higher hip and shoulder down into the water as the arm at your side recovers over the water to the front, and the reaching arm begins stroking. Do three more freestyle strokes. Continue kicking the through the whole process. Breathing should be done to the side during the three strokes. During the kick-only phase, the face should remain mostly submerged, ear against the lower shoulder.
- Step 3 : - Continue doing three strokes, kicking the whole time, and then six more kicks in the side position until you reach the far end of the pool. Notice that when changing from the side kicking phase to the stroking phase, the recovering arm travels easily to the front with leverage of the hip roll. Notice too, at the same time, that the leading arm goes easily into the next stroke, also aided by the hip roll.
- Step 4 : - Keep practicing. Once you are comfortable with the 3 strokes and 6 kicks rhythm, change to 3 strokes and 3 kicks. Then, work on incorporating a switch between each stroke. Notice that what you are doing is almost identical to regular freestyle...a very long, efficient freestyle.
- Step 5 : - Once you are able to roll with each stroke, begin swimming regular freestyle rolling into and out of each stroke, as you did in the drill.
DRILL FEEDBACK CHART
| Problem | Modification |
| I go crooked. | Employ core stability and align your leading arm with the line on the bottom of the pool. |
| I don't roll as much in the three strokes as I do changing to the side kicking phase. | Slow down your strokes. Allow time to roll. |
| It seems that rolling all the way over to my side is too far. | Remember, this is a drill, where the point is to learn to toroll. The action Iis regular a bit exaggerated make the point. in the egular swimming you actually roll to the point where you balance on the top of your hip bone and your armpit. |
The Pendulum Effect
THE PURPOSE OF THIS DRILL
- Understanding the relationship between the recovering arm and the stroking arm
- Feeling acceleration during the switch
- Maintaining balance
HOW TO DO THIS DRILL
- Step 1 : - Float in the water on your side, the arm near the surface at your side, and the other arm extended in front. Kick productively. Slide the hand at your side up to your waist, raising your elbow up to a point, like in the Shark Fin drill. To breathe, maintain your core stability and roll towards your back, breathe, then roll back to your original side position.
- Step 2 : - Hold this position for five seconds, continuing to kick. Notice that at in this position, on your side with one arm extended, and the other arm at its highest point in recovery, neither arm is producing any forward motion.
- Step 3 : - Stroke through with your extended arm as you finish your recovery with arm over the water. Find the same floating position on the other side. Your lower arm should be extended, and your higher arm should be making a shark fin. Again hold for five seconds, continuing to kick.
- Step 4 : - Switch to the other side again. Continue to the far end of the pool, switching to the identical position with your arms on either side, and holding for five seconds before switching. Notice that as you switch arm positions, your hips switch sides too. Notice too that each switch gathers speed from beginning to end.
- Step 5 : - Do another length, this time holding only for three seconds before switching sides. Feel the beginning and the end of each switch. Like the extremes of a pendulum's swing, the motion starts slowly and gathers speed, continuously from side to side.
Step 6: Do another length, this time holding for only one second before switching sides. Feel the pendulum swing and gather speed with each switch. Notice that while one arm reaching and the other out of the water in recovery, neither arm is moving you forward, yet you are still moving forward.
Step 7: Continue to practice, feeling the pendulum effect with each stroke. Focus on using your hips to add power to the switch of your arm positions. Feel your stroke cover more distance with no more effort.
DRILL FEEDBACK CHART
| Problem | Modification |
| I can't keep my elbow in a shark fin. | Your opposite shoulder should be at its lowest point in the water, allowing you to point your recovering elbow toward the sky. Relax your hand and let it hang from your higher elbow. |
| My hips don't add power. | Your hips are probably floating flat. Start in the side floating position, with your shoulder and your hip on the recovering side high. Each time you switch, make sure to achieve the side floating position with shoulders as well as your hips. |
| My kick stops when I switch sides. | Maintaining a continuous kick is important in this drill, and it is important in the full stroke. Blank spots can interfere with the pendulum effect. Use your kick to add power to the switch. |
Hip Skating
THE PURPOSE OF THIS DRILL
- Observing the role of the hips
- Learning to use leverage from the core
- Mastering switching from hip to hip
HOW TO DO THIS DRILL
- Step 1 : - The rhythm of ice skating resembles the rhythm of swimming freestyle. As one side of the body balances, the other is applying force. To go faster, the ice skater does not do shorter, choppier movements. Instead, each stride is extended, using leverage from the hips to produce motion. Try it. Attach an imaginary ice skate to each of your hips on the bone you can feel at the highest and forward most points of your pelvis.
- Step 2 : - Now, push off the wall, face down in the water, preparing to do freestyle, firm core, aligned, floating downhill. Glide forward on the imaginary hip skates. As you get ready to take your first stroke with your right arm, shift your weight toward your right hip, so you are balancing on that skate only, then start the stroke. As the right arm approaches the end of the stroke, switch your weight to your left hip skate, allowing the right hip to rise, while the left arm starts its stroke, and the right arm recovers.
- Step 3 : - Continue skat- ing on your hips, right, then left, then right, then left. Notice how shifting your weight from skate to skate sends power upward through your core to your arm stroke.
DRILL FEEDBACK CHART
| Problem | Modification |
| I can't balance on my hips and float downhill at the same time. | The downhill position corrects your floating position. Start with that. Balancing on your hips drives your stroke. Focus on core stability in both ways. Be patient and keep practicing to achieve both skills. |
| My head is moving side to side with my hips, even when I am not breathing. | Relax the muscles in your neck. On the strokes when you are not breathing, allow your hips and shoulders to roll while your head remains still. Keep looking at the bottom of the pool. It is as if your head was an independent object, floating in front of your body. |
| If I glide too long I just stop. | Yes. So, your task is to identify the point just before you slow down and switch your weight to the other hip to start your next stroke then. This will make the most of your momentum. |
COORDINATION DRILLSThere are many elements of the stroke technique that make up freestyle work in combination to produce coordinated forward motion. Each element affects another, together contributing to a unified, productive freestyle. The goal of the following coordination drills is to learn to bring multiple freestyle skills together into a coordinated effort for the most productive freestyle. |
Heads Up Freestyle
THE PURPOSE OF THIS DRILL
- Learning to grab the water and stroke back
- Using a continuous stroke
- Matching the kick to the arm stroke
HOW TO DO THIS DRILL
- Step 1 : - A lifeguard swimming to a person in trouble approaches the victim using a modified head up freestyle to keep his or her eyes on the victim and get there as quickly as possible. Likewise, a designated sprinter for a waterpolo team races to gain control of the ball, using modified head up freestyle to watch the ball to be captured. Try Heads Up Freestyle. Focus your eyes on a point at the far end of the pool and get there as fast as you can.
- Step 2 : - Stroke quickly, keeping your chin low in the water, and your eyes focused forward. Keep your head up the whole time. Notice that to keep your head up, when your hand enters in front, you must engage the water immediately with your fingertips, palm and forearm, and stroke continuously. Your stroke becomes shorter, and your recovery becomes wider. Notice too that while it is possible to keep your head up by pressing down on the water with your hands, you limit your forward motion by doing so.
- Step 3 : - Continue swimming head up, engaging the water immediately with each stroke. Keep your elbows high. Accelerate to the back with each short, quick stroke. Notice that by pressing back on the water to go forward, your head stays above the water without pushing down. Grab hold of the water aggressively and move closer to your target with each stroke.
- Step 4 : - With your head up, your body position is not ideal in the water. To manage this uphill swimming position, stabilize your core and kick actively, coordinating your kick to your arm stroke. Although the rate of the kick is quicker than the rate of the arm stroke, one kick should match each arm entry. As one arm enters in front, kick down with one foot. Notice that by coordinating the rhythm of your kick to the arm entry, your kick also matches the finish of the stroke by the other arm. Doing so creates additional forward motion, but also lift and balance to the whole stroke.
- Step 5 : - Continue toward your target. Notice that even from this disadvantageous swimming position, you can move forward well when all the parts of the stroke are coordinated and working together. Rest, then try it again.
- Step 6 : - Now try swimming regular freestyle with your face in the water. Use the same quick stroke rate as you did in the Heads Up drill. Press back on the water keeping your elbows high. Match the downbeat of your kick to the point when your hand first takes hold of the water in front. Feel the lift and balance in your stroke.
- Step 7 : - Rest, then alternate several lengths of Heads Up Freestyle and regular freestyle.
DRILL FEEDBACK CHART
| Problem | Modification |
| I am struggling to keep my face up. | Stroke quickly and keep your elbows high as you start each stroke. Accelerate to the back of the stroke. Avoid pressing down on the water to stay up. Instead, move yourself forward by pressing back on the water. Kick with each arm entry. |
| It is very tiring. | Yes, swimming uphill is as tiring as running uphill. And to make forward progress, all parts of the body must work together. |
| It hurts my neck. | Make sure you are balancing on your chest. By doing so, you will not have to raise your chin so much to keep your face out of the water. If it continues to hurt after making this modification, just don't do it. |
Horizontal Rope Climbing
THE PURPOSE OF THIS DRILL
- Utilizing the largest muscles possible
- Moving past your anchored hand
- Feeling efficient forward motion
HOW TO DO THIS DRILL
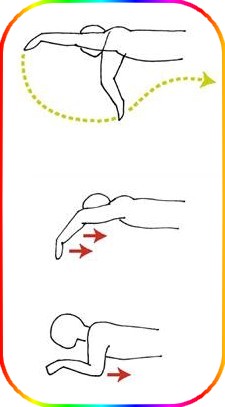
Step 1: Think about how a person climbs a rope. Hand over hand,
- the climber uses one hand to grasp the rope at a point higher than the body, while the other hand holds the body steady at the previous advance. When the reaching hand has a good grip on the rope, the climber moves his or her body past that reaching hand, while the lower hand then becomes the one that reaches to a higher point. This is exactly how the best swimming is. Rather than churning the water madly, efficient swimmers reach and grab hold of the water in front of them, then move their bodies beyond that point, hand over hand.
- Step 2 : - String a rope from one end of the pool to the other. Use the lane line hooks at each end of the pool to secure your rope, but allow slack so that most of the rope floats about one foot under the surface. Avoid using lane lines for this drill. They can snap without warning, and are very expensive to replace.
- Step 3 : - Once your rope is in place, take a big breath and float face down in the water over the rope. With the image of the rope climber in mind, reach as far forward as you can with one hand and take hold of the rope. Keeping your elbow high, pull your body forward past the reaching hand, until your arm is straight and at your hip. At the same time, use the other hand to reach to a father point. Continue, arm over arm, moving your body farther along the rope. When you have to breathe, lift your face out of the water gently, then return to your face down position.
- Step 4 : - Continue to the far end of the pool. Feel your body advance through the water past your reaching hand. Practice several times. Then try regular freestyle, without the rope. Take hold of the water, then move yourself past that point with each stroke. Climb through the water. This is the essence of efficient swimming.
DRILL FEEDBACK CHART
| Problem | Modification |
| This is hard! | Avoid dropping your elbows. High elbows give you more leverage to lift your body past your reaching hand. |
| My legs wag back and forth. | Employ a stable core. You can also kick gently. |
| I thought I was supposed to align my reach with my shoulders, not to the center of my body like with the rope. | Very good! This is true, and it is one of the shortcomings of this drill. Try to ignore this aspect and focus on how you advance past your reaching hand. |
Freestyle with Dolphin
THE PURPOSE OF THIS DRILL
- Coordinating the kick and the arm stroke
- Setting the stroke rhythm to the kick
- Using the momentum of the kick to benefit the arm stroke
HOW TO DO THIS DRILL
- Step 1 : - Push off the wall preparing to do freestyle, arms extended, core engaged. Do six to twelve good dolphin kicks. Focus on producing a rhythmic kick with a compact, yet powerful downbeat, while your feet stay connected to the water. For this drill, it is important to keep your head stable, and not bouncing a lot.
- Step 2 : - Once you have established a strong, rhythmic kick, begin a freestyle arm stroke. Time your kick so you are producing one kick for each single arm stroke. Note: this is different than butterfly stroke rhythm. Once you have matched a kick to each arm stroke, time the downbeat of each kick to happen at precisely the moment that your hand strikes the water in front.
- Step 3 : - Continue to the other end of the pool, focusing on coordinating these two actions. Rest and repeat until the freestyle arms and dolphin kick are well coordinated with a sustainable rhythm. Notice that when the downbeat of your dolphin kick is timed to the entry of your hand in front, that you reach forward with more momentum, encouraging you to extend farther for longer. Notice too, that although you are focusing timing your kick to the reaching arm, that the same kick is also assisting the stroking arm, assisting you in accelerating to the back of your stroke.
- Step 4 : - Repeat the drill. Quicken the rhythm of your kick. Match your arm stroke to that quicker rhythm. As you plant your hand in the water in front, plant your feet in the water to the rear.
- Step 5 : - Now try the same coordination using a flutter kick. While it is common to use more than one flutter kick per arm, make sure that one of your kicks matches the entry of your hand, and simultaneously assists the fast finish of the other hand, for every stroke that you take. Practice for several lengths of the pool.
DRILL FEEDBACK CHART
| Problem | Modification |
| My dolphin kick seems out of alignment. | If you are doing this correctly, your hips will roll, as they should in freestyle, making the dolphin kick not exactly up and down. That is okay. The point of the drill is to match the rhythm of the kick to the arms. |
| When I use the flutter kick, I am using the same side arm and leg to do the simultaneous motion. | This is fine. It really depends on the number of flutter kicks you do per stroke. The average is three kicks per arm, however, many swimmers do two or four. Some even do two on one side and three on the other. This timing can be done successfully using the same side arm and leg, as well as the opposite arm and leg. |
| My freestyle arm stroke turns into butterfly arms when I use the dolphin kick. | Avoid diving your head down as your arms enter. Use a more compact kick, and reach forward upon entry, not down. Kick once per arm, not twice like in butterfly. |
Bilateral Breathing
THE PURPOSE OF THIS DRILL
- Coordinating the breathing with the body roll
- Developing a symmetrical roll
- Developing a symmetrical kick
HOW TO DO THIS DRILL
- Step 1 : - Push off the wall preparing to do regular freestyle. Establish a good, continuous kick. Swim to the other end of the pool breathing toward the right side of the pool. Rest, then swim another length back to your starting point, facing the same side of the pool when you breathe. This will mean you are breathing to the other side of your body. Repeat until you are comfortable maintaining your alignment and kick, and rolling your body to get a breath on your right and left sides.
- Step 2 : - Now, swim another length breathing every third stroke. Time your inhale to start at the same time as the entry of the hand you are breathing away from. Strike the water left, then right, then strike and breathe left. Strike the water right, then left, then strike and breathe right. Remember the Weightless Arm drill, and the Temple Press drill while you are perfecting this timing.
- Step 3 : - Continue to practice breathing every third stroke for several lengths of the pool. One side may seem more natural to you than the other, just like one hand seems more natural when writing. Keep practicing trying to make your less natural side a mirror image of your natural side.
- Step 4 : - Once you are comfortable with this timing, focus on your hip roll. Notice that with bilateral breathing, it is more even on both sides than when you breathe on just one side. Notice too, that your kick has fewer pauses in it, and it is more compact, especially during breathing. Finally, notice that your arm stroke is more symmetrical in depth, width and length with bilateral breathing.
- Step 5 : - Practice for several lengths of the pool. Develop a balanced stroke by breathing on both sides.
DRILL FEEDBACK CHART
| Problem | Modification |
| My neck hurts when I breathe to the left. | Remember to turn your body to breathe,not just your neck. Focus on rolling your right hip down when breathing on your left. |
| Breathing every third stroke seems too often for me. | Although breathing every third stroke is preferred by many swimmers, it may not be right for you as a regular swimming rhythm. However, it is still very beneficial as a drill to develop a symmetrical stroke and kick. |
| I lose the rhythm after a few strokes. | When you notice your rhythm is off, stop, rest, then begin again. Be persistent. It will pay off. |