DRILL FEEDBACK CHART
| Problem | Modification |
| It is much harder without the support of the wall. | Yes, harder than it would seem. Start by rocking your pelvis forward a bit. Then, engage your abdominal muscles to stabilize your upper body in both directions during this motion. |
| I can't keep my hips stable without the wall. | Make sure your head is aligned with your straight spine. Also make sure you are not bowing too deeply. Try starting with only a three-inch bow, focusing on moving your upper body only. Contract your abdominal muscles going into the bow to stabilize your movement. |
| I am using my back muscles. | It is tempting to use the muscles of the back. As land animals, we spend most of our time vertical, and we are used to depending on the muscles of the back for stability and balance. In the water, however, we move horizontally, and to achieve the best stabilization and balance, we must use primarily the muscles of the abdomen. |
Weight Shifting
THE PURPOSE OF THIS DRILL
- Feeling both natural and downhill body positions
- Learning to shift weight forward
- Developing effective core tension and stability
HOW TO DO THIS DRILL
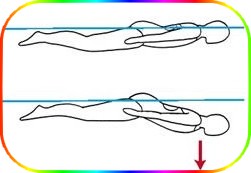
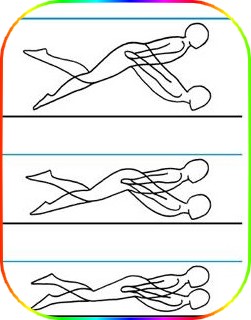
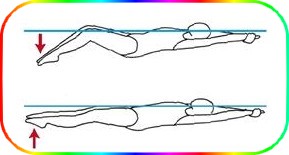
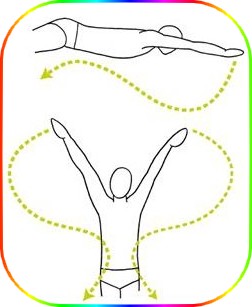
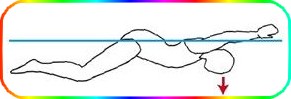
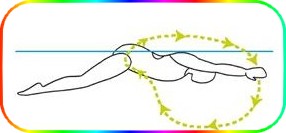
- Step 1 : - Lay in the water, arms at your sides. Look at the bottom of the pool. Feel your natural floating position. In butterfly, you have to learn to actively change from your natural float to a downhill position. You must learn to shift your weight forward so your chest is lower than your hips, during every single stroke. To do this, you must maintain a firm core and upper body, from your neck through to your hips.
- Step 2 : - Holding your core firm, press your chest down into the water. Allow your chest to be lower than your hips. Feel your weight shift forward. Now release your chest press and allow your body to return to its natural float.
- Step 3 : - Again press your chest down into the water, so you achieve a downhill float. Maintaining your firm core, release your chest press and return to your natural float. Repeat several times in a row, maintaining a firm core in both directions in a gentle, rhythmic action. Notice that as your press and release your chest, your hips remain stable in the water. This is the essential position of the butterfly. All other actions depend on this high hip floatation that shifts between the natural and downhill upper body positions.
- Step 4 : - Now push off the wall, with your arms extended over your head. Feel your natural float, then, maintaining your firm core, change it, shifting your weight forward by pressing your chest into the water. Release and do it again, maintaining high hips.
- Step 5 : - Repeat the upper body shift of weight several times, from natural to downhill and back again. Feel the gentle wave produced by alternating your floating position. Feel your hips remain stable.
DRILL FEEDBACK CHART
| Problem | Modification |
| I can't breathe. | This drill is not meant to be done for an extended time. Take a big breath before you start, then stand up when you need more air. Start again with a new breath. |
| When I press my chest down, my legs sink. | Hold your core firm. Avoid folding at the hips or waist. Just press your chest down a few inches, just enough so your weight shifts forward. When your chest is the lowest point of your float, then release it. Switch your weight about once every two seconds in a rhythmic motion. |
| This hurts my back. | It is important that you hold your core firm in both directions, or your back will take a lot of stress. Also, when you return to your natural float, don't force it. Simply allow your body to resume its natural position. If it continues to hurt you, just don't do it. |
KICK DRILLS
The butterfly uses the dolphin kick, where the legs move up and down simultaneously resembling the action of a dolphin's tail. In fact it is more than a leg motion. It is an entire body motion. It is more accurately called simply the dolphin. Done right it is one of the most powerful movements in swimming. The dolphin uses a whip-like motion that starts high in the body, and moves down through the trunk, hips and legs, and ends up with the feet snapping down and up again. The dolphin provides rhythm and balance to the other actions of the stroke, but above all it adds power. A good dolphin makes the butterfly much easier, and much more sustainable. The goal of the following kicking drills for butterfly is to develop an effective, rhythmic and effective dolphin action that benefits the rest of the stroke.
Ribbon Writing
THE PURPOSE OF THIS DRILL
- Understanding the fluid nature of the dolphin
- Generating power high in the body
- Learning to transfer power to the feet
HOW TO DO THIS DRILL
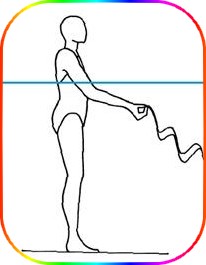
- Step 1 : - Cut a piece of wide ribbon to a length of about fifteen inches. Stand in chest deep water, and hold the ribbon in one hand, with that arm outstretched in front of you, under the water. Begin to sweep your arm down about twelve to fifteen inches, and back up, keeping your hand from breaking the surface of the water at its highest point. Sweep your outstretched arm down and up rhythmically at a rate that the ribbon begins to follow the movement of your arm.
- Step 2 : - Notice how the ribbon creates a sort of S shape as it flows through the water. Notice too, that although the arm holding the ribbon is initiating the movement, it is the free end of the ribbon that is moving more quickly. This is the essence of the dolphin action. While the action is initiated high in the body, it is the feet that exhibit the most motion.
- Step 3 : - Continue making an S or wave with the ribbon, sweeping your outstretched arm down and up through the water. Watch the free end of the ribbon react to the motion of your sweeping arm. Now, without slowing the rhythm of your arm movement, bend at the elbow, and attempt to continue the ribbon's movement using just the lower portion of your arm, from your elbow to your hand. Notice that the wave action of the ribbon diminishes significantly. This is what happens when a swimmer over-bends at the knees doing dolphin.
- Step 4 : - Re-establish your full arm motion, and watch the ribbon again flow through a continuous S shape. Without bending radically at the elbow or wrist, try to make your arm move fluidly through the water, as if your arm was part of the ribbon. This is how a good dolphin works, fluidly, gathering the force of the motion started high in the body and transferring it downward to the feet.
DRILL FEEDBACK CHART
| Problem | Modification |
| My ribbon doesn't make a wave. | Try to make the down and up motion with your arm continuous. Don't slow down as you change directions. Use a smooth, sweeping motion, initiated from the shoulder, rather than from the hand. |
| My ribbon makes a Z not an S. | Try to switch directions more smoothly. Fluidly and rhythmically sweep the ribbon back and forth, and avoid any jerking movements. |
| The free end of my ribbon is not a part of the wave. | Sweep your arm a little faster, and use more depth. Let your arm be long and relaxed until the entire length of the ribbon flows through the wave. |
Deep to Shallow Dolphin
THE PURPOSE OF THIS DRILL
- Practicing full-body dolphin
- Experiencing the forward line of the dolphin
- Achieving a compact dolphin wave
HOW TO DO THIS DRILL
Step 1: At a depth of about six feet, lay face down in the water, arms at your sides. With a firm core and straight spine, bow forward, maintaining a stable hip position. Feel your head lead your body downward toward the bottom of the pool. Allow your legs and feet to follow. Watch your descent carefully, and before reaching the bottom of the pool, come out of your bow by raising your upper body, allowing your legs and feet to follow the same path. As your head rises, your feet should snap downward. At the top of your ascent, your face will clear the water, and you can grab a new breath. Then bow forward again. Repeat this extreme dolphin action several times, following a forward path that is at least four feet of deep.
Step 2: Now move to shallower water, perhaps three feet deep. Lay face down in the water, arms at your sides. With your spine straight and core firm, bow forward, maintaining a high hip position. Feel your body descend downward. Feel your legs and feet follow the same line of descent. Raise your upper body out of your bow before reaching the bottom of the pool. Your legs and feet should follow the same path. As your head rises, feel your feet snap downward. Breathe, then bow forward again, repeating the wave-like dolphin action that passes through a depth of only one and a half feet.
Step 3: Now you have to pretend that you are in water that is only one foot deep. Lay face down in the water, arms at your sides with a straight spine and firm core. Bow forward, maintaining your high hip position. Allow your upper body to descend. Feel your hips, legs and feet react. Quickly, before reaching the bottom of the one-foot deep water, raise your upper body out of the bow. Feel your legs and feet follow quickly. As you head rises, feel your feet snap quickly downward. Breathe then bow forward again, repeating a very compact, yet effective forward wave-like dolphin action that is only a few inches deep.
DRILL FEEDBACK CHART
| Problem | Modification |
| After I breathe, I can't achieve another dolphin. | Be sure you are maintaining a straight spine through your neck, and that you are not raising your chin to breathe. Without this firm spine line, you head will be leading you in a different direction than your body is trying to go. |
| I am not moving forward. | Make sure you are not simply folding in half at the waist, but simply bowing your upper body forward. If you allow your legs to sink as your chest is descending, your forward motion will be reduced. Your legs must follow the same line that your upper body has travelled. |
| I can only make a slight wave in the shallowest water. | Yes, but it is there. Practice condensing all of the power of the dolphin into those few inches of depth. An effective dolphin that is compact uses a shorter path to the other end of the pool. |
Dolphin Dives
THE PURPOSE OF THIS DRILL
- Understanding the full-body action of the dolphin
- Experiencing the line of the dolphin
- Feeling the transfer of power to the feet
HOW TO DO THIS DRILL
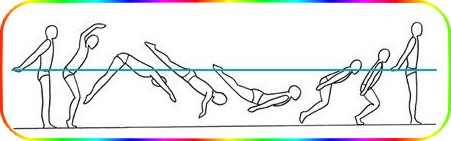
- Step 1 : - Stand in water about hip deep, arms firmly at your sides. Using the muscles of your core, achieve a straight spine from your hips through your neck. Keeping your hips firm, bow forward about twelve inches. At the same time, bend your knees slightly, preparing to jump off the bottom of the pool.
- Step 2 : - Maintaining your bowed position, jump off the bottom with force. As your body rises into the air, bow forward more. Notice that by doing so, the upward force of your jump changes to follow your head forward.
- Step 3 : - At the highest point in your jump, bow forward even more. As you begin to descend, notice that instead of landing back on your feet, you are going to re-enter the water head first. By shifting the position of your upper body, you have changed the line of your jump from a simple up and down path, that landed in the same place it started, to a line that travels forward. By bowing forward, you go up out of the water, forward over the water, and then down into the water. At the point your head enters the water, your hips should actually be higher than your head.
- Step 4 : - You should be aiming head first toward the bottom of the pool, with quite a bit of speed. Your upper body, hips, legs and feet should be following the same line. KEEP YOUR EYES OPEN, and well before you reach the bottom of the pool, raise your upper body out of your bow, again changing the line of your jump.
- Step 5 : - As the upper body rises toward the surface, feel your hips, legs and feet react to the change of di- rection. As your face approaches the surface of water, feel your feet snap down into the water. Your whole body has just travelled through an exaggerated dolphin move- ment. Draw your legs up under you as you resume a standing position.
- Step 6 : - Try it several times. Maintaining a straight spine, actively bow forward and jump up with force. Feel your head and upper body lead you through the wave of the dolphin as you bow forward more. Feel your body travel up, over, then down into the water, head first. Then as you come out of your bow, feel your feet snap down. Stand. Practice several times, until you can do several dolphin dives smoothly in a row without pausing between them.
DRILL FEEDBACK CHART
| Problem | Modification |
| I am landing on my belly. | Jump up with more force, and bow forward more as you feel the upward force of your jump. Bow even more at your highest point so you are aiming more downward than forward as you descend from your jump. |
| I am not aiming toward the bottom of the pool. | Remember, your body will follow your head. Make sure your spine is straight and firm from your hips through your neck. If you raise your chin, bending at the neck, and breaking your straight spine line, the downward line your upper body is travelling at this point will be compromised. If your head is raised, your body won't aim toward the bottom of the pool. |
| My feet don't snap down before I stand. | Maintain your firm core. Allow your legs and feet to travel the same line that your upper body has travelled. They will still be moving downward for a moment when your upper body has shifted legs of the bochange out w. It is when your hips and finally change directions, and begin their path upward that your feet will snap downward. Draw your legs under you only after that point. |
Vertical Dolphin
THE PURPOSE OF THIS DRILL
- Developing a productive dolphin
- Practicing a continuous kick
- Using a fluid, full-body dolphin
HOW TO DO THIS DRILL
- Step 1 : - In water, at least as deep as you are tall, get into a vertical position. Engage your core. With your hands extended out from your sides, begin a gentle sculling action, tracing side-to-side underwater figure eights with your hands, to keep your head above water.
- Step 2 : - Holding your legs together, but relaxed, begin a gentle dolphin action by bowing down and up, allowing your legs and feet to sweep forward and back in reaction. With your ankles relaxed, allow your feet to snap forward as you come out of your bow. Begin another bow immediately, and repeat this motion several times in a row creating a rhythmic wave. Your feet should be sweeping across about fifteen inches of water.
- Step 3 : - As your extended legs move simultaneously in a sweeping motion forward and back in the water, think about the movement of a dolphin's tail. Where does it begin? In fact, the dolphin uses the entire length of its body to produce motion. Pretend you have the tail of a dolphin, that your trunk and legs are part of the movement. You have no waist or hips, and no knees to bend. Your movement is fluid and your entire body works to sweep the water in a wave-like movement. Continue your dolphin until it seems there is no beginning or end to the motion.
- Step 4 : - Once you have achieved a fluid dolphin action, stop the sculling action with your hands. Position your hands: left hand on right shoulder and right hand on left shoulder. Continue your vertical dol- phin keeping your head above water. Maintain for 30 seconds. Rest, and then practice again.
DRILL FEEDBACK CHART
| Problem | Modification |
| I am sinking. | Make sure you are sweeping the water back and forth and not trying to kick down and up, bending a lot at the hips and knees. |
| I feel it in my stomach. | Good! This shows you are using more than your legs for your dolphin action. |
| I get tired too quickly to notice a floppy kicking motion. | Maintain a firm core, and allow your lower body to follow the movement of your upper body. Remember that the best dolphin is compact; so try to produce an effective wave in a small amount of space. |
Back Dolphin
THE PURPOSE OF THIS DRILL
- Using the abdominal muscles for dolphin
- Gathering power for lower body movement
- Avoiding over bending at the knees
HOW TO DO THIS DRILL
- Step 1 : - Push off the wall on your back, arms at your sides. Begin a gentle dolphin action, high in your body and allow it to gather force as it travels down to your feet.
- Step 2 : - Try to kick the water upward enough to make a small boiling effect over your feet. Drop your legs down, then kick up again. Create a rhythmic up and down motion with your legs that extends about 15 inches deep. Use the entire length of your legs and your trunk for dolphin on your back.
- Step 3 : - Your head should be almost still as your core and legs move. Try to keep your head from bouncing so your face submerges. Also, watch your knees to make sure they are not coming out of the water too much, or they will produce a wave of water over your face. Sweep the water upward and downward, rather than closer to you and then father away. Practice several times.
- Step 4 : - Once you have achieved a fluid dolphin action on your back, and forward motion, try it with your arms extended over your head. Produce a smooth, rhythmic dolphin action that starts high in your body and gathers force down to your feet. Feel how your abdominal muscles are engaged. Sweep the water up and down, producing forward motion, while your face stays above water. Practice several times.
DRILL FEEDBACK CHART
| Problem | Modification |
| I can't keep my face above water. | Avoid moving your upper body back beyond your natural floating position. Doing so will prevent the power of the dolphin from flowing down to your feet. |
| I am not moving. | Keep practicing. You don't have to do a large kick to move. Try a dolphin only a few inches deep at first. Kick upward with more force. |
| I am feeling it in my calves. | This indicates that you are using only your lower legs, from your knees down, to kick. Try initiating the action from your core. You should be feeling it in your abdominal muscles. |
ARM STROKE DRILLS
The path of the butterfly underwater arm stroke is similar to the freestyle arm stroke, only it is done with both arms simultaneously. It is an extremely powerful arm stroke, and for a short distance can rival the freestyle in speed. However, because it is just not as sustainable as the freestyle, it is even more important to practice the most economic butterfly arm stroke possible, so that butterfly can be done well for longer. The goal of the following arm stroke drills for butterfly is to develop a productive arm stroke that maximizes power and minimizes effort.
Pitch to Press
THE PURPOSE OF THIS DRILL
- Feeling the path of the butterfly arm stroke
- Learning to press back, and not down
- Using correct hand pitch to maintain pressure on the water
HOW TO DO THIS DRILL
- Step 1 : - Stand in waist deep water. Keeping your feet firmly on the bottom of the pool, bow forward so your face is in the water. Look at the bottom of the pool. Extend your arms forward on the surface of the water slightly wider than your shoulders. With your palms down, position your thumbs slightly lower than your pinkies.
- Step 2 : - Stretch your arms forward, so that your elbows are locked. This should extend your reach, and position your hands slightly farther apart. As your hands achieve their longest reach, bend at the wrists slightly so your palms and fingertips are lower than your wrists and pitched outward. Sweep your palms around so you are pressing back on the water, not pushing down. Allow your forearms to follow your hands, but keep your elbows high and firm. Watch your hands as they pass your face, pressing back and sweeping slightly inward, so they are closer together than their starting point.
- Step 3 : - As your hands continue pressing back and pass your shoulders, they should also sweep by your elbows. Adjust the position of your hands so they maintain firm pressure on the water. As your hands pass under your belly they should be at their closest point together, closer together than your elbows. Again adjust the pitch of your hands so they can continue pressing back. The arm stroke finishes with the hands pressing back quickly, until the arms are straight and outside each hip.
- Step 4 : - Take a breath and return your hands and head to the starting position, slightly wider than your shoulders. Repeat the arm stroke, stretching forward until your elbows lock, then sweeping your palms around and positioning them to press back on the water, with your elbows high. As your hands press back towards your belly and get closer together, change your hand pitch again to sweep quickly back, until your arms are straight and out from your hips.
- Step 5 : - Continue performing the butterfly arm stroke several times. Constantly reposition your hands so they press back on the water and not down. Practice until you can perform several quick arm strokes in a row, producing enough pressure back on the water so it is difficult to maintain your footing on the bottom of the pool.
DRILL FEEDBACK CHART
| Problem | Modification |
| My hand press down then up. | Change the pitch of your hands to press back on the water from the beginning through to the end of the stroke in order to move forward. Otherwise your efforts will be used to move up and down. |
| My hands are almost touching at their closest point. | Correctly positioned, your thumbs might be fairly close, but the fingertips of each hand should be pointing at the bottom of the the pool. Make sure that your elbows are not leading your stroke. They should stay high and firm throughout the stroke. |
| It feels like a large sculling action. | Exactly! You change the pitch of your hand to maintain pressure on the water. Press out with your thumbs down, and in with your thumbs up. |
Sweeping Question Marks
THE PURPOSE OF THIS DRILL
- Feeling the path of the butterfly arm stroke
- Sweeping wide to narrow
- Sweeping deep to shallow
HOW TO DO THIS DRILL
- Step 1 : - Push off the wall face down in the water, arms extended in front of your shoulders. Achieve a downhill, and high hip float. Look at the bottom of the pool. While still gliding forward, perform a single butterfly stroke with both arms simultaneously moving in a wide to narrow line. Stretch forward, sweep out and around, then inward toward your belly. Finish by pressing back quickly past your waist. Notice that the lines you have traced with your arm stroke resemble two question marks, one the mirror image of the other floating flat on the surface of the water. Stand and breathe.
- Step 2 : - Return to the wall, and push off for the butterfly again. Float downhill with high hips. Look at the bottom of the pool. Using the momentum of your push off, again do one butterfly stroke tracing a deep to shallow line. Stretch forward, sweep down and around, then upward under your belly. Finish by pressing back quickly past your waist. Notice that the lines you have traced with your arm stroke resemble two question marks, one the mirror image of the other floating perpendicular to the surface of the water. Stand and breathe.
- Step 3 : - Return to the wall, and push off for the butterfly once again. Look at the bottom of the pool and achieve a high hip downhill floating position. With the forward motion of your glide, do a butter- fly stroke tracing a wide to narrow, and deep to shallow path at the same time. Stretch forward, sweep out and down, around, then inward and upward under your belly. Finish by pressing back quickly past your waist. Notice that the lines you have traced with your arm stroke resemble question marks floating diagonally in the water, one the mirror image of the other.
- Step 4 : - Stand and breathe. Continue to practice the path of the butterfly arm stroke tracing deep to shallow and wide to narrow question marks at the same time.
DRILL FEEDBACK CHART
| Problem | Modification |
| My arm stroke goes straight back, not like question marks. | You will be able to achieve a longer, more productive stroke if you use the sweeping question mark arm stroke. You will be able to use fewer strokes, and therefore less energy to cross the pool. |
| My arms are shallow the whole way. | Make sure you are holding your elbows firm to start the stroke. Move your hands first, and allow them to pass under your elbows to achieve depth. |
| My arms are deep the whole way. | To be strongest in the middle of the arm stroke, allow your hands to sweep closer under your belly. |
One-arm Butterfly
THE PURPOSE OF THIS DRILL
- Feeling the rhythm of the butterfly arm stroke
- Practicing the path of the arm stroke
- Pressing back on the water
HOW TO DO THIS DRILL
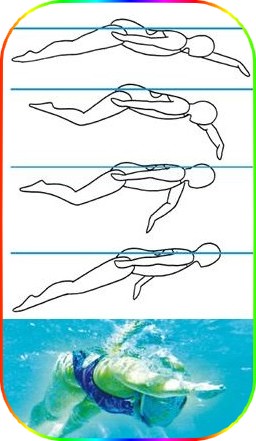
Step 1: Push off the wall face down in the water, arms extended in front of your shoulders. Achieve a downhill, high hip float. With your right hand remaining in the extended position, perform a single butterfly stroke with your left arm. Stretch forward, sweep out and around, then inward under your belly. Finish by pressing back quickly past your waist. Breathe toward the moving arm, and do an over-the-water, freestyle-like recovery.
Step 2: Do another stroke with the same arm, accompanied by a light dolphin action. When your hand stretches forward, your chest should be low in the water. Your feet should snap down as you first press on the water. Then, when your hand presses back to the finish, your chest should be high, as your feet should snap down again. Remem- ber that the dolphin action should be generated high in the body, without exces- sive knee bend. Repeat the one arm butterfly several times, tracing the wide to narrow, and, deep to shallow line of the stroke. Maintain pressure back on the water, and use two dolphins with each arm stroke. The first dolphin propels you into the beginning of the arm stroke. The second dolphin assists the fast finish of the arm stroke.
Step 3: Continue practicing your one-arm butterfly arm stroke, accompanied by a rhythmic light dolphin action. Focus on accelerating your stroke to the rear. Maintain a hand pitch that you can constantly press back on the water, not down or up. From front to back, stretch forward, sweep out and around, inward under your belly, wide to narrow, and, deep to shallow. Finish by pressing back quickly. Breathe. Recover. Repeat to the far end of the pool.
Step 4: After resting, push off the wall and leave your left arm extended. Perform the one-arm butterfly with your right arm. Match your light dolphin to accompany the start and the finish of the stroke. Accelerate the stroke toward the rear. Continue to the far end of the pool.
Step 5: Practice the one-arm butterfly for several lengths of the pool. Keep your hips high and time the kick to match the beginning and end of your arm stroke. Feel your dolphin move through your body and assist you in catching water at the beginning of the stroke. Feel your dolphin assist you again to finish the stroke with speed.
DRILL FEEDBACK CHART
| Problem | Modification |
| I am leaning to one side a bit. | That is okay. The more forward momentum you produce, the less noticeable this will be. Focus on accelerating your arm to the back of the stroke, and maintaining pressure back on the water the whole time. |
| My hands are aimed inward at the start of the stroke. | Starting in the correct position is important in order to begin the stroke from a position of power. Your hands should enter at shoulder width apart or even wider, but not closer. Your fingertips should be pointing forward, and a bit outward. In this position, be sure to lock your elbows and stretch forward to the far end of the pool. |
| I am not accelerating at the end of the stroke. | Make sure you are starting the stroke by moving your hands, not your elbows. If your elbows move first, you will not be in position to accelerate your hands to the end of the stroke. |
Left Arm, Right Arm, Both Arms
THE PURPOSE OF THIS DRILL
- Feeling the line of the stroke
- Practicing accelerating to the back of the stroke
- Experiencing butterfly rhythm
HOW TO DO THIS DRILL
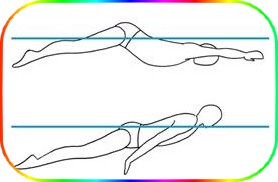
- Step 1 : - Push off the wall face down in the water, arms extended in front of your shoulders. Achieve a downhill float. Maintain high hips. With your right hand remaining in the extended position, perform a single butterfly stroke with your left arm, accompanied by a rhythmic light dolphin action. Focus on accelerating your stroke to the rear. Breathe toward the moving arm, and recover, like freestyle, over the water.
- Step 2 : - As your left arm reaches the front and engages the water, your feet should snap down. As they do, begin stroking with your right arm, leaving your left arm extended in front of you. Accelerate to the back again. Allow your feet to snap down again as you finish the stroke. Recover.
- Step 3 : - Now, with both arms extended in front, perform a butterfly arm stroke with both arms. Bow forward and stretch your elbows to the locked position as your feet snap down. Press out and sweep around, positioning your hands to press back. Accelerate your arm stroke as your hands move past your belly, closer together than your elbows. Finish by pressing quickly back toward your hips as your feet snap down again. Return your arms over the surface of the water to the starting position in front.
- Step 4 : - Repeat the sequence. Left arm, right arm, both arms, maintaining a light rhythmic dolphin that matches the beginning and the end of the stroke. Maintain pressure back on the water, and an accelerating stroke. Continue to the far end of the pool. Rest, then practice again until you are moving comfortably and rhythmically through the water.
DRILL FEEDBACK CHART
| Problem | Modification |
| My arms sink down in front. | Remember to stretch your arm forward when you enter. Reach toward the far end of the pool, then sweep around and press back on the water, not down. |
| I don't know when to breathe on the stroke with both arms. | For this drill, don't breathe on the double arm stroke. Focus on the path of the stroke, maintaining constant pressure back on the water, and accelerating your stroke toward your hips. You can breathe on the one-arm strokes. |
| My arms get stuck at the rear on the two-arm stroke. | Make sure your hands are the first part of your arm to move. Hold your elbows firm. If your elbows move first, your hands won't clear the water at the rear. |
The Round Off
THE PURPOSE OF THIS DRILL
- Pressing outward the end of the stroke
- Practicing a quick finish of the stroke
- Learning to release the water in back
HOW TO DO THIS DRILL
- Step 1 : - Push off the wall face down in the water, arms extended in front of your shoulders. Achieve a downhill float. Do several dolphins in a row, beginning each high in your body and snapping downward to your feet. On the sixth dolphin, start your arm stroke, bowing forward as your reach, then sweeping around and back, closer under your belly.
- Step 2 : - As your hands accelerate toward the end of your stroke, pitch your palms slightly outward. Press back and outward from your body in a fast finish as your feet snap down again. Your hands should clear the water between your waist and your hips, several inches away from your body. Return them to the front, extended and slightly wider than your shoulders.
- Step 3 : - Do another arm stroke, tracing question marks. As your hands approach their closest point under your belly, press them back with speed, and outward like a J. Your hands should release the water and rise easily up through the surface with your pinkies up.
- Step 4 : - Return them to the front, again. Stretch forward and engage your palms. Sweep around and press back against the water. Feel your hands get closer together under your belly, then accelerate into your fast finish, rounding off at the rear of the stroke in a J shape out from your body. Feel your hands rise easily up through the surface of the water with no resistance. Use their momentum to return to the front. Repeat several times, accelerating to the rounded off finish of your stroke.
DRILL FEEDBACK CHART
| Problem | Modification |
| My arm stroke makes more forward motion when I push straight back. | With the round off, your hands are actually travelling the same distance, but not so far back along your body. When the arm stroke goes straight back, the path back to the front takes longer, so the kicks have to be spaced farther apart in order to occur at the most beneficial points in the stroke. This can produce dead space or loss of momentum. |
| My hands come out of the water, palms up. | Make sure you are not lifting the water up at the end of the J. Position your hands so you are pushing it back and outward. Your pinkie should leave the water first. |
| This makes my stroke short. | Again, the distance of the actual stroke path is the same, it just curves outward more. Your stroke turn-over will be quicker, because the recovery path is shorter. This allows you to spend more time with your hands pressing against the water, and less time with them in the air. |
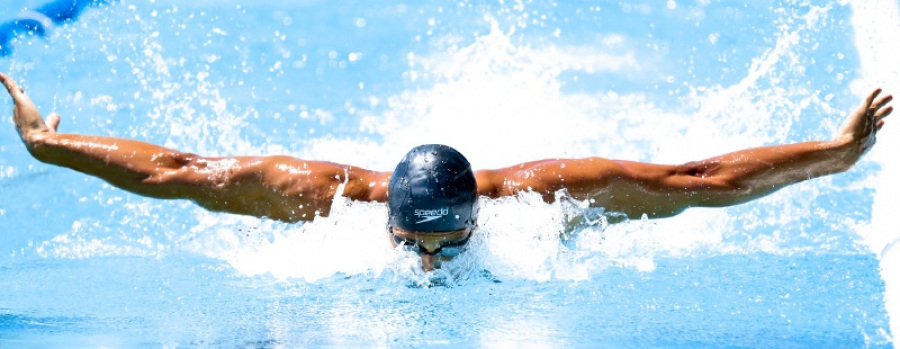
RECOVERY DRILLS
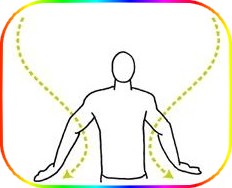
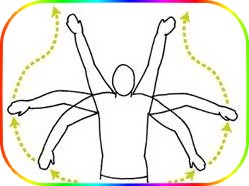
The butterfly uses a simultaneous arm recovery over the surface of the water. It is this characteristic spread wing position that makes the butterfly such a favorite photo opportunity. It is important to use a relaxed recovery, however, variations in flexibility make each swimmer's butterfly recovery slightly unique. In general, the recovery is close to the water, as the arms swing around wide from back to front. When the arms pass the shoulders, they realign to aim forward. The goal of the following recovery drills for the butterfly is to achieve a relaxed, direct, and well-aligned recovery for a better butterfly.
Pinkies-up
THE PURPOSE OF THIS DRILL
- Learning to maintain a pinkie up position
- Feeling a relaxed recovery
- Creating an arch with your arms over the water
HOW TO DO THIS DRILL
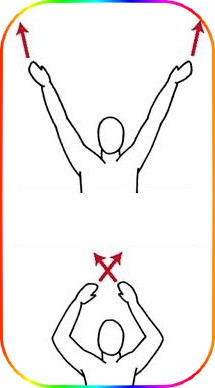
- Step 1 : - Standing in front of a mirror, bow forward so your upper body is horizontal. Beginning with your arms extended in front of you, do a butterfly arm stroke in the air, stretching forward then sweeping around, close through the middle, then quickly back and outward in a J. Freeze after the J. Notice that your pinkies are the high point of your hands.
- Step 2 : - Maintaining your pinkie-up hand position, sweep your hand around and forward through recovery, toward the starting position. Your arms and hands should be relaxed. Notice the arch that your two arms make, with your head in the middle. Notice too that as you sweep to the widest wing span, in order to maintain a pinkie-up position, you have to lower your chest into the water.
- Step 3 : - As your hands pass your shoulders, reach forward with your arms, still maintaining your pinkie-up position. Stretch forward, as if preparing to enter the water. Repeat the complete path of the butterfly arms several times looking in the mirror. Watch your hands maintain a pinkie-up posi- tion throughout their reco- very. Feel your arms and hands relax as they swing around and forward.
- Step 4 : - Now try it in the water. Push off the wall face down in the water, arms extended in front of your shoulders. After several dolphins, start your arm stroke, reaching forward, then sweeping around and back, closer under your belly. Accelerate toward the end of your stroke, pitching your palms outward and back to finish in a quick J as your feet snap down again. Your hands should clear the water, pinkies-up, several inches away from the sides of your body. Return them to the front in a relaxed wide arm swing, maintaining your pinkie-up position throughout the recovery. Extend your arms forward as your hands pass your shoulders, and enter the water slightly wider than your shoulders.
- Step 5 : - Do another stroke, tracing a wide to narrow, and deep to shallow line, and accelerating to the rear. Round off the finish in a J , then slide your hands out of the water pinkies first. Recover pinkies-up, creating a relaxed arch over the water. Practice several times until you achieve a relaxed recovery with your pinkies-up the whole way.
DRILL FEEDBACK CHART
| Problem | Modification |
| My elbows drag through the water during recovery. | This probably means your hands are recovering thumbs-up. In this position, your elbows are low and can drag through the water. Practice again, actively rotating your hands to the pinkie-up position and hold it throughout the recovery. |
| My hands start pinkie-up, but then turn over. | This means you are not relaxing during recovery, but instead pulling your hands forward. Try rotating your whole arm and shoulder forward to maintain the pinkie-up position. Try to initiate the recovery from higher in the arm. |
| My hands bump into each other in front. | As your hands pass your shoulders in the recovery, redirect your arms to reach forward rather than continuing the circular swing. It is important to align your stroke forward at the end of the recovery, and enter the water with your hands about shoulder width apart to avoid starting your next stroke from a position of weakness. |
The Flop
THE PURPOSE OF THIS DRILL
- Using your chest and shoulders to recover
- Finishing the recovery in a downhill position
- Feeling a relaxed recovery
HOW TO DO THIS DRILL
- Step 1 : - Push off the wall face for the butterfly. After several dolphins, start your arm stroke. Sweep your arms wide to narrow and deep to shallow, accelerating to the rear. Round off the end of the stroke and slide your hands out of the water pinkies first. Recover with a relaxed wide arm swing, maintaining your pinkie-up position. As your arms reach their widest position, your shoulders and head should be at the top of the arch of your recovery. Feel the swing of the recovery come from the shoulders and chest, rather than from the hands.
- Step 2 : - When your hands pass your shoulders, roll your shoulders forward. Then as your arms realign to reach forward at the end of the recovery, drop your chest downward into the water. Do it again. Stroke and exit the water at the rear pinkies-up. Initiate your recovery from the shoulders and chest, maintaining a pinkie-up position. As your hands pass your shoulders, roll your shoulders forward. Drop your chest down into the water as your arms reach forward. It should feel like your arms are flopping forward effortlessly.
- Step 3 : - Do several more strokes, focusing on your relaxed, pinkie-up recovery, powered from the chest and shoulders. At the mid- point in recovery, roll your shoulders forward, and drop your chest down as you realign your arms forward with each recovery. Notice that doing so adds speed to the end of your recovery. Notice too that as your shoulder and chest action flops your arms auto- matically into their forward entry position, your body achieves a downhill floating position.
- Step 4 : - Practice more, focusing on achieving a relaxed recovery from start to finish. Maintain a pinkie-up position each time. Flop your arms into their entry position using your shoulders and chest. Feel your body achieve a downhill position. Feel your arms landing in their forward entry position relaxed and aimed forward after each recovery.
DRILL FEEDBACK CHART
| Problem | Modification |
| I do not end up in the downhill position. | Make sure that you are maintaining a straight spine from hips through to your neck. You should be looking at the bottom of the pool and not forward. Your hips should be high and stable as you flop forward. |
| My arms enter the water closer than my shoulders. | Realign your arms forward earlier in the recovery. Make sure your are reaching forward with your elbows straight, so your whole arm is aligned in the direction you are trying to go. |
| When I enter the water, my chest is the lowest part of my body. | Good. This means you will start your next stroke from a position of power. |
Reaching to a Y
THE PURPOSE OF THIS DRILL
- Finishing recovery with your fingertips wider than your shoulders
- Aligning from the thumbs
- Positioning the hands to hold more water
HOW TO DO THIS DRILL
- Step 1 : - Push off the wall preparing to do the butterfly, straight spine, high hips, arms extended. Establish your rhythm with several dolphins, then start your arm stroke, tracing question marks as you accelerate to the back. Round off your finish and recover pinkies-up. When your hands pass your shoulders, realign your arms to reach forward.
- Step 2 : - At the end of the recovery, to prepare for the next stroke, drop your chest down, extend your arms forward, and push your elbows out straight. Point your thumbs to the far end of the pool. Notice that by doing so, your fingertips pitch outward. Do it again, actively aligning your recovery forward with your thumbs to finish your recovery. Feel your fingertips enter the water wider than your shoulders as you achieve the downhill position.
- Step 3 : - Do several more strokes, making a wide relaxed recovery, then redirect your arms to reach forward as your hands pass your shoulders. Drop your chest, press your elbows out straight, and align your reach to the far end of the pool with your thumbs. Fully extended, you should feel as if your arms form a Y on the surface of the water.
- Step 4 : - Practice more, finishing each recovery by aligning your thumbs forward and achieving a Y entry position. Notice that by simply pointing with your thumbs, your arms enter aligned outside your shoulders. Notice too that from the Y position, you are able to take hold of the water better with your hands as you begin each new stroke.
DRILL FEEDBACK CHART
| Problem | Modification |
| It feels too wide. | It is actually just your hands that are positioned wider than usual. Your arms are still aligned with your shoulders. This wide hand position enables you to catch and hold more water at the beginning of the stroke. |
| Entering this way my stroke misses the top part of the question mark. | There is very little forward motion produced by pressing outward. Entering in a Y, positions your hands to immediately start a productive sweep around and back. |
| My fingertips are not wider than my shoulders. | Remember to push your elbows out straight. It is important to create a forward line from your shoulders, through your elbow, and all the way to your thumbs. If your elbows are not straight, the forward line of your stroke will be compromised. |
BREATHING DRILLS
Breathing in the butterfly happens within the line of the stroke, so that the swimmer inhales when the upper body is naturally at its highest point, and finishes when the upper body regains its downhill position. Timed correctly, no independent head action is required to achieve a breath. The most economic breathing style is low on the water, facing forward. Regular, rhythmic breathing is important to achieving a sustainable stroke, but successful butterfliers use a variety of breathing patterns, from breathing every stroke, to breathing every third stroke. The goal of the following breathing drills for butterfly is to practice the correct timing of the breathing so it happens with the natural rhythm of the stroke.
Breathing Timing Drill
THE PURPOSE OF THIS DRILL
- Learning the timing of the butterfly breathing
- Achieving the inhale at the high point of the stroke
- Feeling the face return to the water before the hands
HOW TO DO THIS DRILL
- Step 1 : - Stand in waist deep water. Keeping your feet firmly on the bottom of the pool, bow forward so your face is in the water. Look at the bottom of the pool. Extend your arms forward on the surface of the water, aligning your elbows and thumbs forward. Begin tracing the question mark line of your arm stroke. As your hands press back and accelerate to the end of the stroke, stand upright.
- Step 2 : - Inhale as you achieve your full standing position, while your hands press quickly back and round off the finish of the stroke. As your hands leave the water, pinkies-up and move into the arch of the recovery, again bow forward so your body joins the forward line of the arms as they go over the water. Your face should submerge just before your hands enter the water in front.
- Step 3 : - Begin another stroke, and stand as your hands transition to the fast finish. Inhale. Bow forward again as your arms recover, allowing your face to reach the water before your hands. Do several strokes, standing to inhale at the end of each one. As you move into the recovery and bow forward, notice that your head and arms move in unison towards the front. Your head should beat your arms to the water because it has a shorter distance to travel.
- Step 4 : - Now try several strokes in a row. Bow forward to begin each stroke with your face in the water. Stand and inhale as your hands approach the back of the stroke. Bow forward again as your arms recover, so your face reaches the water an instant before your hands.
- Step 5 : - Continue to practice, focusing on inhaling at the high point of your stroke. Allow your body position to determine when your breath begins and ends.
DRILL FEEDBACK CHART
| Problem | Modification |
| My hands and face hit the water at the same time. | Try to get your face back to the water before your hands. Although they should be travelling in unison, your arms have a longer path to travel, so your face should reach the water first. |
| It seems like I am pressing down on the water, not back. | In this drill, since you are vertical, you will initially be pressing down. Try to pay attention to the timing of the breathing rather than the path of the stroke in this drill. |
| When my face hits the water, my hands are already stroking. | You might be breathing too late. Time the inhale to end as the arms are reaching forward toward the Y. |
Flying Dolphin Dives
THE PURPOSE OF THIS DRILL
- Learning the timing of the butterfly breathing
- Breathing within the line of the stroke
- Feeling the wave of the stroke
HOW TO DO THIS DRILL
- Step 1 : - Stand in water that is hip deep, arms extended back and outside the hips, pinkies-up. Achieve a straight spine from your hips through your neck. Keeping your hips firm, bow forward about twelve inches while bending your knees slightly, preparing to jump off the bottom of the pool.
- Step 2 : - Jump off the bottom with force. As your body rises into the air, bow forward more, and swing your arms around and forward like a butterfly recovery. Your arms should be finishing their recovery as your body begins to descend. As your face enters the water, your hips should actually be higher than your head, and your arms should be extended, and in the water, aiming downward toward the bottom of the pool.
- Step 3 : - As your arms descend, your upper body, legs and feet should be following the same line, travelling up, over, then down into the water. Before you reach the bottom of the pool, sweep through the butterfly arm stroke, and raise your upper body out of your bow. Feel your legs and feet react to the change of direction. As your face rises to the surface of water, feel your feet snap down into the water, as your hands reach the end of the stroke. Draw your legs up under you as you resume the standing position. Inhale.
- Step 4 : - From the starting position, standing with your arms extended back and out from your body, begin another dolphin dive. Jump up and swing your arms into the re- covery as you bow forward. Continue to bow forward so that by the high point of your jump, your hips are higher than your head, and your arms are pointing down toward the water. As you descend into the water, trace the butterfly arm stroke as you come out of your bow. Finish your stroke as your face rises out of the water and your feet snap down. Inhale and resume your starting position.
- Step 5 : - Perform several flying dolphin dives in a row, using the high point of each to inhale. Travel up, over, then down into the water with each one, maintaining a fluid rhythm from one to the next.
DRILL FEEDBACK CHART
| Problem | Modification |
| I am landing flat on the water. | Bow forward more to start. Then bow forward even more as you jump up and swing of your arms of y around forward. Your legs shoud stil be risisng when your arms have finished their recovery, and are pointing with your head down toward the water. |
| My face doesn't clear the water until I stand. | As your arms finish the stroke and you come out of your bow, allow your legs to follow the same wave until wour feet snap down. That will naturally lift your face to the surface before you stand up completely. |
| My face comes out of the water before my feet snap down. | This could means that you are raising your chin to breathe, rather than breathing within the wave of the dolphin dive. Hold your head position firm throughout the whole drill. Achieve your breathe at the high point of the dolphin dive, without changing your head position. |
Eyes on the Water Butterfly
THE PURPOSE OF THIS DRILL
- Learning to maintain a stable head position
- Practicing looking down at the water while breathing
- Using the natural wave to the stroke to breathe
HOW TO DO THIS DRILL
- Step 1 : - Push off the wall preparing to do the butterfly, straight spine, arms extended in front of you, looking down at the bottom of the pool. Do several dolphins to establish your rhythm, then start your arm stroke. Sweep around and accelerate to the rear. Finish fast and feel your upper body rise. Breathe and begin the recovery. When your hands pass your shoulders and your chest drops down, allow your head to return to the water as you realign your arms to reach forward in a Y.
- Step 2 : - Continue into a second stroke. Look at the bottom of the pool. Maintain a firm spine, from your hips through to your neck. As your arms begin to sweep through the stroke, feel your upper body start to rise. As your arms accelerate to the finish, your feet should snap down again, propelling your face to the surface of the water. Inhale without changing your head position.
- Step 3 : - Continue into the recovery. Your head should be moving in unison with your arms, continuing the forward line of the stroke. When your arms pass your shoulders, your face should enter the water as your chest drops down and flops your arms forward. Your arms enter the water a moment after your head, as you achieve the downhill position.
- Step 4 : - Continue into a third stroke. Stroke through to the rear, accelerating as you press against the water. As you finish the stroke quickly, allow your feet to snap down. Feel your upper body rise, and your face pop to the surface. Inhale looking down at the water directly in front of you. If you have maintained a stable head position, you should not be able to see the far end of the pool. Recover and feel your face submerge as your feet snap down again and you move into the downhill position.
- Step 5 : - Perform a fourth stroke, accelerating through and allowing your feet to snap down as your finish your stroke. Feel your upper body rise. Inhale at your highest point, maintaining your head position. At the highest point, your chin should be just above the surface of the water, and you should be looking down at the water right in front of you. As you proceed into the recovery, drop your chest and face into the water. Notice that without changing your head position, you are again looking at the bottom of the pool.
- Step 6 : - Practice more, achieving each breath within the line of your stroke. Maintain a stable head position throughout the stroke, so you are looking down at the bottom of the pool when your face is in the water, and down at the water in front of you when you are inhaling.

DRILL FEEDBACK CHART
| Problem | Modification |
| My face doesn't pop out of the water. | Make sure you are finishing the stroke quickly, and that your feet are snapping down at the same time, giving you the lift you need to breathe. Also, make sure that your dolphin begins high in your body, and that you are not snapping your feet down as an independent action by over-bending at the knee. |
| I see the other end of the pool when I am inhaling. | This means you are raising your chin to breathe. Doing so compromises the straight spine line of the stroke. Instead, keep your chin down, so you will maintain a stronger position to start the next stroke. |
| My chin is much higher than the surface of the water when I am inhaling. | You might be pressing down on the water to achieve lift. Although you will be able to get your breath this way, it is very difficult to sustain high breathing, as you are spending a great deal of energy going up rather than forward. |
Hammer and Nail
THE PURPOSE OF THIS DRILL
- Learning to breathe from the core
- Shifting to a downhill position after breathing
- Maintaining a stable head position
HOW TO DO THIS DRILL
- Step 1 : - Push off the wall for the butterfly. Dolphin several times to establish rhythm, then start your arm stroke. Sweep through and accelerate to the rear. Finish fast as your feet snap down and feel your upper body rise. Inhale at the high point, looking down at the water. Recover, rolling your shoulders forward and dropping your chest down as your arms reach for the front. Feel your face return to the water and achieve the downhill position. Focus on what part of your face hits the water first.
- Step 2 : - Do another stroke. After the inhale, as your arms and head move back to the starting position, freeze as your face hits the water. It should hit the water forehead first, rather than chin first. It should feel like your forehead hits like a hammer and the water is a nail.
- Step 4 : - Do another stroke. As you accelerate to the rear and your upper body rises for the breath, focus on the arch of arms as they pass over the water. From the beginning to the end of the recovery, the forward movement of the arms is powered from the core, not the arms. The core action actually determines the line of the stroke. As you roll your shoulders forward, feel your head leave the high point of the stroke. As your hands pass your shoulders, and you drop your chest down into the water, the line of the stroke aims down and forward, bringing your face back to the water forehead first, and positioning your body downhill to begin the next stroke.
- Step 5 : - Notice that without changing your head position at all, you rise from the water to breathe forehead first, and you also return to the water forehead first. Practice more, using your forehead as the hammer to hit the nail that is the water. Do so with force, carrying the momentum of your recovery into the next stroke.
DRILL FEEDBACK CHART
| Problem | Modification |
| I hit the nail with my chin. | Make sure that you are maintaining a straight spine through to your neck throughout the entire breathing action. This means you are looking at the water during the inhale, not forward. Then, make sure that you are using your core to swing your arms around and forward during recovery, not just your arms. Roll your shoulders forward then drop your chest to change how your face enters the water. |
| When I hit the nail with my forehead my arms aim down. | Reach forward with your arms while your chest drops down. Doing so will allow you to keep moving forward while transitioning to the downhill position. |
| I don't feel momentum from the recovery. | Make sure your hands are relaxed, so they are not initiating the recovery. The motion should come from your core, in the middle of the arch of your two arms. Use your core to aim your body up and forward to breathe, and down and forward to return your face to the water, and to prepare for the next stroke. |
LEVERAGE DRILLS
Leverage makes the butterfly work. Using it is necessary to perpetuate the forward momentum of the stroke for any length of time. While the whole body, from the hands through to the feet works as a lever, high hips are crucial to benefiting from its effects. Leverage in butterfly works between the upper body and the hips, and, between the hips and the feet. The goal of the following leverage drills for butterfly is to learn to position the body to make the most of the leverage at each stage of the stroke.
Advanced One-arm Butterfly
THE PURPOSE OF THIS DRILL
- Maintaining a high hip body position
- Feeling the hips as the center of the butterfly
- Using leverage in the butterfly
HOW TO DO THIS DRILL
- Step 1 : - Push off the wall preparing to do the butterfly. Achieve a downhill float. Position your left arm at your side, while your right hand is extended in front of you. Perform a single butterfly stroke with your right arm, finishing quickly as your feet snap down, looking at the water in front of you as you inhale. Recover from the core, returning your face to the water and regaining your downhill position.
- Step 2 : - Do another stroke with the same arm, focusing on your hips. When you are in the downhill position at the beginning of the stroke, your hips should be high. When you are in the inhale position, your hips should still be higher than your feet, though lower than your head. During recovery, when you are returning to the downhill position, and as your upper body travels down and forward into the water, your hips remain high.
- Step 3 : - Continue your one- arm butterfly arm stroke, holding your hips high. Feel your upper body rise toward the end to the stroke. Feel it return to the downhill position at the end of the recovery. All the time your hips are high. Feel your feet snap down. Feel them rise. All the time your hips are high. Notice that your hips are the center of all the lever action in the stroke.
- Step 4 : - Keep practicing the one-arm butterfly with your left arm at your side. Maintain high hips and feel the lever action in the stroke. Use it to achieve the downhill float. Use it to accelerate your stroke. Use it to inhale. Use it to recover. Use it to carry momentum into the next stroke.
- Step 5 : - Continue to the far end of the pool. Switch arms and practice more.
DRILL FEEDBACK CHART
| Problem | Modification |
| My hips sink when I am breathing. | This is the position when your upper body is a bit higher than your hips, but in relation to your feet, your hips should still be high. Maintain a firm core and make sure you are not lifting your upper body too high out of the water to breathe. Look down at the water and keep your chin close to the surface of the water. |
| My hips are not higher than my chest at the start of the stroke. | Drop your chest down as your arms reach forward. Carry the momentum of your recovery forward and down into your extended position. Also make sure you are not over-bending at the knee when you dolphin. Doing so will weaken the lever effect when you are transitioning to the downhill position. |
| When I dolphin my hips get lower. | What should actually be happening is that the hips are high to start, then they get even higher as the feet snap down. They return to the original position, which is lower than when the feet snap down, but they are still high in relation to the body. |
No Kick Butterfly 96
THE PURPOSE OF THIS DRILL
- Achieving a dolphin without independent leg action
- Using leverage in the butterfly
- Powering the stroke from the core
HOW TO DO THIS DRILL
- Step 1 : - Push off the wall for the butterfly. Achieve a straight spine, firm core and high hips. Lean into a downhill float and stretch your arms for- ward. Stroke through, and breathe when your upper body reaches its highest point. Recover using your core to propel your arms forward. Roll your shoulders forward and drop your chest down to return your face to the water.
- Step 2 : - Do another stroke, maintaining a high hip position, but purposely do not kick. From the downhill position, accelerate through the sweep of the arm stroke as your upper body rises. Breathe at the high point of the stroke. Notice that your feet snap down as you finish the arm stroke and breathe anyway.
- Step 3 : - Recover, using your core to sweep your arms in a wide arch over the water. Return your face to the water as your chest drops, and your hands reach for the front. Notice that it is difficult to keep your feet from snapping down again after your chest drops into the water at the end of the recovery.
- Step 4 : - In fact, the kick, or foot motion in butterfly is a result of the other actions of the stroke. Try it again. Holding a high hip position, but without actively kicking, sweep through to the back of the stroke. Feel your feet snap down as your upper body and head rise. Using your core, chest and shoulders, recover as your face returns to the water. Feel your feet snap down again as you reach forward.
- Step 5 : - Continue doing the butterfly, producing a kick as a result of the actions of the rest of the stroke. Hold your core firm, and try to make your feet snap down with force, only through the other movements of the stroke. Practice to the far end of the pool. Rest, then practice again.
DRILL FEEDBACK CHART
| Problem | Modification |
| My feet don't snap down automatically. | Engage your core, and keep your spine straight. Without deliberately doing so, your lever will not work well, and your feet will not react to the other actions of the stroke. |
| When I don't kick, I can't breathe. | Maintain a high elbow position throughout the arm stroke, and finish the stroke with more speed. Press back on the water and avoid lifting it up at the finish. Doing so will pull you down into the water when it is time to breathe. |
| Without a kick, I am flat in the water. | Make sure your hips are high. Remember that they are the center of the stroke action. If they are not high, the leverage effect will be minimum. |
No Pause Fly
THE PURPOSE OF THIS DRILL
- Establishing rhythm from the core
- Maintaining momentum and leverage
- Avoiding damaging pauses in the stroke
HOW TO DO THIS DRILL
- Step 1 : - Push off the wall for the butterfly. Swim to the far end of the pool. Establish a rhythmic stroke, with evenly spaced kicks. If you aren't tired when you reach the wall, swim another length. As you reach the point where it is hard to maintain a rhythmic stroke, do a few more strokes, focusing on where in the stroke you lose your rhythm. Identify the point where your arms are when your rhythm breaks down.
- Step 2 : - Notice that it happens after the arm entry, when your arms are extended. As you get tired, the extension at the Y position becomes a glide. When the arms come to a stop in front, rhythm is lost. When rhythm is lost, momentum and leverage are lost as well.
- Step 3 : - Rest again. Now, push off the wall for the butterfly. Do only four strokes. Make each one a quick stroke. Focus on allowing no pause at the front of the stroke after your arms enter the water. Make a seamless transition from the recovery into the next stroke. Lay your hands on the surface of the water and grab hold of it. With your chest low in the water at this point, it should almost feel like you are reaching up with your hands.
- Step 4 : - Rest and try it again. Do four quick strokes, grabbing hold of the water the instant your reach the Y. With your chest low, anchor your hands in the water and vault your body forward over your hands. Actively involve your core in the transition to the next stroke.
- Step 5 : - Rest and then practice again. Achieve a chest-low position and reach into the Y. Kick and feel the power of that kick move through your body. Use it to advance into your next stroke with absolutely no pause. Without pausing at the front of the stroke, you carry valuable momentum into the next stroke. Continue practicing No Pause butterfly, gradually increasing the number of strokes you do in a row.
DRILL FEEDBACK CHART
| Problem | Modification |
| I don't feel like I am vaulting over my hands. | Make sure your elbows are straight and you achieve the Y position before starting the next stroke. Move your hands before your elbows. |
| I still have a pause at the front of my stroke. | Never stop your arm motion. Stretch forward then immediately sweep out and around. Actively space the down-beats of your dolphins to match the entry and the finish of your arm stroke. |
| I have a pause at the back of my stroke. | It could be that you are breathing as an independent action. If your head is rising too late, your arms will pause at the rear of the stroke. Let your breathing happen at the high point of the stroke. |
COORDINATION DRILLS
A well-coordinated butterfly is a thing of beauty. The swimmer appears to move effortlessly through the water. Truly, a successful butterfly is less a matter of strength, and more a matter of a coordinated sequence of stroke actions. When the body position, dolphin action, arm stroke, recovery, breathing and leverage work together, the result is a butterfly that moves forward with rhythm, grace and power. The goal of the following coordination drills for butterfly is to practice the various actions of the butterfly in sequence so they benefit stroke as a whole, and improve the forward line of the stroke.
Chest Balance
THE PURPOSE OF THIS DRILL
- Benefiting from the downhill position
- Avoiding a flat butterfly
- Bringing momentum into the next stroke
HOW TO DO THIS DRILL
- Step 1 : - Push off the wall preparing to do the butterfly. Achieve a straight spine, firm core and high hips. Sweep through and at the highest point in the stroke, take your breath. Recover, swinging your arms around and forward from the core. Notice that the breathing action is almost automatic. Perhaps because breathing is a matter of survival, it is a stroke action that we perfect early on.
- Step 2 : - Take another stroke, and breathe when your upper body reaches its highest point. Freeze in that position. Notice that your forward motion quickly stops. While we are good and practiced in achieving the breath, it is the part of the stroke after the breath that deserves attention in terms of maintaining the momentum and forward line of the stroke.
- Step 3 : - Stroke again. Accelerate through, breathe, and recover. Notice that it takes deliberate action to get back to the downhill position. You have to actively to angle your upper body correctly, or you will end up flat, and without momentum for the next stroke. Try it again. Sweep through to the breathing position, then recover, actively regaining your downhill position, using your core and shoulders. Drop your chest down and lean downhill. At this moment, your hips should be higher than your head. It should feel like you are balancing on your chest as you reach forward into the next stroke. Notice that by doing so you carry momentum with you into the next stroke.
- Step 4 : - Take another stroke. Accelerate through, breathe, then deliberately use your core and shoulders during recovery to transition to the downhill position. Press your chest down and balance on it, feeling your body ride downhill. Stretch forward and begin the next stroke. Continue swimming butterfly for several strokes, focusing on achieving this chest balance point before beginning the next stroke. Rest, then practice again.
- Step 5 : - Practice until balancing on your chest is as automatic as breathing.
DRILL FEEDBACK CHART
| Problem | Modification |
| I don't feel like I am riding downhill when I balance on my chest. | Make sure your hips are high throughout the stroke. At the point when you are balancing on your chest, your hips should actually be higher than your head. |
| I end up very deep when I balance on my chest. | Make sure you are not riding downhill for too long. Maintain your forward momentum by balancing on your chest only for a moment as you move into your next stroke. Otherwise you will have to use your arm stroke to lift yourself to the surface rather than to move forward. |
| This means that at entry, my chest is lower than my hands. | Exactly. Just for a moment, balance on your chest as you achieve your maximum reach and best alignment, then move into the next stroke from a position of strength. |
Coordination Checkpoint
THE PURPOSE OF THIS DRILL
- Coordinating the arms, legs and breathing
- Using momentum and leverage
- Achieving effortless breathing
HOW TO DO THIS DRILL
- Step 1 : - Push off the wall for the butterfly. Sweep through the arm stroke, maintaining high, firm elbows. Sweep your hands closer together under your belly, then accelerate toward the rear. As you press quickly outward in a J, feel your feet snap down and your face rise. Inhale. Notice three stroke actions happening simultaneously: the finish of the arm stroke, the inhale, and the down-beat of the second kick.
- Step 2 : - Try it again. Sweep through the arm stroke, round off the finish as your feet snap down, and you achieve the high point in the stroke to inhale. Try it for several strokes in a row, focusing on the point when these actions happen at once.
- Step 3 : - Notice that as these three actions happen at the same time, you can observe yourself surging forward through the water. Try it again. As your finish the stroke, and snap your feet down, look down at the water while inhaling. Notice your significant forward motion at this point.
- Step 4 : - This is an excellent checkpoint for stroke coordination as you swim butterfly for any length of time. If the down-beat of your kick, the finish of your arm stroke, and your inhale do not happen together, the rhythm of the stroke suffers.
- Step 5 : - Rest, then practice again, focusing on the coordination checkpoint every few strokes.

DRILL FEEDBACK CHART
| Problem | Modification |
| I can't do this because I don't breathe every stroke. | Check your coordination on your breathing strokes. |
| My kick happens before my inhale. | Hold your kick until your arms are near the finish of the stroke so you can breathe at the natural high point of the stroke. |
| My inhale happens after my stroke finishes. | It is important to breathe with the end of the stroke to create a unified forward line in the stroke. Otherwise, your face will be moving back as your arms are moving forward, slowing you down. |
Quiet Butterfly
THE PURPOSE OF THIS DRILL
- Achieving a clean entry
- Directing the stroke forward
- Swimming butterfly with the water, not against it
HOW TO DO THIS DRILL
Step 1: Stand in waist deep water. Bow forward until your chin rests on the surface of the water. Extend your arms forward aligned with your shoulders. Do four butterfly arm strokes and recoveries with your feet on the bottom of the pool, watching your point of entry in front.
Step 2: Look the splash that results as your hands enter. Notice the direction that the splash goes. This will tell you where your stroke is directed, and if you are swimming with the water or against it. Is the splash from your left arm crashing into the splash from your right arm? If so, you are directing your stroke side-ways, not forward. Is the splash from your hands going straight up? If you are directing your stroke down, not forward.
Step 3: Try it again. Stand in the water and bow forward. Do four complete strokes watching your entry. Aim each stroke forward at the end of recovery. At entry, lay your hands on the water, and slide them through the surface as you extend. Notice that the splash you make is minimal, and it is directed forward. Practice again, moving your arms with the water, not against it. Enter the water cleanly, displacing a minimum of water, and only in the forward direction.
Step 4: Now try it while swimming. Push off the wall for the butterfly. Do four stroke cycles focusing on directing each new stroke forward at entry. At the end of recovery, lay your hands quietly on the surface of the water. Slide them through the surface, fingertips first as you extend. Anchor your hands just below the surface of the water as your feet snap down. Sweep through and bring the momentum of your stroke and second dolphin into the recovery.
Step 5: At the end of recovery, reach forward to a Y, not to the center. Slide your hands into the water without a sound, and extend and take hold of the water right under the surface, not more than a few inches deep. Direct all actions of the stroke to move you forward, quietly using the water, not fighting it.
DRILL FEEDBACK CHART
| Problem | Modification |
| I have to slow my stroke down to enter the water without splashing. | At first you might have to slow down, but as you perfect your forward line you will be able to increase speed. Use the dolphin to provide momentum, then direct that momentum forward. |
| My hands go deep at entry. | Drop your chest down as you stretch your arms forward. Attempt to make no splash as you enter by laying your hands on the surface of the water. |
| My hands aim to the center at entry. | Try straightening your elbows as your reach forward in the recovery. Reach for the Y' with your thumbs. |
CONCLUSION
While there are enough great swimming drills out here to fill several volumes, I hope you have benefited from the 100 presented in this book. It has been my pleasure to witness each drill in this collection having a positive impact on the technique, economy and efficiency of swimmers I have coached. Just as every swimmer is unique, every swimmer has a favorite drill, one that has helped him or her feel and understand swimming better. It is my hope that this book becomes dog-eared and water-logged, as your poolside companion, along with your pull buoy and hand paddles, as you explore these drills, and that through focused practice, you find new favorites that lead you closer to the experience of more efficient swimming.
nique that these butterfliers share is good body position. While the line of the stroke is characterized by a wave or rocking motion, it is a stable, high hip floating position that is key to a good stroke. This position balances the stroke, and integrates the actions of both the upper and lower body. Often, swimmers attempt to achieve the rocking effect of the butterfly by folding both forward and back at the hips. Doing so eliminates core stability, lowers the hips, and eliminates balance in the stroke. It can also lead to back pain. The goal of the following drills for the butterfly body position is to develop a firm core, high hip body position for better balance and integration of butterfly actions.
Taking a Bow
THE PURPOSE OF THIS DRILL
- Learning to stabilize motion using the abdominals
- Isolating upper body motion
- Using abdominal muscles to maintain a straight spine
HOW TO DO THIS DRILL
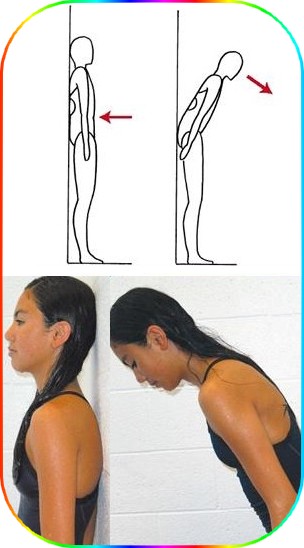
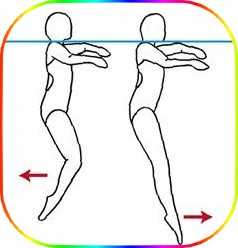
- Step 1 : - Stand with your head, back and legs against a wall, arms at your sides. Notice at the small of your back, you can fit your hand between the wall and your back. To achieve a truly firm core, you must straighten your spine, and eliminate this space at the small of your back. To do so, pull your belly button back toward your spine, and press the small of your back into the wall. Notice that to do this, you contract your abdominal muscles.
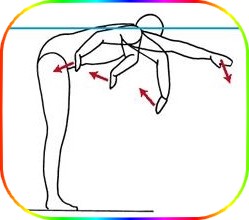
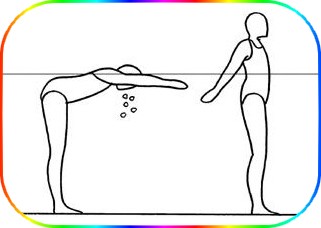
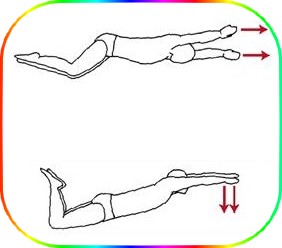
- Step 2 : - Maintaining your spine straight with contracted abdominals, press your chest forward away from the wall about six inches, as if taking a bow. Keep your hips and lower body firmly against the wall, controlling the speed of the movement. Hold this position for five seconds, stabilizing your position with your abdominal muscles.
- Step 3 : - Keeping your core firm, return your back to the wall. Check to see if you have maintained a straight spine by trying to fit your hand between the wall and the small of your back. Repeat the bow, actively using your abdominal muscles to maintain a straight spine, and to stabilize your upper body throughout the bow. Notice that your hips remain stable through the entire range of motion.
- Step 4 : - Now, try the same bowing action without the support of the wall. Maintain a straight spine. Keep your hips stable. Use your abdominal muscles to control the movement of your upper body, while your lower body remains still.
DRILL FEEDBACK CHART
| Problem | Modification |
| It is much harder without the support of the wall. | Yes, harder than it would seem. Start by rocking your pelvis forward a bit. Then, engage your abdominal muscles to stabilize your upper body in both directions during this motion. |
| I can't keep my hips stable without the wall. | Make sure your head is aligned with your straight spine. Also make sure you are not bowing too deeply. Try starting with only a three-inch bow, focusing on moving your upper body only. Contract your abdominal muscles going into the bow to stabilize your movement. |
| I am using my back muscles. | It is tempting to use the muscles of the back. As land animals, we spend most of our time vertical, and we are used to depending on the muscles of the back for stability and balance. In the water, however, we move horizontally, and to achieve the best stabilization and balance, we must use primarily the muscles of the abdomen. |
Weight Shifting
THE PURPOSE OF THIS DRILL
- Feeling both natural and downhill body positions
- Learning to shift weight forward
- Developing effective core tension and stability
HOW TO DO THIS DRILL
- Step 1 : - Lay in the water, arms at your sides. Look at the bottom of the pool. Feel your natural floating position. In butterfly, you have to learn to actively change from your natural float to a downhill position. You must learn to shift your weight forward so your chest is lower than your hips, during every single stroke. To do this, you must maintain a firm core and upper body, from your neck through to your hips.
- Step 2 : - Holding your core firm, press your chest down into the water. Allow your chest to be lower than your hips. Feel your weight shift forward. Now release your chest press and allow your body to return to its natural float.
- Step 3 : - Again press your chest down into the water, so you achieve a downhill float. Maintaining your firm core, release your chest press and return to your natural float. Repeat several times in a row, maintaining a firm core in both directions in a gentle, rhythmic action. Notice that as your press and release your chest, your hips remain stable in the water. This is the essential position of the butterfly. All other actions depend on this high hip floatation that shifts between the natural and downhill upper body positions.
- Step 4 : - Now push off the wall, with your arms extended over your head. Feel your natural float, then, maintaining your firm core, change it, shifting your weight forward by pressing your chest into the water. Release and do it again, maintaining high hips.
- Step 5 : - Repeat the upper body shift of weight several times, from natural to downhill and back again. Feel the gentle wave produced by alternating your floating position. Feel your hips remain stable.
DRILL FEEDBACK CHART
| Problem | Modification |
| I can't breathe. | This drill is not meant to be done for an extended time. Take a big breath before you start, then stand up when you need more air. Start again with a new breath. |
| When I press my chest down, my legs sink. | Hold your core firm. Avoid folding at the hips or waist. Just press your chest down a few inches, just enough so your weight shifts forward. When your chest is the lowest point of your float, then release it. Switch your weight about once every two seconds in a rhythmic motion. |
| This hurts my back. | It is important that you hold your core firm in both directions, or your back will take a lot of stress. Also, when you return to your natural float, don't force it. Simply allow your body to resume its natural position. If it continues to hurt you, just don't do it. |
KICK DRILLS
The butterfly uses the dolphin kick, where the legs move up and down simultaneously resembling the action of a dolphin's tail. In fact it is more than a leg motion. It is an entire body motion. It is more accurately called simply the dolphin. Done right it is one of the most powerful movements in swimming. The dolphin uses a whip-like motion that starts high in the body, and moves down through the trunk, hips and legs, and ends up with the feet snapping down and up again. The dolphin provides rhythm and balance to the other actions of the stroke, but above all it adds power. A good dolphin makes the butterfly much easier, and much more sustainable. The goal of the following kicking drills for butterfly is to develop an effective, rhythmic and effective dolphin action that benefits the rest of the stroke.
Ribbon Writing
THE PURPOSE OF THIS DRILL
- Understanding the fluid nature of the dolphin
- Generating power high in the body
- Learning to transfer power to the feet
HOW TO DO THIS DRILL
- Step 1 : - Cut a piece of wide ribbon to a length of about fifteen inches. Stand in chest deep water, and hold the ribbon in one hand, with that arm outstretched in front of you, under the water. Begin to sweep your arm down about twelve to fifteen inches, and back up, keeping your hand from breaking the surface of the water at its highest point. Sweep your outstretched arm down and up rhythmically at a rate that the ribbon begins to follow the movement of your arm.
- Step 2 : - Notice how the ribbon creates a sort of S shape as it flows through the water. Notice too, that although the arm holding the ribbon is initiating the movement, it is the free end of the ribbon that is moving more quickly. This is the essence of the dolphin action. While the action is initiated high in the body, it is the feet that exhibit the most motion.
- Step 3 : - Continue making an S or wave with the ribbon, sweeping your outstretched arm down and up through the water. Watch the free end of the ribbon react to the motion of your sweeping arm. Now, without slowing the rhythm of your arm movement, bend at the elbow, and attempt to continue the ribbon's movement using just the lower portion of your arm, from your elbow to your hand. Notice that the wave action of the ribbon diminishes significantly. This is what happens when a swimmer over-bends at the knees doing dolphin.
- Step 4 : - Re-establish your full arm motion, and watch the ribbon again flow through a continuous S shape. Without bending radically at the elbow or wrist, try to make your arm move fluidly through the water, as if your arm was part of the ribbon. This is how a good dolphin works, fluidly, gathering the force of the motion started high in the body and transferring it downward to the feet.
DRILL FEEDBACK CHART
| Problem | Modification |
| My ribbon doesn't make a wave. | Try to make the down and up motion with your arm continuous. Don't slow down as you change directions. Use a smooth, sweeping motion, initiated from the shoulder, rather than from the hand. |
| My ribbon makes a Z not an S. | Try to switch directions more smoothly. Fluidly and rhythmically sweep the ribbon back and forth, and avoid any jerking movements. |
| The free end of my ribbon is not a part of the wave. | Sweep your arm a little faster, and use more depth. Let your arm be long and relaxed until the entire length of the ribbon flows through the wave. |
Deep to Shallow Dolphin
THE PURPOSE OF THIS DRILL
- Practicing full-body dolphin
- Experiencing the forward line of the dolphin
- Achieving a compact dolphin wave
HOW TO DO THIS DRILL
Step 1: At a depth of about six feet, lay face down in the water, arms at your sides. With a firm core and straight spine, bow forward, maintaining a stable hip position. Feel your head lead your body downward toward the bottom of the pool. Allow your legs and feet to follow. Watch your descent carefully, and before reaching the bottom of the pool, come out of your bow by raising your upper body, allowing your legs and feet to follow the same path. As your head rises, your feet should snap downward. At the top of your ascent, your face will clear the water, and you can grab a new breath. Then bow forward again. Repeat this extreme dolphin action several times, following a forward path that is at least four feet of deep.
Step 2: Now move to shallower water, perhaps three feet deep. Lay face down in the water, arms at your sides. With your spine straight and core firm, bow forward, maintaining a high hip position. Feel your body descend downward. Feel your legs and feet follow the same line of descent. Raise your upper body out of your bow before reaching the bottom of the pool. Your legs and feet should follow the same path. As your head rises, feel your feet snap downward. Breathe, then bow forward again, repeating the wave-like dolphin action that passes through a depth of only one and a half feet.
Step 3: Now you have to pretend that you are in water that is only one foot deep. Lay face down in the water, arms at your sides with a straight spine and firm core. Bow forward, maintaining your high hip position. Allow your upper body to descend. Feel your hips, legs and feet react. Quickly, before reaching the bottom of the one-foot deep water, raise your upper body out of the bow. Feel your legs and feet follow quickly. As you head rises, feel your feet snap quickly downward. Breathe then bow forward again, repeating a very compact, yet effective forward wave-like dolphin action that is only a few inches deep.
DRILL FEEDBACK CHART
| Problem | Modification |
| After I breathe, I can't achieve another dolphin. | Be sure you are maintaining a straight spine through your neck, and that you are not raising your chin to breathe. Without this firm spine line, you head will be leading you in a different direction than your body is trying to go. |
| I am not moving forward. | Make sure you are not simply folding in half at the waist, but simply bowing your upper body forward. If you allow your legs to sink as your chest is descending, your forward motion will be reduced. Your legs must follow the same line that your upper body has travelled. |
| I can only make a slight wave in the shallowest water. | Yes, but it is there. Practice condensing all of the power of the dolphin into those few inches of depth. An effective dolphin that is compact uses a shorter path to the other end of the pool. |
Dolphin Dives
THE PURPOSE OF THIS DRILL
- Understanding the full-body action of the dolphin
- Experiencing the line of the dolphin
- Feeling the transfer of power to the feet
HOW TO DO THIS DRILL
- Step 1 : - Stand in water about hip deep, arms firmly at your sides. Using the muscles of your core, achieve a straight spine from your hips through your neck. Keeping your hips firm, bow forward about twelve inches. At the same time, bend your knees slightly, preparing to jump off the bottom of the pool.
- Step 2 : - Maintaining your bowed position, jump off the bottom with force. As your body rises into the air, bow forward more. Notice that by doing so, the upward force of your jump changes to follow your head forward.
- Step 3 : - At the highest point in your jump, bow forward even more. As you begin to descend, notice that instead of landing back on your feet, you are going to re-enter the water head first. By shifting the position of your upper body, you have changed the line of your jump from a simple up and down path, that landed in the same place it started, to a line that travels forward. By bowing forward, you go up out of the water, forward over the water, and then down into the water. At the point your head enters the water, your hips should actually be higher than your head.
- Step 4 : - You should be aiming head first toward the bottom of the pool, with quite a bit of speed. Your upper body, hips, legs and feet should be following the same line. KEEP YOUR EYES OPEN, and well before you reach the bottom of the pool, raise your upper body out of your bow, again changing the line of your jump.
- Step 5 : - As the upper body rises toward the surface, feel your hips, legs and feet react to the change of di- rection. As your face approaches the surface of water, feel your feet snap down into the water. Your whole body has just travelled through an exaggerated dolphin move- ment. Draw your legs up under you as you resume a standing position.
- Step 6 : - Try it several times. Maintaining a straight spine, actively bow forward and jump up with force. Feel your head and upper body lead you through the wave of the dolphin as you bow forward more. Feel your body travel up, over, then down into the water, head first. Then as you come out of your bow, feel your feet snap down. Stand. Practice several times, until you can do several dolphin dives smoothly in a row without pausing between them.
DRILL FEEDBACK CHART
| Problem | Modification |
| I am landing on my belly. | Jump up with more force, and bow forward more as you feel the upward force of your jump. Bow even more at your highest point so you are aiming more downward than forward as you descend from your jump. |
| I am not aiming toward the bottom of the pool. | Remember, your body will follow your head. Make sure your spine is straight and firm from your hips through your neck. If you raise your chin, bending at the neck, and breaking your straight spine line, the downward line your upper body is travelling at this point will be compromised. If your head is raised, your body won't aim toward the bottom of the pool. |
| My feet don't snap down before I stand. | Maintain your firm core. Allow your legs and feet to travel the same line that your upper body has travelled. They will still be moving downward for a moment when your upper body has shifted legs of the bochange out w. It is when your hips and finally change directions, and begin their path upward that your feet will snap downward. Draw your legs under you only after that point. |
Vertical Dolphin
THE PURPOSE OF THIS DRILL
- Developing a productive dolphin
- Practicing a continuous kick
- Using a fluid, full-body dolphin
HOW TO DO THIS DRILL
- Step 1 : - In water, at least as deep as you are tall, get into a vertical position. Engage your core. With your hands extended out from your sides, begin a gentle sculling action, tracing side-to-side underwater figure eights with your hands, to keep your head above water.
- Step 2 : - Holding your legs together, but relaxed, begin a gentle dolphin action by bowing down and up, allowing your legs and feet to sweep forward and back in reaction. With your ankles relaxed, allow your feet to snap forward as you come out of your bow. Begin another bow immediately, and repeat this motion several times in a row creating a rhythmic wave. Your feet should be sweeping across about fifteen inches of water.
- Step 3 : - As your extended legs move simultaneously in a sweeping motion forward and back in the water, think about the movement of a dolphin's tail. Where does it begin? In fact, the dolphin uses the entire length of its body to produce motion. Pretend you have the tail of a dolphin, that your trunk and legs are part of the movement. You have no waist or hips, and no knees to bend. Your movement is fluid and your entire body works to sweep the water in a wave-like movement. Continue your dolphin until it seems there is no beginning or end to the motion.
- Step 4 : - Once you have achieved a fluid dolphin action, stop the sculling action with your hands. Position your hands: left hand on right shoulder and right hand on left shoulder. Continue your vertical dol- phin keeping your head above water. Maintain for 30 seconds. Rest, and then practice again.
DRILL FEEDBACK CHART
| Problem | Modification |
| I am sinking. | Make sure you are sweeping the water back and forth and not trying to kick down and up, bending a lot at the hips and knees. |
| I feel it in my stomach. | Good! This shows you are using more than your legs for your dolphin action. |
| I get tired too quickly to notice a floppy kicking motion. | Maintain a firm core, and allow your lower body to follow the movement of your upper body. Remember that the best dolphin is compact; so try to produce an effective wave in a small amount of space. |
Back Dolphin
THE PURPOSE OF THIS DRILL
- Using the abdominal muscles for dolphin
- Gathering power for lower body movement
- Avoiding over bending at the knees
HOW TO DO THIS DRILL
- Step 1 : - Push off the wall on your back, arms at your sides. Begin a gentle dolphin action, high in your body and allow it to gather force as it travels down to your feet.
- Step 2 : - Try to kick the water upward enough to make a small boiling effect over your feet. Drop your legs down, then kick up again. Create a rhythmic up and down motion with your legs that extends about 15 inches deep. Use the entire length of your legs and your trunk for dolphin on your back.
- Step 3 : - Your head should be almost still as your core and legs move. Try to keep your head from bouncing so your face submerges. Also, watch your knees to make sure they are not coming out of the water too much, or they will produce a wave of water over your face. Sweep the water upward and downward, rather than closer to you and then father away. Practice several times.
- Step 4 : - Once you have achieved a fluid dolphin action on your back, and forward motion, try it with your arms extended over your head. Produce a smooth, rhythmic dolphin action that starts high in your body and gathers force down to your feet. Feel how your abdominal muscles are engaged. Sweep the water up and down, producing forward motion, while your face stays above water. Practice several times.
DRILL FEEDBACK CHART
| Problem | Modification |
| I can't keep my face above water. | Avoid moving your upper body back beyond your natural floating position. Doing so will prevent the power of the dolphin from flowing down to your feet. |
| I am not moving. | Keep practicing. You don't have to do a large kick to move. Try a dolphin only a few inches deep at first. Kick upward with more force. |
| I am feeling it in my calves. | This indicates that you are using only your lower legs, from your knees down, to kick. Try initiating the action from your core. You should be feeling it in your abdominal muscles. |
ARM STROKE DRILLS
The path of the butterfly underwater arm stroke is similar to the freestyle arm stroke, only it is done with both arms simultaneously. It is an extremely powerful arm stroke, and for a short distance can rival the freestyle in speed. However, because it is just not as sustainable as the freestyle, it is even more important to practice the most economic butterfly arm stroke possible, so that butterfly can be done well for longer. The goal of the following arm stroke drills for butterfly is to develop a productive arm stroke that maximizes power and minimizes effort.
Pitch to Press
THE PURPOSE OF THIS DRILL
- Feeling the path of the butterfly arm stroke
- Learning to press back, and not down
- Using correct hand pitch to maintain pressure on the water
HOW TO DO THIS DRILL
- Step 1 : - Stand in waist deep water. Keeping your feet firmly on the bottom of the pool, bow forward so your face is in the water. Look at the bottom of the pool. Extend your arms forward on the surface of the water slightly wider than your shoulders. With your palms down, position your thumbs slightly lower than your pinkies.
- Step 2 : - Stretch your arms forward, so that your elbows are locked. This should extend your reach, and position your hands slightly farther apart. As your hands achieve their longest reach, bend at the wrists slightly so your palms and fingertips are lower than your wrists and pitched outward. Sweep your palms around so you are pressing back on the water, not pushing down. Allow your forearms to follow your hands, but keep your elbows high and firm. Watch your hands as they pass your face, pressing back and sweeping slightly inward, so they are closer together than their starting point.
- Step 3 : - As your hands continue pressing back and pass your shoulders, they should also sweep by your elbows. Adjust the position of your hands so they maintain firm pressure on the water. As your hands pass under your belly they should be at their closest point together, closer together than your elbows. Again adjust the pitch of your hands so they can continue pressing back. The arm stroke finishes with the hands pressing back quickly, until the arms are straight and outside each hip.
- Step 4 : - Take a breath and return your hands and head to the starting position, slightly wider than your shoulders. Repeat the arm stroke, stretching forward until your elbows lock, then sweeping your palms around and positioning them to press back on the water, with your elbows high. As your hands press back towards your belly and get closer together, change your hand pitch again to sweep quickly back, until your arms are straight and out from your hips.
- Step 5 : - Continue performing the butterfly arm stroke several times. Constantly reposition your hands so they press back on the water and not down. Practice until you can perform several quick arm strokes in a row, producing enough pressure back on the water so it is difficult to maintain your footing on the bottom of the pool.
DRILL FEEDBACK CHART
| Problem | Modification |
| My hand press down then up. | Change the pitch of your hands to press back on the water from the beginning through to the end of the stroke in order to move forward. Otherwise your efforts will be used to move up and down. |
| My hands are almost touching at their closest point. | Correctly positioned, your thumbs might be fairly close, but the fingertips of each hand should be pointing at the bottom of the the pool. Make sure that your elbows are not leading your stroke. They should stay high and firm throughout the stroke. |
| It feels like a large sculling action. | Exactly! You change the pitch of your hand to maintain pressure on the water. Press out with your thumbs down, and in with your thumbs up. |
Sweeping Question Marks
THE PURPOSE OF THIS DRILL
- Feeling the path of the butterfly arm stroke
- Sweeping wide to narrow
- Sweeping deep to shallow
HOW TO DO THIS DRILL
- Step 1 : - Push off the wall face down in the water, arms extended in front of your shoulders. Achieve a downhill, and high hip float. Look at the bottom of the pool. While still gliding forward, perform a single butterfly stroke with both arms simultaneously moving in a wide to narrow line. Stretch forward, sweep out and around, then inward toward your belly. Finish by pressing back quickly past your waist. Notice that the lines you have traced with your arm stroke resemble two question marks, one the mirror image of the other floating flat on the surface of the water. Stand and breathe.
- Step 2 : - Return to the wall, and push off for the butterfly again. Float downhill with high hips. Look at the bottom of the pool. Using the momentum of your push off, again do one butterfly stroke tracing a deep to shallow line. Stretch forward, sweep down and around, then upward under your belly. Finish by pressing back quickly past your waist. Notice that the lines you have traced with your arm stroke resemble two question marks, one the mirror image of the other floating perpendicular to the surface of the water. Stand and breathe.
- Step 3 : - Return to the wall, and push off for the butterfly once again. Look at the bottom of the pool and achieve a high hip downhill floating position. With the forward motion of your glide, do a butter- fly stroke tracing a wide to narrow, and deep to shallow path at the same time. Stretch forward, sweep out and down, around, then inward and upward under your belly. Finish by pressing back quickly past your waist. Notice that the lines you have traced with your arm stroke resemble question marks floating diagonally in the water, one the mirror image of the other.
- Step 4 : - Stand and breathe. Continue to practice the path of the butterfly arm stroke tracing deep to shallow and wide to narrow question marks at the same time.
DRILL FEEDBACK CHART
| Problem | Modification |
| My arm stroke goes straight back, not like question marks. | You will be able to achieve a longer, more productive stroke if you use the sweeping question mark arm stroke. You will be able to use fewer strokes, and therefore less energy to cross the pool. |
| My arms are shallow the whole way. | Make sure you are holding your elbows firm to start the stroke. Move your hands first, and allow them to pass under your elbows to achieve depth. |
| My arms are deep the whole way. | To be strongest in the middle of the arm stroke, allow your hands to sweep closer under your belly. |
One-arm Butterfly
THE PURPOSE OF THIS DRILL
- Feeling the rhythm of the butterfly arm stroke
- Practicing the path of the arm stroke
- Pressing back on the water
HOW TO DO THIS DRILL
Step 1: Push off the wall face down in the water, arms extended in front of your shoulders. Achieve a downhill, high hip float. With your right hand remaining in the extended position, perform a single butterfly stroke with your left arm. Stretch forward, sweep out and around, then inward under your belly. Finish by pressing back quickly past your waist. Breathe toward the moving arm, and do an over-the-water, freestyle-like recovery.
Step 2: Do another stroke with the same arm, accompanied by a light dolphin action. When your hand stretches forward, your chest should be low in the water. Your feet should snap down as you first press on the water. Then, when your hand presses back to the finish, your chest should be high, as your feet should snap down again. Remem- ber that the dolphin action should be generated high in the body, without exces- sive knee bend. Repeat the one arm butterfly several times, tracing the wide to narrow, and, deep to shallow line of the stroke. Maintain pressure back on the water, and use two dolphins with each arm stroke. The first dolphin propels you into the beginning of the arm stroke. The second dolphin assists the fast finish of the arm stroke.
Step 3: Continue practicing your one-arm butterfly arm stroke, accompanied by a rhythmic light dolphin action. Focus on accelerating your stroke to the rear. Maintain a hand pitch that you can constantly press back on the water, not down or up. From front to back, stretch forward, sweep out and around, inward under your belly, wide to narrow, and, deep to shallow. Finish by pressing back quickly. Breathe. Recover. Repeat to the far end of the pool.
Step 4: After resting, push off the wall and leave your left arm extended. Perform the one-arm butterfly with your right arm. Match your light dolphin to accompany the start and the finish of the stroke. Accelerate the stroke toward the rear. Continue to the far end of the pool.
Step 5: Practice the one-arm butterfly for several lengths of the pool. Keep your hips high and time the kick to match the beginning and end of your arm stroke. Feel your dolphin move through your body and assist you in catching water at the beginning of the stroke. Feel your dolphin assist you again to finish the stroke with speed.
DRILL FEEDBACK CHART
| Problem | Modification |
| I am leaning to one side a bit. | That is okay. The more forward momentum you produce, the less noticeable this will be. Focus on accelerating your arm to the back of the stroke, and maintaining pressure back on the water the whole time. |
| My hands are aimed inward at the start of the stroke. | Starting in the correct position is important in order to begin the stroke from a position of power. Your hands should enter at shoulder width apart or even wider, but not closer. Your fingertips should be pointing forward, and a bit outward. In this position, be sure to lock your elbows and stretch forward to the far end of the pool. |
| I am not accelerating at the end of the stroke. | Make sure you are starting the stroke by moving your hands, not your elbows. If your elbows move first, you will not be in position to accelerate your hands to the end of the stroke. |
Left Arm, Right Arm, Both Arms
THE PURPOSE OF THIS DRILL
- Feeling the line of the stroke
- Practicing accelerating to the back of the stroke
- Experiencing butterfly rhythm
HOW TO DO THIS DRILL
- Step 1 : - Push off the wall face down in the water, arms extended in front of your shoulders. Achieve a downhill float. Maintain high hips. With your right hand remaining in the extended position, perform a single butterfly stroke with your left arm, accompanied by a rhythmic light dolphin action. Focus on accelerating your stroke to the rear. Breathe toward the moving arm, and recover, like freestyle, over the water.
- Step 2 : - As your left arm reaches the front and engages the water, your feet should snap down. As they do, begin stroking with your right arm, leaving your left arm extended in front of you. Accelerate to the back again. Allow your feet to snap down again as you finish the stroke. Recover.
- Step 3 : - Now, with both arms extended in front, perform a butterfly arm stroke with both arms. Bow forward and stretch your elbows to the locked position as your feet snap down. Press out and sweep around, positioning your hands to press back. Accelerate your arm stroke as your hands move past your belly, closer together than your elbows. Finish by pressing quickly back toward your hips as your feet snap down again. Return your arms over the surface of the water to the starting position in front.
- Step 4 : - Repeat the sequence. Left arm, right arm, both arms, maintaining a light rhythmic dolphin that matches the beginning and the end of the stroke. Maintain pressure back on the water, and an accelerating stroke. Continue to the far end of the pool. Rest, then practice again until you are moving comfortably and rhythmically through the water.
DRILL FEEDBACK CHART
| Problem | Modification |
| My arms sink down in front. | Remember to stretch your arm forward when you enter. Reach toward the far end of the pool, then sweep around and press back on the water, not down. |
| I don't know when to breathe on the stroke with both arms. | For this drill, don't breathe on the double arm stroke. Focus on the path of the stroke, maintaining constant pressure back on the water, and accelerating your stroke toward your hips. You can breathe on the one-arm strokes. |
| My arms get stuck at the rear on the two-arm stroke. | Make sure your hands are the first part of your arm to move. Hold your elbows firm. If your elbows move first, your hands won't clear the water at the rear. |
The Round Off
THE PURPOSE OF THIS DRILL
- Pressing outward the end of the stroke
- Practicing a quick finish of the stroke
- Learning to release the water in back
HOW TO DO THIS DRILL
- Step 1 : - Push off the wall face down in the water, arms extended in front of your shoulders. Achieve a downhill float. Do several dolphins in a row, beginning each high in your body and snapping downward to your feet. On the sixth dolphin, start your arm stroke, bowing forward as your reach, then sweeping around and back, closer under your belly.
- Step 2 : - As your hands accelerate toward the end of your stroke, pitch your palms slightly outward. Press back and outward from your body in a fast finish as your feet snap down again. Your hands should clear the water between your waist and your hips, several inches away from your body. Return them to the front, extended and slightly wider than your shoulders.
- Step 3 : - Do another arm stroke, tracing question marks. As your hands approach their closest point under your belly, press them back with speed, and outward like a J. Your hands should release the water and rise easily up through the surface with your pinkies up.
- Step 4 : - Return them to the front, again. Stretch forward and engage your palms. Sweep around and press back against the water. Feel your hands get closer together under your belly, then accelerate into your fast finish, rounding off at the rear of the stroke in a J shape out from your body. Feel your hands rise easily up through the surface of the water with no resistance. Use their momentum to return to the front. Repeat several times, accelerating to the rounded off finish of your stroke.
DRILL FEEDBACK CHART
| Problem | Modification |
| My arm stroke makes more forward motion when I push straight back. | With the round off, your hands are actually travelling the same distance, but not so far back along your body. When the arm stroke goes straight back, the path back to the front takes longer, so the kicks have to be spaced farther apart in order to occur at the most beneficial points in the stroke. This can produce dead space or loss of momentum. |
| My hands come out of the water, palms up. | Make sure you are not lifting the water up at the end of the J. Position your hands so you are pushing it back and outward. Your pinkie should leave the water first. |
| This makes my stroke short. | Again, the distance of the actual stroke path is the same, it just curves outward more. Your stroke turn-over will be quicker, because the recovery path is shorter. This allows you to spend more time with your hands pressing against the water, and less time with them in the air. |
RECOVERY DRILLS
The butterfly uses a simultaneous arm recovery over the surface of the water. It is this characteristic spread wing position that makes the butterfly such a favorite photo opportunity. It is important to use a relaxed recovery, however, variations in flexibility make each swimmer's butterfly recovery slightly unique. In general, the recovery is close to the water, as the arms swing around wide from back to front. When the arms pass the shoulders, they realign to aim forward. The goal of the following recovery drills for the butterfly is to achieve a relaxed, direct, and well-aligned recovery for a better butterfly.
Pinkies-up
THE PURPOSE OF THIS DRILL
- Learning to maintain a pinkie up position
- Feeling a relaxed recovery
- Creating an arch with your arms over the water
HOW TO DO THIS DRILL
- Step 1 : - Standing in front of a mirror, bow forward so your upper body is horizontal. Beginning with your arms extended in front of you, do a butterfly arm stroke in the air, stretching forward then sweeping around, close through the middle, then quickly back and outward in a J. Freeze after the J. Notice that your pinkies are the high point of your hands.
- Step 2 : - Maintaining your pinkie-up hand position, sweep your hand around and forward through recovery, toward the starting position. Your arms and hands should be relaxed. Notice the arch that your two arms make, with your head in the middle. Notice too that as you sweep to the widest wing span, in order to maintain a pinkie-up position, you have to lower your chest into the water.
- Step 3 : - As your hands pass your shoulders, reach forward with your arms, still maintaining your pinkie-up position. Stretch forward, as if preparing to enter the water. Repeat the complete path of the butterfly arms several times looking in the mirror. Watch your hands maintain a pinkie-up posi- tion throughout their reco- very. Feel your arms and hands relax as they swing around and forward.
- Step 4 : - Now try it in the water. Push off the wall face down in the water, arms extended in front of your shoulders. After several dolphins, start your arm stroke, reaching forward, then sweeping around and back, closer under your belly. Accelerate toward the end of your stroke, pitching your palms outward and back to finish in a quick J as your feet snap down again. Your hands should clear the water, pinkies-up, several inches away from the sides of your body. Return them to the front in a relaxed wide arm swing, maintaining your pinkie-up position throughout the recovery. Extend your arms forward as your hands pass your shoulders, and enter the water slightly wider than your shoulders.
- Step 5 : - Do another stroke, tracing a wide to narrow, and deep to shallow line, and accelerating to the rear. Round off the finish in a J , then slide your hands out of the water pinkies first. Recover pinkies-up, creating a relaxed arch over the water. Practice several times until you achieve a relaxed recovery with your pinkies-up the whole way.
DRILL FEEDBACK CHART
| Problem | Modification |
| My elbows drag through the water during recovery. | This probably means your hands are recovering thumbs-up. In this position, your elbows are low and can drag through the water. Practice again, actively rotating your hands to the pinkie-up position and hold it throughout the recovery. |
| My hands start pinkie-up, but then turn over. | This means you are not relaxing during recovery, but instead pulling your hands forward. Try rotating your whole arm and shoulder forward to maintain the pinkie-up position. Try to initiate the recovery from higher in the arm. |
| My hands bump into each other in front. | As your hands pass your shoulders in the recovery, redirect your arms to reach forward rather than continuing the circular swing. It is important to align your stroke forward at the end of the recovery, and enter the water with your hands about shoulder width apart to avoid starting your next stroke from a position of weakness. |
The Flop
THE PURPOSE OF THIS DRILL
- Using your chest and shoulders to recover
- Finishing the recovery in a downhill position
- Feeling a relaxed recovery
HOW TO DO THIS DRILL
- Step 1 : - Push off the wall face for the butterfly. After several dolphins, start your arm stroke. Sweep your arms wide to narrow and deep to shallow, accelerating to the rear. Round off the end of the stroke and slide your hands out of the water pinkies first. Recover with a relaxed wide arm swing, maintaining your pinkie-up position. As your arms reach their widest position, your shoulders and head should be at the top of the arch of your recovery. Feel the swing of the recovery come from the shoulders and chest, rather than from the hands.
- Step 2 : - When your hands pass your shoulders, roll your shoulders forward. Then as your arms realign to reach forward at the end of the recovery, drop your chest downward into the water. Do it again. Stroke and exit the water at the rear pinkies-up. Initiate your recovery from the shoulders and chest, maintaining a pinkie-up position. As your hands pass your shoulders, roll your shoulders forward. Drop your chest down into the water as your arms reach forward. It should feel like your arms are flopping forward effortlessly.
- Step 3 : - Do several more strokes, focusing on your relaxed, pinkie-up recovery, powered from the chest and shoulders. At the mid- point in recovery, roll your shoulders forward, and drop your chest down as you realign your arms forward with each recovery. Notice that doing so adds speed to the end of your recovery. Notice too that as your shoulder and chest action flops your arms auto- matically into their forward entry position, your body achieves a downhill floating position.
- Step 4 : - Practice more, focusing on achieving a relaxed recovery from start to finish. Maintain a pinkie-up position each time. Flop your arms into their entry position using your shoulders and chest. Feel your body achieve a downhill position. Feel your arms landing in their forward entry position relaxed and aimed forward after each recovery.
DRILL FEEDBACK CHART
| Problem | Modification |
| I do not end up in the downhill position. | Make sure that you are maintaining a straight spine from hips through to your neck. You should be looking at the bottom of the pool and not forward. Your hips should be high and stable as you flop forward. |
| My arms enter the water closer than my shoulders. | Realign your arms forward earlier in the recovery. Make sure your are reaching forward with your elbows straight, so your whole arm is aligned in the direction you are trying to go. |
| When I enter the water, my chest is the lowest part of my body. | Good. This means you will start your next stroke from a position of power. |
Reaching to a Y
THE PURPOSE OF THIS DRILL
- Finishing recovery with your fingertips wider than your shoulders
- Aligning from the thumbs
- Positioning the hands to hold more water
HOW TO DO THIS DRILL
- Step 1 : - Push off the wall preparing to do the butterfly, straight spine, high hips, arms extended. Establish your rhythm with several dolphins, then start your arm stroke, tracing question marks as you accelerate to the back. Round off your finish and recover pinkies-up. When your hands pass your shoulders, realign your arms to reach forward.
- Step 2 : - At the end of the recovery, to prepare for the next stroke, drop your chest down, extend your arms forward, and push your elbows out straight. Point your thumbs to the far end of the pool. Notice that by doing so, your fingertips pitch outward. Do it again, actively aligning your recovery forward with your thumbs to finish your recovery. Feel your fingertips enter the water wider than your shoulders as you achieve the downhill position.
- Step 3 : - Do several more strokes, making a wide relaxed recovery, then redirect your arms to reach forward as your hands pass your shoulders. Drop your chest, press your elbows out straight, and align your reach to the far end of the pool with your thumbs. Fully extended, you should feel as if your arms form a Y on the surface of the water.
- Step 4 : - Practice more, finishing each recovery by aligning your thumbs forward and achieving a Y entry position. Notice that by simply pointing with your thumbs, your arms enter aligned outside your shoulders. Notice too that from the Y position, you are able to take hold of the water better with your hands as you begin each new stroke.
DRILL FEEDBACK CHART
| Problem | Modification |
| It feels too wide. | It is actually just your hands that are positioned wider than usual. Your arms are still aligned with your shoulders. This wide hand position enables you to catch and hold more water at the beginning of the stroke. |
| Entering this way my stroke misses the top part of the question mark. | There is very little forward motion produced by pressing outward. Entering in a Y, positions your hands to immediately start a productive sweep around and back. |
| My fingertips are not wider than my shoulders. | Remember to push your elbows out straight. It is important to create a forward line from your shoulders, through your elbow, and all the way to your thumbs. If your elbows are not straight, the forward line of your stroke will be compromised. |
BREATHING DRILLS
Breathing in the butterfly happens within the line of the stroke, so that the swimmer inhales when the upper body is naturally at its highest point, and finishes when the upper body regains its downhill position. Timed correctly, no independent head action is required to achieve a breath. The most economic breathing style is low on the water, facing forward. Regular, rhythmic breathing is important to achieving a sustainable stroke, but successful butterfliers use a variety of breathing patterns, from breathing every stroke, to breathing every third stroke. The goal of the following breathing drills for butterfly is to practice the correct timing of the breathing so it happens with the natural rhythm of the stroke.
Breathing Timing Drill
THE PURPOSE OF THIS DRILL
- Learning the timing of the butterfly breathing
- Achieving the inhale at the high point of the stroke
- Feeling the face return to the water before the hands
HOW TO DO THIS DRILL
- Step 1 : - Stand in waist deep water. Keeping your feet firmly on the bottom of the pool, bow forward so your face is in the water. Look at the bottom of the pool. Extend your arms forward on the surface of the water, aligning your elbows and thumbs forward. Begin tracing the question mark line of your arm stroke. As your hands press back and accelerate to the end of the stroke, stand upright.
- Step 2 : - Inhale as you achieve your full standing position, while your hands press quickly back and round off the finish of the stroke. As your hands leave the water, pinkies-up and move into the arch of the recovery, again bow forward so your body joins the forward line of the arms as they go over the water. Your face should submerge just before your hands enter the water in front.
- Step 3 : - Begin another stroke, and stand as your hands transition to the fast finish. Inhale. Bow forward again as your arms recover, allowing your face to reach the water before your hands. Do several strokes, standing to inhale at the end of each one. As you move into the recovery and bow forward, notice that your head and arms move in unison towards the front. Your head should beat your arms to the water because it has a shorter distance to travel.
- Step 4 : - Now try several strokes in a row. Bow forward to begin each stroke with your face in the water. Stand and inhale as your hands approach the back of the stroke. Bow forward again as your arms recover, so your face reaches the water an instant before your hands.
- Step 5 : - Continue to practice, focusing on inhaling at the high point of your stroke. Allow your body position to determine when your breath begins and ends.
DRILL FEEDBACK CHART
| Problem | Modification |
| My hands and face hit the water at the same time. | Try to get your face back to the water before your hands. Although they should be travelling in unison, your arms have a longer path to travel, so your face should reach the water first. |
| It seems like I am pressing down on the water, not back. | In this drill, since you are vertical, you will initially be pressing down. Try to pay attention to the timing of the breathing rather than the path of the stroke in this drill. |
| When my face hits the water, my hands are already stroking. | You might be breathing too late. Time the inhale to end as the arms are reaching forward toward the Y. |
Flying Dolphin Dives
THE PURPOSE OF THIS DRILL
- Learning the timing of the butterfly breathing
- Breathing within the line of the stroke
- Feeling the wave of the stroke
HOW TO DO THIS DRILL
- Step 1 : - Stand in water that is hip deep, arms extended back and outside the hips, pinkies-up. Achieve a straight spine from your hips through your neck. Keeping your hips firm, bow forward about twelve inches while bending your knees slightly, preparing to jump off the bottom of the pool.
- Step 2 : - Jump off the bottom with force. As your body rises into the air, bow forward more, and swing your arms around and forward like a butterfly recovery. Your arms should be finishing their recovery as your body begins to descend. As your face enters the water, your hips should actually be higher than your head, and your arms should be extended, and in the water, aiming downward toward the bottom of the pool.
- Step 3 : - As your arms descend, your upper body, legs and feet should be following the same line, travelling up, over, then down into the water. Before you reach the bottom of the pool, sweep through the butterfly arm stroke, and raise your upper body out of your bow. Feel your legs and feet react to the change of direction. As your face rises to the surface of water, feel your feet snap down into the water, as your hands reach the end of the stroke. Draw your legs up under you as you resume the standing position. Inhale.
- Step 4 : - From the starting position, standing with your arms extended back and out from your body, begin another dolphin dive. Jump up and swing your arms into the re- covery as you bow forward. Continue to bow forward so that by the high point of your jump, your hips are higher than your head, and your arms are pointing down toward the water. As you descend into the water, trace the butterfly arm stroke as you come out of your bow. Finish your stroke as your face rises out of the water and your feet snap down. Inhale and resume your starting position.
- Step 5 : - Perform several flying dolphin dives in a row, using the high point of each to inhale. Travel up, over, then down into the water with each one, maintaining a fluid rhythm from one to the next.
DRILL FEEDBACK CHART
| Problem | Modification |
| I am landing flat on the water. | Bow forward more to start. Then bow forward even more as you jump up and swing of your arms of y around forward. Your legs shoud stil be risisng when your arms have finished their recovery, and are pointing with your head down toward the water. |
| My face doesn't clear the water until I stand. | As your arms finish the stroke and you come out of your bow, allow your legs to follow the same wave until wour feet snap down. That will naturally lift your face to the surface before you stand up completely. |
| My face comes out of the water before my feet snap down. | This could means that you are raising your chin to breathe, rather than breathing within the wave of the dolphin dive. Hold your head position firm throughout the whole drill. Achieve your breathe at the high point of the dolphin dive, without changing your head position. |
Eyes on the Water Butterfly
THE PURPOSE OF THIS DRILL
- Learning to maintain a stable head position
- Practicing looking down at the water while breathing
- Using the natural wave to the stroke to breathe
HOW TO DO THIS DRILL
- Step 1 : - Push off the wall preparing to do the butterfly, straight spine, arms extended in front of you, looking down at the bottom of the pool. Do several dolphins to establish your rhythm, then start your arm stroke. Sweep around and accelerate to the rear. Finish fast and feel your upper body rise. Breathe and begin the recovery. When your hands pass your shoulders and your chest drops down, allow your head to return to the water as you realign your arms to reach forward in a Y.
- Step 2 : - Continue into a second stroke. Look at the bottom of the pool. Maintain a firm spine, from your hips through to your neck. As your arms begin to sweep through the stroke, feel your upper body start to rise. As your arms accelerate to the finish, your feet should snap down again, propelling your face to the surface of the water. Inhale without changing your head position.
- Step 3 : - Continue into the recovery. Your head should be moving in unison with your arms, continuing the forward line of the stroke. When your arms pass your shoulders, your face should enter the water as your chest drops down and flops your arms forward. Your arms enter the water a moment after your head, as you achieve the downhill position.
- Step 4 : - Continue into a third stroke. Stroke through to the rear, accelerating as you press against the water. As you finish the stroke quickly, allow your feet to snap down. Feel your upper body rise, and your face pop to the surface. Inhale looking down at the water directly in front of you. If you have maintained a stable head position, you should not be able to see the far end of the pool. Recover and feel your face submerge as your feet snap down again and you move into the downhill position.
- Step 5 : - Perform a fourth stroke, accelerating through and allowing your feet to snap down as your finish your stroke. Feel your upper body rise. Inhale at your highest point, maintaining your head position. At the highest point, your chin should be just above the surface of the water, and you should be looking down at the water right in front of you. As you proceed into the recovery, drop your chest and face into the water. Notice that without changing your head position, you are again looking at the bottom of the pool.
- Step 6 : - Practice more, achieving each breath within the line of your stroke. Maintain a stable head position throughout the stroke, so you are looking down at the bottom of the pool when your face is in the water, and down at the water in front of you when you are inhaling.
DRILL FEEDBACK CHART
| Problem | Modification |
| My face doesn't pop out of the water. | Make sure you are finishing the stroke quickly, and that your feet are snapping down at the same time, giving you the lift you need to breathe. Also, make sure that your dolphin begins high in your body, and that you are not snapping your feet down as an independent action by over-bending at the knee. |
| I see the other end of the pool when I am inhaling. | This means you are raising your chin to breathe. Doing so compromises the straight spine line of the stroke. Instead, keep your chin down, so you will maintain a stronger position to start the next stroke. |
| My chin is much higher than the surface of the water when I am inhaling. | You might be pressing down on the water to achieve lift. Although you will be able to get your breath this way, it is very difficult to sustain high breathing, as you are spending a great deal of energy going up rather than forward. |
Hammer and Nail
THE PURPOSE OF THIS DRILL
- Learning to breathe from the core
- Shifting to a downhill position after breathing
- Maintaining a stable head position
HOW TO DO THIS DRILL
- Step 1 : - Push off the wall for the butterfly. Dolphin several times to establish rhythm, then start your arm stroke. Sweep through and accelerate to the rear. Finish fast as your feet snap down and feel your upper body rise. Inhale at the high point, looking down at the water. Recover, rolling your shoulders forward and dropping your chest down as your arms reach for the front. Feel your face return to the water and achieve the downhill position. Focus on what part of your face hits the water first.
- Step 2 : - Do another stroke. After the inhale, as your arms and head move back to the starting position, freeze as your face hits the water. It should hit the water forehead first, rather than chin first. It should feel like your forehead hits like a hammer and the water is a nail.
- Step 4 : - Do another stroke. As you accelerate to the rear and your upper body rises for the breath, focus on the arch of arms as they pass over the water. From the beginning to the end of the recovery, the forward movement of the arms is powered from the core, not the arms. The core action actually determines the line of the stroke. As you roll your shoulders forward, feel your head leave the high point of the stroke. As your hands pass your shoulders, and you drop your chest down into the water, the line of the stroke aims down and forward, bringing your face back to the water forehead first, and positioning your body downhill to begin the next stroke.
- Step 5 : - Notice that without changing your head position at all, you rise from the water to breathe forehead first, and you also return to the water forehead first. Practice more, using your forehead as the hammer to hit the nail that is the water. Do so with force, carrying the momentum of your recovery into the next stroke.
DRILL FEEDBACK CHART
| Problem | Modification |
| I hit the nail with my chin. | Make sure that you are maintaining a straight spine through to your neck throughout the entire breathing action. This means you are looking at the water during the inhale, not forward. Then, make sure that you are using your core to swing your arms around and forward during recovery, not just your arms. Roll your shoulders forward then drop your chest to change how your face enters the water. |
| When I hit the nail with my forehead my arms aim down. | Reach forward with your arms while your chest drops down. Doing so will allow you to keep moving forward while transitioning to the downhill position. |
| I don't feel momentum from the recovery. | Make sure your hands are relaxed, so they are not initiating the recovery. The motion should come from your core, in the middle of the arch of your two arms. Use your core to aim your body up and forward to breathe, and down and forward to return your face to the water, and to prepare for the next stroke. |
LEVERAGE DRILLS
Leverage makes the butterfly work. Using it is necessary to perpetuate the forward momentum of the stroke for any length of time. While the whole body, from the hands through to the feet works as a lever, high hips are crucial to benefiting from its effects. Leverage in butterfly works between the upper body and the hips, and, between the hips and the feet. The goal of the following leverage drills for butterfly is to learn to position the body to make the most of the leverage at each stage of the stroke.
Advanced One-arm Butterfly
THE PURPOSE OF THIS DRILL
- Maintaining a high hip body position
- Feeling the hips as the center of the butterfly
- Using leverage in the butterfly
HOW TO DO THIS DRILL
- Step 1 : - Push off the wall preparing to do the butterfly. Achieve a downhill float. Position your left arm at your side, while your right hand is extended in front of you. Perform a single butterfly stroke with your right arm, finishing quickly as your feet snap down, looking at the water in front of you as you inhale. Recover from the core, returning your face to the water and regaining your downhill position.
- Step 2 : - Do another stroke with the same arm, focusing on your hips. When you are in the downhill position at the beginning of the stroke, your hips should be high. When you are in the inhale position, your hips should still be higher than your feet, though lower than your head. During recovery, when you are returning to the downhill position, and as your upper body travels down and forward into the water, your hips remain high.
- Step 3 : - Continue your one- arm butterfly arm stroke, holding your hips high. Feel your upper body rise toward the end to the stroke. Feel it return to the downhill position at the end of the recovery. All the time your hips are high. Feel your feet snap down. Feel them rise. All the time your hips are high. Notice that your hips are the center of all the lever action in the stroke.
- Step 4 : - Keep practicing the one-arm butterfly with your left arm at your side. Maintain high hips and feel the lever action in the stroke. Use it to achieve the downhill float. Use it to accelerate your stroke. Use it to inhale. Use it to recover. Use it to carry momentum into the next stroke.
- Step 5 : - Continue to the far end of the pool. Switch arms and practice more.
DRILL FEEDBACK CHART
| Problem | Modification |
| My hips sink when I am breathing. | This is the position when your upper body is a bit higher than your hips, but in relation to your feet, your hips should still be high. Maintain a firm core and make sure you are not lifting your upper body too high out of the water to breathe. Look down at the water and keep your chin close to the surface of the water. |
| My hips are not higher than my chest at the start of the stroke. | Drop your chest down as your arms reach forward. Carry the momentum of your recovery forward and down into your extended position. Also make sure you are not over-bending at the knee when you dolphin. Doing so will weaken the lever effect when you are transitioning to the downhill position. |
| When I dolphin my hips get lower. | What should actually be happening is that the hips are high to start, then they get even higher as the feet snap down. They return to the original position, which is lower than when the feet snap down, but they are still high in relation to the body. |
No Kick Butterfly 96
THE PURPOSE OF THIS DRILL
- Achieving a dolphin without independent leg action
- Using leverage in the butterfly
- Powering the stroke from the core
HOW TO DO THIS DRILL
- Step 1 : - Push off the wall for the butterfly. Achieve a straight spine, firm core and high hips. Lean into a downhill float and stretch your arms for- ward. Stroke through, and breathe when your upper body reaches its highest point. Recover using your core to propel your arms forward. Roll your shoulders forward and drop your chest down to return your face to the water.
- Step 2 : - Do another stroke, maintaining a high hip position, but purposely do not kick. From the downhill position, accelerate through the sweep of the arm stroke as your upper body rises. Breathe at the high point of the stroke. Notice that your feet snap down as you finish the arm stroke and breathe anyway.
- Step 3 : - Recover, using your core to sweep your arms in a wide arch over the water. Return your face to the water as your chest drops, and your hands reach for the front. Notice that it is difficult to keep your feet from snapping down again after your chest drops into the water at the end of the recovery.
- Step 4 : - In fact, the kick, or foot motion in butterfly is a result of the other actions of the stroke. Try it again. Holding a high hip position, but without actively kicking, sweep through to the back of the stroke. Feel your feet snap down as your upper body and head rise. Using your core, chest and shoulders, recover as your face returns to the water. Feel your feet snap down again as you reach forward.
- Step 5 : - Continue doing the butterfly, producing a kick as a result of the actions of the rest of the stroke. Hold your core firm, and try to make your feet snap down with force, only through the other movements of the stroke. Practice to the far end of the pool. Rest, then practice again.
DRILL FEEDBACK CHART
| Problem | Modification |
| My feet don't snap down automatically. | Engage your core, and keep your spine straight. Without deliberately doing so, your lever will not work well, and your feet will not react to the other actions of the stroke. |
| When I don't kick, I can't breathe. | Maintain a high elbow position throughout the arm stroke, and finish the stroke with more speed. Press back on the water and avoid lifting it up at the finish. Doing so will pull you down into the water when it is time to breathe. |
| Without a kick, I am flat in the water. | Make sure your hips are high. Remember that they are the center of the stroke action. If they are not high, the leverage effect will be minimum. |
No Pause Fly
THE PURPOSE OF THIS DRILL
- Establishing rhythm from the core
- Maintaining momentum and leverage
- Avoiding damaging pauses in the stroke
HOW TO DO THIS DRILL
- Step 1 : - Push off the wall for the butterfly. Swim to the far end of the pool. Establish a rhythmic stroke, with evenly spaced kicks. If you aren't tired when you reach the wall, swim another length. As you reach the point where it is hard to maintain a rhythmic stroke, do a few more strokes, focusing on where in the stroke you lose your rhythm. Identify the point where your arms are when your rhythm breaks down.
- Step 2 : - Notice that it happens after the arm entry, when your arms are extended. As you get tired, the extension at the Y position becomes a glide. When the arms come to a stop in front, rhythm is lost. When rhythm is lost, momentum and leverage are lost as well.
- Step 3 : - Rest again. Now, push off the wall for the butterfly. Do only four strokes. Make each one a quick stroke. Focus on allowing no pause at the front of the stroke after your arms enter the water. Make a seamless transition from the recovery into the next stroke. Lay your hands on the surface of the water and grab hold of it. With your chest low in the water at this point, it should almost feel like you are reaching up with your hands.
- Step 4 : - Rest and try it again. Do four quick strokes, grabbing hold of the water the instant your reach the Y. With your chest low, anchor your hands in the water and vault your body forward over your hands. Actively involve your core in the transition to the next stroke.
- Step 5 : - Rest and then practice again. Achieve a chest-low position and reach into the Y. Kick and feel the power of that kick move through your body. Use it to advance into your next stroke with absolutely no pause. Without pausing at the front of the stroke, you carry valuable momentum into the next stroke. Continue practicing No Pause butterfly, gradually increasing the number of strokes you do in a row.
DRILL FEEDBACK CHART
| Problem | Modification |
| I don't feel like I am vaulting over my hands. | Make sure your elbows are straight and you achieve the Y position before starting the next stroke. Move your hands before your elbows. |
| I still have a pause at the front of my stroke. | Never stop your arm motion. Stretch forward then immediately sweep out and around. Actively space the down-beats of your dolphins to match the entry and the finish of your arm stroke. |
| I have a pause at the back of my stroke. | It could be that you are breathing as an independent action. If your head is rising too late, your arms will pause at the rear of the stroke. Let your breathing happen at the high point of the stroke. |
COORDINATION DRILLS
A well-coordinated butterfly is a thing of beauty. The swimmer appears to move effortlessly through the water. Truly, a successful butterfly is less a matter of strength, and more a matter of a coordinated sequence of stroke actions. When the body position, dolphin action, arm stroke, recovery, breathing and leverage work together, the result is a butterfly that moves forward with rhythm, grace and power. The goal of the following coordination drills for butterfly is to practice the various actions of the butterfly in sequence so they benefit stroke as a whole, and improve the forward line of the stroke.
Chest Balance
THE PURPOSE OF THIS DRILL
- Benefiting from the downhill position
- Avoiding a flat butterfly
- Bringing momentum into the next stroke
HOW TO DO THIS DRILL
- Step 1 : - Push off the wall preparing to do the butterfly. Achieve a straight spine, firm core and high hips. Sweep through and at the highest point in the stroke, take your breath. Recover, swinging your arms around and forward from the core. Notice that the breathing action is almost automatic. Perhaps because breathing is a matter of survival, it is a stroke action that we perfect early on.
- Step 2 : - Take another stroke, and breathe when your upper body reaches its highest point. Freeze in that position. Notice that your forward motion quickly stops. While we are good and practiced in achieving the breath, it is the part of the stroke after the breath that deserves attention in terms of maintaining the momentum and forward line of the stroke.
- Step 3 : - Stroke again. Accelerate through, breathe, and recover. Notice that it takes deliberate action to get back to the downhill position. You have to actively to angle your upper body correctly, or you will end up flat, and without momentum for the next stroke. Try it again. Sweep through to the breathing position, then recover, actively regaining your downhill position, using your core and shoulders. Drop your chest down and lean downhill. At this moment, your hips should be higher than your head. It should feel like you are balancing on your chest as you reach forward into the next stroke. Notice that by doing so you carry momentum with you into the next stroke.
- Step 4 : - Take another stroke. Accelerate through, breathe, then deliberately use your core and shoulders during recovery to transition to the downhill position. Press your chest down and balance on it, feeling your body ride downhill. Stretch forward and begin the next stroke. Continue swimming butterfly for several strokes, focusing on achieving this chest balance point before beginning the next stroke. Rest, then practice again.
- Step 5 : - Practice until balancing on your chest is as automatic as breathing.
DRILL FEEDBACK CHART
| Problem | Modification |
| I don't feel like I am riding downhill when I balance on my chest. | Make sure your hips are high throughout the stroke. At the point when you are balancing on your chest, your hips should actually be higher than your head. |
| I end up very deep when I balance on my chest. | Make sure you are not riding downhill for too long. Maintain your forward momentum by balancing on your chest only for a moment as you move into your next stroke. Otherwise you will have to use your arm stroke to lift yourself to the surface rather than to move forward. |
| This means that at entry, my chest is lower than my hands. | Exactly. Just for a moment, balance on your chest as you achieve your maximum reach and best alignment, then move into the next stroke from a position of strength. |
Coordination Checkpoint
THE PURPOSE OF THIS DRILL
- Coordinating the arms, legs and breathing
- Using momentum and leverage
- Achieving effortless breathing
HOW TO DO THIS DRILL
- Step 1 : - Push off the wall for the butterfly. Sweep through the arm stroke, maintaining high, firm elbows. Sweep your hands closer together under your belly, then accelerate toward the rear. As you press quickly outward in a J, feel your feet snap down and your face rise. Inhale. Notice three stroke actions happening simultaneously: the finish of the arm stroke, the inhale, and the down-beat of the second kick.
- Step 2 : - Try it again. Sweep through the arm stroke, round off the finish as your feet snap down, and you achieve the high point in the stroke to inhale. Try it for several strokes in a row, focusing on the point when these actions happen at once.
- Step 3 : - Notice that as these three actions happen at the same time, you can observe yourself surging forward through the water. Try it again. As your finish the stroke, and snap your feet down, look down at the water while inhaling. Notice your significant forward motion at this point.
- Step 4 : - This is an excellent checkpoint for stroke coordination as you swim butterfly for any length of time. If the down-beat of your kick, the finish of your arm stroke, and your inhale do not happen together, the rhythm of the stroke suffers.
- Step 5 : - Rest, then practice again, focusing on the coordination checkpoint every few strokes.
DRILL FEEDBACK CHART
| Problem | Modification |
| I can't do this because I don't breathe every stroke. | Check your coordination on your breathing strokes. |
| My kick happens before my inhale. | Hold your kick until your arms are near the finish of the stroke so you can breathe at the natural high point of the stroke. |
| My inhale happens after my stroke finishes. | It is important to breathe with the end of the stroke to create a unified forward line in the stroke. Otherwise, your face will be moving back as your arms are moving forward, slowing you down. |
Quiet Butterfly
THE PURPOSE OF THIS DRILL
- Achieving a clean entry
- Directing the stroke forward
- Swimming butterfly with the water, not against it
HOW TO DO THIS DRILL
Step 1: Stand in waist deep water. Bow forward until your chin rests on the surface of the water. Extend your arms forward aligned with your shoulders. Do four butterfly arm strokes and recoveries with your feet on the bottom of the pool, watching your point of entry in front.
Step 2: Look the splash that results as your hands enter. Notice the direction that the splash goes. This will tell you where your stroke is directed, and if you are swimming with the water or against it. Is the splash from your left arm crashing into the splash from your right arm? If so, you are directing your stroke side-ways, not forward. Is the splash from your hands going straight up? If you are directing your stroke down, not forward.
Step 3: Try it again. Stand in the water and bow forward. Do four complete strokes watching your entry. Aim each stroke forward at the end of recovery. At entry, lay your hands on the water, and slide them through the surface as you extend. Notice that the splash you make is minimal, and it is directed forward. Practice again, moving your arms with the water, not against it. Enter the water cleanly, displacing a minimum of water, and only in the forward direction.
Step 4: Now try it while swimming. Push off the wall for the butterfly. Do four stroke cycles focusing on directing each new stroke forward at entry. At the end of recovery, lay your hands quietly on the surface of the water. Slide them through the surface, fingertips first as you extend. Anchor your hands just below the surface of the water as your feet snap down. Sweep through and bring the momentum of your stroke and second dolphin into the recovery.
Step 5: At the end of recovery, reach forward to a Y, not to the center. Slide your hands into the water without a sound, and extend and take hold of the water right under the surface, not more than a few inches deep. Direct all actions of the stroke to move you forward, quietly using the water, not fighting it.
DRILL FEEDBACK CHART
| Problem | Modification |
| I have to slow my stroke down to enter the water without splashing. | At first you might have to slow down, but as you perfect your forward line you will be able to increase speed. Use the dolphin to provide momentum, then direct that momentum forward. |
| My hands go deep at entry. | Drop your chest down as you stretch your arms forward. Attempt to make no splash as you enter by laying your hands on the surface of the water. |
| My hands aim to the center at entry. | Try straightening your elbows as your reach forward in the recovery. Reach for the Y' with your thumbs. |