
An effective flutter kick is a significant part of an efficient backstroke. Although similar in its alternating motion to the flutter kick of freestyle, there are certain distinctions. Kicking well on the back requires employing leg muscles differently than humans commonly do for most land activities. The major force of the backstroke kick is upward, against gravity, making quick, compact kicking and good foot position extremely important. The goal of the following backstroke kicking drills is to address the unique issues of the backstroke kick that contribute to an effective and sustainable kicking technique.
Boiling Water Drill
THE PURPOSE OF THIS DRILL
- Learning to kick upward with force
- Feeling the water with your feet
- Developing a centralized kick
HOW TO DO THIS DRILL
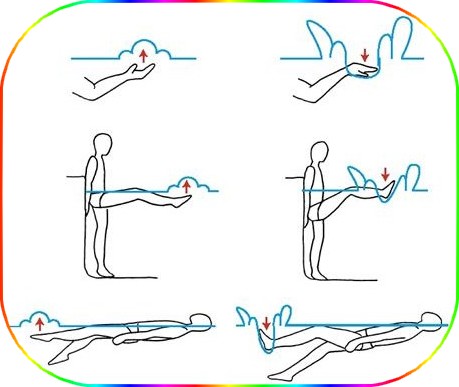
- Step 1 : - Stand in the water a bit more than waist deep. Hold one arm outstretched in front of you about twelve inches over the surface of the water. Now, drop your hand down with force into the water. Notice that the splash that occurs goes in all directions. Notice too the sound that your hand makes as it makes a hole in the water.
- Step 2 : - Now, hold your arm outstretched about twelve inches under the surface of the water. Raise your hand up with force to about three inches under the surface of the water. Notice the water welling up, almost like water coming to a boil. Repeat this action, with more force, as if bringing the water to a full boil, without your hand ever reaching the surface of the water. This is what your feet do in a good backstroke kick.
- Step 3 : - Try the same thing with your feet. Standing with your back supported at the side of the pool, bring your foot about twelve inches over the surface of the water and drop it down into the water. Notice the large splash. Listen to the distinct sound of your foot making a hole in the water. Now hold your foot twelve inches under the water, toes pointed, and force your foot up towards the surface, but don't allow any part of your foot to break the surface of the water. Make the water boil. Notice the feeling of the water against the top of your foot.
- Step 4 : - Now lay horizontally in the water, face up, straight spine and good water-line, arms at your sides, toes pointed. Drop the heel of your right foot down about twelve inches into the water. Force it up quickly and create a visible boil. Try it with your left foot. Now try it alternating feet. As the one foot forces the water up, the heel of the other foot drops down.
- Step 5 : - Kick at a tempo that there is no distinction on the surface of the water between the boil from one foot and that of the other. Continue to the other end of the pool, using a more forceful upward motion, and a gentler downward motion. Repeat for several lengths, feeling the difference between the water on your foot as you force it upwards, and as you drop your heel down.
DRILL FEEDBACK CHART
| Problem | Modification |
| I can't make the water boil. | Try relaxing your foot and ankle, so that your foot works more like the tail of a fish. See the Floppy Foot drill to work on this. |
| My toes keep breaking the surface. | Point your toes more. Control your kick so your feet remain connected to the water. |
| I am not moving. | Remember to kick with more force upward than downward. Check that your toes are pointed, and that your knees are not bending too much. |

No Knees Streamline Kick
THE PURPOSE OF THIS DRILL
- Learning to keep the knees under the water
- Using the correct muscles to kick backstroke
- Developing an efficient backstroke kick
HOW TO DO THIS DRILL
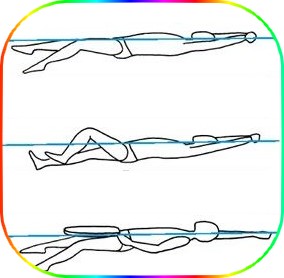
- Step 1 : - Lay horizontally in the water, face up, straight spine and good water-line, toes pointed. Extend your arms over your head, squeezing your ears between your elbows and clasping your hands, one over the other. Begin the flutter kick, kicking upward with more force.
- Step 2 : - Kick at a tempo that there is no distinction on the surface of the water between the boil from one foot and the other. Maintaining a neutral chin position, use your peripheral vision to see if your knees are breaking the surface of the water, or if the water is moving upward around your knees. If so, this indicates that you are lifting your knees, or doing a bicycling motion during your kick. This is common because the muscles used to lift the knees, the abductors, that connect the legs to the abdomen, are used a great deal by humans on land in actions such as walking, running, cycling and climbing stairs. However, in the backstroke kick, lifting your knees weakens your kick.
- tep 3: To engage the correct backstroke kicking muscles, the quads and the hamstrings, resume your backstroke float, hands leading, spine straight, good water-line, squeezing your ears with your elbows, and begin kicking with absolutely no bend at the hips. It means you have to start the kick lower than the surface of the water, and use your leg as if to kick a ball floating on the surface of the water. Although your knee will bend, it is only as a result of your dropping your heel into the water, not by lifting your knee. Imagine kicking a ball with your foot by raising your knee. It wouldn't work. Using your peripheral vision, check your knees. There should be no water moving around them. Practice for several lengths of the pool.
- Step 4 : - Now, double check if you are lifting your knees by holding a kickboard with one hand, positioning it the long way over your upper legs and knees as you float and kick, keeping the other arm extended over your head. As you kick, you will be able to feel if your knees bump the kickboard. Practice for several lengths of the pool.
DRILL FEEDBACK CHART
| Problem | Modification |
| Water gets in my face . . . a lot. | This is feedback that you are lifting your knees. Doing so produces a wave, which washes over your face. Work on starting the kick by dropping your heel down, rather than raising your knee up. Try it on land looking in a mirror. Also, in the water try kicking faster to produce more forward momentum. |
| It hurts my lower back when I don't bend my knees. | Rotate your pelvis forward and work on your straight spine using the Float on Your Spine drill. You also might be kicking too deep. The backstroke kick is only about twelve inches at its deepest. Additionally, make sure you are not kicking down with force. Simply drop your heel into the water. Kick with force only in the upward direction. |
| I move very well even with my knees breaking the surface. | You are probably blessed with excellent ankle flexibility which makes the backstroke kick much easier. But just think how well you would move if you also eliminated the drag that your knees are producing. It is worth your time to work on this. |
Med Hassan EL HAOUAT
Pigeontoed Kicking
THE PURPOSE OF THIS DRILL
- Feeling the most advantageous foot position
- Using the most foot surface to kick
- Developing a centralized kick
HOW TO DO THIS DRILL
- Step 1 : - Lay on your back in the water. Achieve a straight spine, good water-line, and pointed toes. Extend your arms over your head, squeezing your ears between your elbows and clasping your hands, one over the other. Begin the flutter kick.
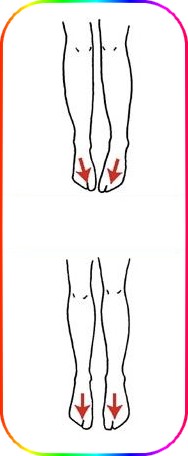
- Step 2 : - Point your toes and use a quick kick tempo. Kick upward with more force, creating a boil on the surface of the water. Notice that the part of your foot that comes closest to the surface is your big toe. Kick to the far end of the pool.
- Step 3 : - Now push off the wall again for the backstroke kick. This time, turn your feet inward to the pigeontoed position, so your big toes are closer together than the rest of your feet. Notice that by turning your feet inward, your knees and hips are also internally rotated. Begin kicking.
- Step 4 : - Continue kicking with a quick tempo. Feel the top of your foot press upward against the water. Notice that you are engaging more of your foot's surface by positioning your pigeontoed feet. Notice too that your kick is more productive. Kick to the far end of the pool.
- Step 5 : - Push off again for the backstroke kick. Achieve the pigeontoed position and kick at a quick tempo. Kick the water upward. Notice the centralized boil on the surface of the water. Notice too that your knees stay under the surface of the water better. Continue kicking for several lengths of the pool.
DRILL FEEDBACK CHART
| Problem | Modification |
| My big toes bump into each other. | An occasional bump is okay. If your big toes are bumping into each other with every kick, this could slow your kick rhythm. Adjust the pitch of your feet very slightly so they don't touch. |
| My feet don't rotate this way. | Try it on land first. Turn your knees inward and let your feet follow. You can increase your flexibility by practicing it over time. |
| I still feel the downbeat more. | Engage your quads to kick upward. Try not to use your hamstrings to an equal extent. Drop your heel down, then force the top of your foot up quickly for the most effective backstroke kicking action. |
Med Hassan EL HAOUAT
Quarter Roll with Cup on Forehead
THE PURPOSE OF THIS DRILL
- Developing a balanced, effective kick
- Understanding the changing orientation of the kick
- Maintaining a stable head position while kicking
HOW TO DO THIS DRILL
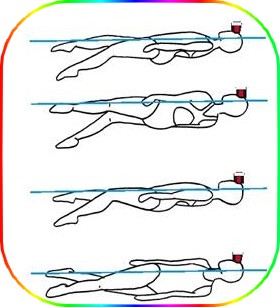
- Step 1 : - Fill a medium plastic cup halfway with water. Gently balance the cup on your forehead as you lay on your back in the water, with a straight spine and good water-line. Once the cup is balanced, position both arms at your sides. Begin kicking, toes pointed, knees underwater, making the water boil. Continue kicking to the other end of the pool, trying to keep the cup of water balanced on your forehead. If it falls off, stand and start again. Practice until you can kick productively without the cup falling off for a full length of the pool.
- Step 2 : - Now prepare to kick another length with the cup on your forehead. This time, every six kicks, do a quarter roll. Keeping your head still so the cup remains balanced, roll your body clockwise, so that your left shoulder, arm and hip are out of the water, while your right shoulder, arm and hip are low in the water. Your kick should now be oriented to the side.
- Step 3 : - After six kicks, roll your body a quarter turn counter-clockwise, so you are again flat on your back, and your kick is up and down. Do six kicks. Now, maintaining your head position so the cup stays on your forehead, turn your body a quarter turn clockwise again, so that your right shoulder, arm and hip are out of the water, while your left shoulder, arm and hip are low in the water. After six kicks, roll back to the flat back floating position, kicking up and down.
- Step 4 : - Continue kicking with quarter rolls to the end of the pool, with your head still so that the cup remains balanced on your forehead. If the cup falls off, start again. This is not an easy drill! Practice until you can kick productively, with quarter rolls, while the cup remains on your forehead for several lengths of the pool.
DRILL FEEDBACK CHART
| Problem | Modification |
| The cup falls off right away, even without a quarter roll. | Work on your straight spine and neutral chin. Work on the drills in the section called Body Position. Make sure your ears are underwater and your neck is relaxed. |
| When I do a quarter roll, my head turns too, and the cup falls off. | Relax your neck and turn your shoulder toward your cheek. Try it on land first, looking in a mirror. |
| My kick still aims up even with a quarter roll to the left or right. | Use more core stability, so that your shoulders and hips roll together and don't twist at the waist, leaving your hips flat. |
Med Hassan EL HAOUAT
