There are many elements of the stroke technique that make up freestyle work in combination to produce coordinated forward motion. Each element affects another, together contributing to a unified, productive freestyle. The goal of the following coordination drills is to learn to bring multiple freestyle skills together into a coordinated effort for the most productive freestyle.
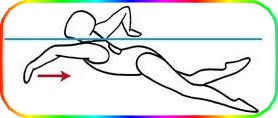
Heads Up Freestyle
THE PURPOSE OF THIS DRILL
- Learning to grab the water and stroke back
- Using a continuous stroke
- Matching the kick to the arm stroke
HOW TO DO THIS DRILL
- Step 1 : - A lifeguard swimming to a person in trouble approaches the victim using a modified head up freestyle to keep his or her eyes on the victim and get there as quickly as possible. Likewise, a designated sprinter for a waterpolo team races to gain control of the ball, using modified head up freestyle to watch the ball to be captured. Try Heads Up Freestyle. Focus your eyes on a point at the far end of the pool and get there as fast as you can.
- Step 2 : - Stroke quickly, keeping your chin low in the water, and your eyes focused forward. Keep your head up the whole time. Notice that to keep your head up, when your hand enters in front, you must engage the water immediately with your fingertips, palm and forearm, and stroke continuously. Your stroke becomes shorter, and your recovery becomes wider. Notice too that while it is possible to keep your head up by pressing down on the water with your hands, you limit your forward motion by doing so.
- Step 3 : - Continue swimming head up, engaging the water immediately with each stroke. Keep your elbows high. Accelerate to the back with each short, quick stroke. Notice that by pressing back on the water to go forward, your head stays above the water without pushing down. Grab hold of the water aggressively and move closer to your target with each stroke.
- Step 4 : - With your head up, your body position is not ideal in the water. To manage this uphill swimming position, stabilize your core and kick actively, coordinating your kick to your arm stroke. Although the rate of the kick is quicker than the rate of the arm stroke, one kick should match each arm entry. As one arm enters in front, kick down with one foot. Notice that by coordinating the rhythm of your kick to the arm entry, your kick also matches the finish of the stroke by the other arm. Doing so creates additional forward motion, but also lift and balance to the whole stroke.
- Step 5 : - Continue toward your target. Notice that even from this disadvantageous swimming position, you can move forward well when all the parts of the stroke are coordinated and working together. Rest, then try it again.
- Step 6 : - Now try swimming regular freestyle with your face in the water. Use the same quick stroke rate as you did in the Heads Up drill. Press back on the water keeping your elbows high. Match the downbeat of your kick to the point when your hand first takes hold of the water in front. Feel the lift and balance in your stroke.
- Step 7 : - Rest, then alternate several lengths of Heads Up Freestyle and regular freestyle.
DRILL FEEDBACK CHART
| Problem | Modification |
| I am struggling to keep my face up. | Stroke quickly and keep your elbows high as you start each stroke. Accelerate to the back of the stroke. Avoid pressing down on the water to stay up. Instead, move yourself forward by pressing back on the water. Kick with each arm entry. |
| It is very tiring. | Yes, swimming uphill is as tiring as running uphill. And to make forward progress, all parts of the body must work together. |
| It hurts my neck. | Make sure you are balancing on your chest. By doing so, you will not have to raise your chin so much to keep your face out of the water. If it continues to hurt after making this modification, just don't do it. |
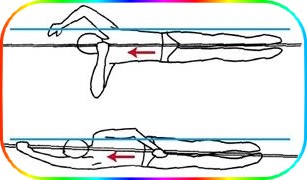
Horizontal Rope Climbing
THE PURPOSE OF THIS DRILL
- Utilizing the largest muscles possible
- Moving past your anchored hand
- Feeling efficient forward motion
HOW TO DO THIS DRILL
Step 1: Think about how a person climbs a rope. Hand over hand,
- the climber uses one hand to grasp the rope at a point higher than the body, while the other hand holds the body steady at the previous advance. When the reaching hand has a good grip on the rope, the climber moves his or her body past that reaching hand, while the lower hand then becomes the one that reaches to a higher point. This is exactly how the best swimming is. Rather than churning the water madly, efficient swimmers reach and grab hold of the water in front of them, then move their bodies beyond that point, hand over hand.
- Step 2 : - String a rope from one end of the pool to the other. Use the lane line hooks at each end of the pool to secure your rope, but allow slack so that most of the rope floats about one foot under the surface. Avoid using lane lines for this drill. They can snap without warning, and are very expensive to replace.
- Step 3 : - Once your rope is in place, take a big breath and float face down in the water over the rope. With the image of the rope climber in mind, reach as far forward as you can with one hand and take hold of the rope. Keeping your elbow high, pull your body forward past the reaching hand, until your arm is straight and at your hip. At the same time, use the other hand to reach to a father point. Continue, arm over arm, moving your body farther along the rope. When you have to breathe, lift your face out of the water gently, then return to your face down position.
- Step 4 : - Continue to the far end of the pool. Feel your body advance through the water past your reaching hand. Practice several times. Then try regular freestyle, without the rope. Take hold of the water, then move yourself past that point with each stroke. Climb through the water. This is the essence of efficient swimming.
DRILL FEEDBACK CHART
| Problem | Modification |
| This is hard! | Avoid dropping your elbows. High elbows give you more leverage to lift your body past your reaching hand. |
| My legs wag back and forth. | Employ a stable core. You can also kick gently. |
| I thought I was supposed to align my reach with my shoulders, not to the center of my body like with the rope. | Very good! This is true, and it is one of the shortcomings of this drill. Try to ignore this aspect and focus on how you advance past your reaching hand. |
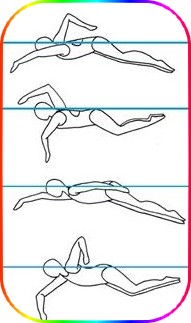
Freestyle with Dolphin
THE PURPOSE OF THIS DRILL
- Coordinating the kick and the arm stroke
- Setting the stroke rhythm to the kick
- Using the momentum of the kick to benefit the arm stroke
HOW TO DO THIS DRILL
- Step 1 : - Push off the wall preparing to do freestyle, arms extended, core engaged. Do six to twelve good dolphin kicks. Focus on producing a rhythmic kick with a compact, yet powerful downbeat, while your feet stay connected to the water. For this drill, it is important to keep your head stable, and not bouncing a lot.
- Step 2 : - Once you have established a strong, rhythmic kick, begin a freestyle arm stroke. Time your kick so you are producing one kick for each single arm stroke. Note: this is different than butterfly stroke rhythm. Once you have matched a kick to each arm stroke, time the downbeat of each kick to happen at precisely the moment that your hand strikes the water in front.
- Step 3 : - Continue to the other end of the pool, focusing on coordinating these two actions. Rest and repeat until the freestyle arms and dolphin kick are well coordinated with a sustainable rhythm. Notice that when the downbeat of your dolphin kick is timed to the entry of your hand in front, that you reach forward with more momentum, encouraging you to extend farther for longer. Notice too, that although you are focusing timing your kick to the reaching arm, that the same kick is also assisting the stroking arm, assisting you in accelerating to the back of your stroke.
- Step 4 : - Repeat the drill. Quicken the rhythm of your kick. Match your arm stroke to that quicker rhythm. As you plant your hand in the water in front, plant your feet in the water to the rear.
- Step 5 : - Now try the same coordination using a flutter kick. While it is common to use more than one flutter kick per arm, make sure that one of your kicks matches the entry of your hand, and simultaneously assists the fast finish of the other hand, for every stroke that you take. Practice for several lengths of the pool.
DRILL FEEDBACK CHART
| Problem | Modification |
| My dolphin kick seems out of alignment. | If you are doing this correctly, your hips will roll, as they should in freestyle, making the dolphin kick not exactly up and down. That is okay. The point of the drill is to match the rhythm of the kick to the arms. |
| When I use the flutter kick, I am using the same side arm and leg to do the simultaneous motion. | This is fine. It really depends on the number of flutter kicks you do per stroke. The average is three kicks per arm, however, many swimmers do two or four. Some even do two on one side and three on the other. This timing can be done successfully using the same side arm and leg, as well as the opposite arm and leg. |
| My freestyle arm stroke turns into butterfly arms when I use the dolphin kick. | Avoid diving your head down as your arms enter. Use a more compact kick, and reach forward upon entry, not down. Kick once per arm, not twice like in butterfly. |
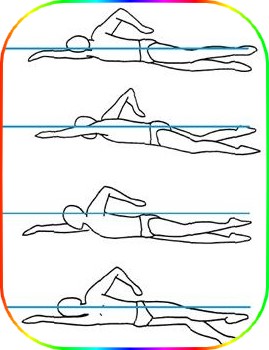
Bilateral Breathing
THE PURPOSE OF THIS DRILL
- Coordinating the breathing with the body roll
- Developing a symmetrical roll
- Developing a symmetrical kick
HOW TO DO THIS DRILL
- Step 1 : - Push off the wall preparing to do regular freestyle. Establish a good, continuous kick. Swim to the other end of the pool breathing toward the right side of the pool. Rest, then swim another length back to your starting point, facing the same side of the pool when you breathe. This will mean you are breathing to the other side of your body. Repeat until you are comfortable maintaining your alignment and kick, and rolling your body to get a breath on your right and left sides.
- Step 2 : - Now, swim another length breathing every third stroke. Time your inhale to start at the same time as the entry of the hand you are breathing away from. Strike the water left, then right, then strike and breathe left. Strike the water right, then left, then strike and breathe right. Remember the Weightless Arm drill, and the Temple Press drill while you are perfecting this timing.
- Step 3 : - Continue to practice breathing every third stroke for several lengths of the pool. One side may seem more natural to you than the other, just like one hand seems more natural when writing. Keep practicing trying to make your less natural side a mirror image of your natural side.
- Step 4 : - Once you are comfortable with this timing, focus on your hip roll. Notice that with bilateral breathing, it is more even on both sides than when you breathe on just one side. Notice too, that your kick has fewer pauses in it, and it is more compact, especially during breathing. Finally, notice that your arm stroke is more symmetrical in depth, width and length with bilateral breathing.
- Step 5 : - Practice for several lengths of the pool. Develop a balanced stroke by breathing on both sides.
DRILL FEEDBACK CHART
| Problem | Modification |
| My neck hurts when I breathe to the left. | Remember to turn your body to breathe,not just your neck. Focus on rolling your right hip down when breathing on your left. |
| Breathing every third stroke seems too often for me. | Although breathing every third stroke is preferred by many swimmers, it may not be right for you as a regular swimming rhythm. However, it is still very beneficial as a drill to develop a symmetrical stroke and kick. |
| I lose the rhythm after a few strokes. | When you notice your rhythm is off, stop, rest, then begin again. Be persistent. It will pay off. |