Of the many misconceptions about the backstroke arm stroke, the most common is that the arms remain straight throughout the stroke, like a windmill. A straight arm stroke is often associated with shoulder problems. It is also difficult, like trying to lift yourself out of the pool with straight arms. While it is important to begin and finish the stroke with straight, well aligned arms, using a high and firm bent elbow position, during the middle of the stroke, allows the swimmer to access more power, and move forward with an accelerating pull then push action. The goal of the following arm stroke drills for backstroke is to learn the most productive path of the underwater stroke for an easier, more effective, shoulder-saving stroke.
One Arm Pull/Push
THE PURPOSE OF THIS DRILL
- Learning the path of the backstroke arms
- Feeling both pull and push
- Rolling into and out of each stroke
HOW TO DO THIS DRILL
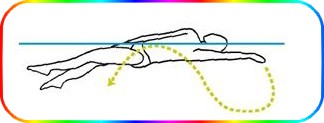
- Step 1 : - Float in the water, face up, spine straight, good water-line, kicking productively, with one arm at your side and the other extended over your head, aligned with the shoulder.
- Step 2 : - Start your stroke by descending your reaching hand about twelve inches straight down into the water, pinkie finger first, allowing the opposite shoulder and hip to rise at the same time. From twelve inches deep, keeping your elbow absolutely still, begin to move your fingertips and palm upward to press the water toward your feet. Sweep your hand to the height of your shoulder, so that your arm is close to a right angle. Done correctly, it should feel like your forearm is rotating around your elbow. This is the pull portion of the backstroke arms.
- Step 3 : - From that point, straighten your arm in a quick sweep until your hand stops below your hip, with your fingertips pointing toward your feet. Allow your whole arm to become involved in this sweep. At the same time, roll your same side hip upward to assist in the power of this action. This is the push portion of the backstroke arms.
- Step 4 : - Recover your arm over the water and repeat the path of the backstroke arm with the same arm. Notice that your hand is tracing a sort of S shape along the side of your body. The top curve is the pull, the bottom curve is the push. This S shape can become more pronounced as you increase your roll into the top curve with your shoulder and hip, and out of the bottom curve with your shoulder and hip. Continue to the end of the pool.
- Step 5 : - Repeat the drill, quickening your tempo, and accelerating your hand toward your hip. Hold your elbow firm. Roll in and roll out of each stroke. Try to identify the transition between pull and push. Continue for several lengths, then switch arms.
DRILL FEEDBACK CHART
| Problem | Modification |
| It hurts my shoulder to get my hand twelve inches deep at the beginning of the stroke. | It is very important to allow your same side shoulder and hip to roll down with your hand. Without this roll, it is nearly impossible, and painful for many swimmers, as the shoulder joint is not designed for this range of motion from a flat position. |
| The palm of my hand is facing up when my hand reaches my hip. | This indicates that the path of your stroke is circular, instead of S shaped. When you finish with your palm up, you are lifting the water. Doing so actually pulls your body down, not forward. Try tracing the shape of an S in the air, then again in the water. |
| My fingertips come out of the water when my hand and shoulder line up. | Your hand might be too close to your shoulder. Keep it at a right angle to your shoulder. Also, be sure that you are rolling into your stroke with your shoulder and hip, giving you water over your fingertips when you your fingertips are closest to the water's surface. |
Med Hassan EL HAOUAT

Up and Over
THE PURPOSE OF THIS DRILL
- Feeling the path of the backstroke arms
- Maintaining a stable elbow position
- Catching deep water
HOW TO DO THIS DRILL
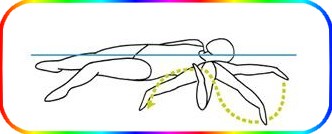
- Step 1 : - Push off the wall for the backstroke, both arms extended over your head. Achieve a straight spine, firm core and good water- line. Establish a productive kick. Begin the backstroke arm stroke with your right arm, leaving your left arm in the extended position.
- Step 2 : - Lower your right hand about twelve inches down into the water by rolling the same side shoulder and hip down, and the opposite shoulder and hip up. As your hand reaches its deepest point, catch a handful of water. Maintaining a stable elbow position, move your handful of water in an arch up and over your elbow.
- Step 3 : - At the highest point in the arch, your fingers should be pointing upward toward the surface of the water, but not breaking the surface. At the finish of the arch, your arm should be straight along the side of your body, and your fingertips should be pointing toward your feet.
- Step 4 : - As your right arm exits the water by your hip and returns over the water to its starting position, trace the same path with your left arm. Roll your left hip and shoulder down into the water, causing your left hand to come to a depth of about twelve inches. Grab hold of deep water, and sweep your hand up and over your still elbow in an arch that finishes with your arm straight at your side.
- Step 5 : - Continue stroking with alternating arms. Catch the water deep and keep hold it as your hand traces an arch up and over your elbow with each stroke. Trace the arch with more speed. Feel your body move forward with each stroke. Practice for several lengths of the pool.
DRILL FEEDBACK CHART
| Problem | Modification |
| My hand breaks the surface at the top of the arch. | This indicates you are too flat in the water. Make sure you roll your body with your descending arm to get the depth you need at the top of the arch. |
| I can't seem to catch the water. | As your hand reaches its deepest point, move your fingertips and hand upward into position to press against the water. Keep your elbow firm and still at this point. |
| I lose my handful of water at the end of the arch. | Accelerate your motion through the arch. Your hand should be moving fastest at the end of the arch, pressing the water down and past your hip. |
Med Hassan EL HAOUAT
Fist Backstroke
THE PURPOSE OF THIS DRILL
- Learning to feel the water with the forearm
- Using a stable, high elbow
- Appreciating the role of the hand
HOW TO DO THIS DRILL
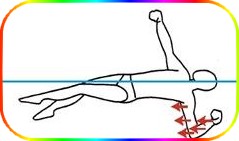
- Step 1 : - Push off the wall for the backstroke. Before the first stroke, form closed fists with each hand.
- Step 2 : - Start to stroke. At first it may seem impossible to make forward progress without the paddle of your open hand. Keep stroking, purposely positioning your arm so your forearm works as your paddle to press against the water. This will require you to initiate the stroke by moving your fists without moving your elbows, and to keep your elbows high and stable as your fist moves past them.
- Step 3 : - Use the whole length of the stroke, top to bottom. Feel pull and push. Accelerate the underwater stroke. Maintain opposition. Adapt your stroke to the handless paddle. Continue to the other end of the pool.
- Step 4 : - Now push off again, this time with open hands. Swim regular backstroke, using your hand as well as your forearm to press against the water. Keep a stable, elbow high. Feel pull and push. Accelerate your stroke. Maintain opposition.
- Step 5 : - Continue alter- nating lengths of fist and open hand until you are feeling the water with a paddle that includes both your hand and your forearm.
DRILL FEEDBACK CHART
| Problem | Modification |
| I am not moving. | Reposition your forearm so when your arm moves through the stroke, it quickly becomes perpendicular to the surface of the water. |
| I am not feeling my forearm against the water. | Keep your elbow still as you move your fist, then move your forearm upward into position to press back on the water. If your elbow drops at this point, your forearm will not engage the water. |
| My elbows keep moving. | Try widening the angle of your bent arm through the beginning and middle of the underwater arm stroke. Move your fist before your forearm. |
Med Hassan EL HAOUAT
Corkscrew
THE PURPOSE OF THIS DRILL
- Achieving depth to begin the stroke
- Feeling the roll that begins the arm stroke
- Using a bent arm mid-pull similar to freestyle
HOW TO DO THIS DRILL
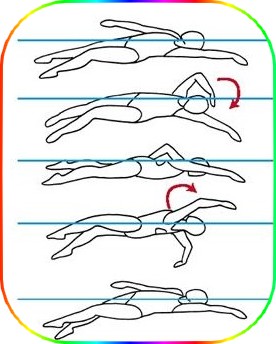
- Step 1 : - Push off the wall for the backstroke with your arms extended. Achieve a straight spine and good water-line. Kick productively.
- Step 2 : - Take one stroke with your left arm. As your left arm reaches your side, begin to stroke with your right arm while your left arm starts its recovery over the water.
- Step 3 : - When your right arm approaches mid-recovery, your left arm should have come to its deepest point under- water. The shoulder and hip of your recovering arm should be at least partially out of the water, and the shoulder and hip of your stroking arm should be low in the water.
- Step 4 : - At this point, redirect your recovery to cross over toward your opposite shoulder, and lead your body to switch from its side, to a front floating position. Your recovering hand should enter the water as a freestyle stroke.
- Step 5 : - Start to stroke with freestyle as the arm at your side starts to recover as freestyle. You should again be floating on your side, and by mid-recovery, redirect your over-the-water-arm to enter the water as the backstroke.
- Step 6 : - Continue to move through the water, one stroke as backstroke and the next as freestyle. Feel the depth that your arm achieves to begin each stroke on your back. Notice the similar bent elbow position of your arms in both strokes during the mid-pull. Feel how rolling toward your stroking arm accesses more power for the stroke.
DRILL FEEDBACK CHART
| Problem | Modification |
| I am getting dizzy. | Yes, this can happen. Stop frequently. Make the most of each stroke that you are able to do. Be very focused on noticing the depth that your hand achieves, the bent arm position in the middle of the stroke, and your roll until you feel dizzy. |
| It is hard to flip from my back to my front. | Allow your body to roll onto its side, using your hips and shoulders. Then simply continue that roll so you end up floating on your front. |
| I can't figure out when to breathe. | Catch a breath during the stroke on your back. This drill does not accommodate breathing during the freestyle stroke. |