Learning to float well on the back is the first step in being comfortable with the backstroke. Good spinal alignment and core tension not only improve comfort on the back, but can also contribute to an effective backstroke. The goal of the following drills for body position in backstroke is to experience positive backstroke floatation upon which a good backstroke can be built.
Float on Spine
THE PURPOSE OF THIS DRILL
- Achieving an advantageous backstroke floating position
- Feeling effective core tension and stability
- Being comfortable on the back
HOW TO DO THIS DRILL
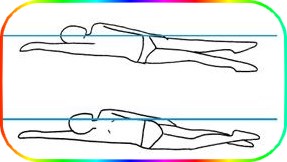
- Step 1 : - Lay horizontally in the water, face up, without attempting any forward motion, arms at sides, head leading.
- Step 2 : - Focus on how your spine affects your floatation. First, round your spine so that your knees come up toward your chest, and your hips are low, as if you were sitting in the water. Notice that you have a hard time floating in this position. Your face may even submerge.
- Step 3 : - Resume your horizontal position in the water, face up. Focus on your spine. Now, arch your back, so your belly button is the highest point of your body. Try to get it above the water. Notice that by doing so your face submerges, or nearly submerges in the water. Your legs may also sink.
- Step 4 : - Again lay horizontally in the water, face up. Focus on your spine. Make it as absolutely straight as possible. This includes straightening the natural bends in the small of the back and at the neck. To accomplish this, rotate your pelvis forward, and press the back of your head into the water. Notice that in doing so, you contract your abdominal muscles, and actually relax your neck. Notice too that your body floats more horizontally. This is the advantageous floating position which you can build a good backstroke stroke upon.
- Step 5 : - Practice several times until you achieve the feeling of balancing on your spine.

DRILL FEEDBACK CHART
| Problem | Modification |
| My legs still sink. | If you have heavy legs, it is even more important to learn to rotate your pelvis forward. Contract your abdominal muscles, and float on your spine. |
| I'm not sure my spine is straight. | You can check it by standing against a wall and pressing every inch of your spine into the wall. Reach back and try to slide your hand between the wall and the small of your back. If you succeed, you need to rotate your pelvis more forward to close this gap. Check the same way behind your neck. No space should remain. Take time to analyze what muscles you are engaging to achieve your straight spine, then, do it in the water. |
| Doing this makes my hips higher than my belly button. | Yes, that is correct. You might feel sort of like an elongated banana in the front of your body. But in the backstroke, it is your spine that you float on, and that is what needs to be straight. |
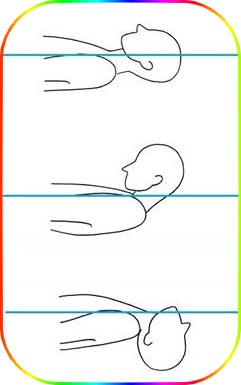
Water-Line Drill
THE PURPOSE OF THIS DRILL
- Finding correct head alignment
- Feeling the water-line around your face
- Relaxing the neck, shoulders and upper back
HOW TO DO THIS DRILL
- Step 1 : - Lay horizontally in the water, face up, arms at sides, spine straight. Do not produce any forward motion.
- Step 2 : - Now move your chin toward your chest until the surface of the water, or the water-line is just below your ear lobes. Notice that in this position, the muscles in your neck and shoulders are fully engaged. Your legs may also sink, and it will probably be difficult to maintain your floatation.
- Step 3 : - Now lay horizontally in the water, face up, spine straight. Lift your chin and rock your head back, until your ears are completely submerged and you can see the water at the back of your head. The waterline will be at your eye brows and around your throat. Notice that in this position, the muscles in the back of your neck and upper back are engaged. Your float will probably not suffer, although you will feel probably quite stiff.
- Step 4 : - Again lay horizontally in the water, face up, spine straight. Hold your chin neutral, as if you are looking at someone who is exactly the same height as you. The water-line will surround your face, from your hairline to the bottom of your chin. In this position, your ears will be submerged and your neck, shoulders and upper back will be relaxed, like when your head rests on a pillow. This is the correct head position for the back- stroke.
DRILL FEEDBACK CHART
| Problem | Modification |
| Water gets in my ears. | This is a problem that will be resolved when you add forward motion to the float in the next section. The water will then pass by your ears instead of going in them. |
| I seem to float better with my ears out of the water. | You might be achieving the needed abdominal contraction by lifting your upper body, rather than rotating your pelvis forward. It is important to use your pelvis to contract your abdominal muscles, because you need your upper body to stay aligned in the direction you are going. |
| I am not able to relax my neck. | Lower your shoulders. Float with your palms facing the surface of the water. Breathe in and out deeply. Practice letting the water hold your head. |
Twelve Kick Switch Backstroke
THE PURPOSE OF THIS DRILL
- Maintaining a straight spine while moving
- Beginning to feel leverage from the core
- Identifying the longest backstroke position
HOW TO DO THIS DRILL
- Step 1 : - Lay on your side in the water, with the arm closest to the surface at your side, and the arm closest to the bottom of the pool extended over your head. Achieve a straight spine, and good water- line.
- Step 2 : - Begin a gentle but continuous flutter kick, which should also be directed side to side.
- Step 3 : - Although your body is floating on its side, allow your face to float straight up, so it is completely out of the water. Relax your neck so your head feels like an independent object floating in front of your body. In this position, the shoulder of the arm at your side should be out of the water and closer to your cheek than your other arm is to the other cheek.
- Step 4 : - Kick twelve times (each leg equals one kick).
- Step 5 : - Just as you finish the last kick, bring the arm laying by your side straight over the water to an extended position over your head, and at the same time, bring the forward reaching arm through the water to your side, as you switch to the opposite side of your body to float. All the time maintain a straight spine and core stability.
- Step 6 : - Kick twelve more kicks in this position. Repeat the switch with your arms and floating side. Continue to kick twelve times then switch until you reach the far end of the pool.
DRILL FEEDBACK CHART
| Problem | Modification |
| I get a lot of water in my face. | Make sure your chin is neutral and that your spine is straight. But remember, the fact is that even excellent backstrokers get water in their face. However, the more momentum you produce, the more the water will go around you, instead of in your face. |
| My kick is aimed up and down. | Let the hip on the side with your arm extended be lower than the other hip. |
| I go crooked. | Align your extended arm straight and lock your elbow. Do this drill next to the side of the pool, or by a lane line to keep your bearings. |
