Using leverage gives freestlyers an advantage. Instead of swimming flat, and depending on the small muscles of the arm, swimmers can use the body to roll into and out of each stroke. Doing so accesses more power from the core. By engaging the large muscles of the core it is possible to travel more distance per stroke, with the same amount of energy. The freestyle becomes more productive and more sustainable. In addition, using core leverage avoids injury to vulnerable shoulder joints. Long term flat freestyle is responsible for many swimmers being out of the water for extended periods of time, with bursitis or rotator cuff problems. By using core leverage, the shoulders can be spared of the entire burden of freestyle. The goal of the following freestyle leverage drills is to create a more sustainable and injury-free freestyle by using available leverage to the fullest.
Three Stroke Switch Freestyle
THE PURPOSE OF THIS DRILL
- Practicing the roll into and out of the stroke
- Accessing your core strength
- Transferring power from the core to the limbs
HOW TO DO THIS DRILL
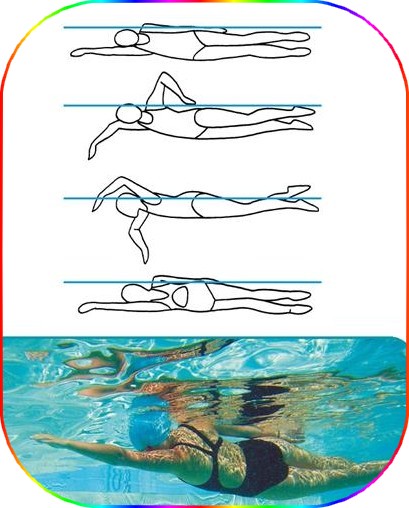
- Step 1 : - Push off the wall preparing to do freestyle, core engaged, perform three freestyle strokes (one arm = one stroke), accompanied by a productive flutter kick. As your arm approaches your hip on the third stroke, roll onto your side and float and kick with the arm that just finished stroking at your side, the other arm fully extended. The arm at your side should be closer to the surface, and the arm lower in the water should be extended over your head. Holding this position, do six good kicks (one leg = one kick).
- Step 2 : - With your sixth kick, roll your higher hip and shoulder down into the water as the arm at your side recovers over the water to the front, and the reaching arm begins stroking. Do three more freestyle strokes. Continue kicking the through the whole process. Breathing should be done to the side during the three strokes. During the kick-only phase, the face should remain mostly submerged, ear against the lower shoulder.
- Step 3 : - Continue doing three strokes, kicking the whole time, and then six more kicks in the side position until you reach the far end of the pool. Notice that when changing from the side kicking phase to the stroking phase, the recovering arm travels easily to the front with leverage of the hip roll. Notice too, at the same time, that the leading arm goes easily into the next stroke, also aided by the hip roll.
- Step 4 : - Keep practicing. Once you are comfortable with the 3 strokes and 6 kicks rhythm, change to 3 strokes and 3 kicks. Then, work on incorporating a switch between each stroke. Notice that what you are doing is almost identical to regular freestyle...a very long, efficient freestyle.
- Step 5 : - Once you are able to roll with each stroke, begin swimming regular freestyle rolling into and out of each stroke, as you did in the drill.
DRILL FEEDBACK CHART
| Problem | Modification |
| I go crooked. | Employ core stability and align your leading arm with the line on the bottom of the pool. |
| I don't roll as much in the three strokes as I do changing to the side kicking phase. | Slow down your strokes. Allow time to roll. |
| It seems that rolling all the way over to my side is too far. | Remember, this is a drill, where the point is to learn to toroll. The action Iis regular a bit exaggerated make the point. in the egular swimming you actually roll to the point where you balance on the top of your hip bone and your armpit. |
The Pendulum Effect
THE PURPOSE OF THIS DRILL
- Understanding the relationship between the recovering arm and the stroking arm
- Feeling acceleration during the switch
- Maintaining balance
HOW TO DO THIS DRILL
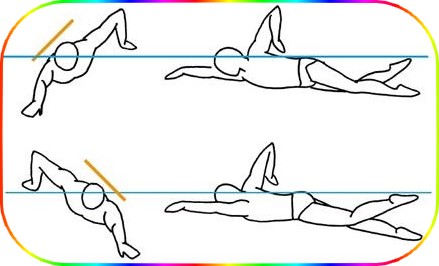
- Step 1 : - Float in the water on your side, the arm near the surface at your side, and the other arm extended in front. Kick productively. Slide the hand at your side up to your waist, raising your elbow up to a point, like in the Shark Fin drill. To breathe, maintain your core stability and roll towards your back, breathe, then roll back to your original side position.
- Step 2 : - Hold this position for five seconds, continuing to kick. Notice that at in this position, on your side with one arm extended, and the other arm at its highest point in recovery, neither arm is producing any forward motion.
- Step 3 : - Stroke through with your extended arm as you finish your recovery with arm over the water. Find the same floating position on the other side. Your lower arm should be extended, and your higher arm should be making a shark fin. Again hold for five seconds, continuing to kick.
- Step 4 : - Switch to the other side again. Continue to the far end of the pool, switching to the identical position with your arms on either side, and holding for five seconds before switching. Notice that as you switch arm positions, your hips switch sides too. Notice too that each switch gathers speed from beginning to end.
- Step 5 : - Do another length, this time holding only for three seconds before switching sides. Feel the beginning and the end of each switch. Like the extremes of a pendulum's swing, the motion starts slowly and gathers speed, continuously from side to side.
Step 6: Do another length, this time holding for only one second before switching sides. Feel the pendulum swing and gather speed with each switch. Notice that while one arm reaching and the other out of the water in recovery, neither arm is moving you forward, yet you are still moving forward.
Step 7: Continue to practice, feeling the pendulum effect with each stroke. Focus on using your hips to add power to the switch of your arm positions. Feel your stroke cover more distance with no more effort.
DRILL FEEDBACK CHART
| Problem | Modification |
| I can't keep my elbow in a shark fin. | Your opposite shoulder should be at its lowest point in the water, allowing you to point your recovering elbow toward the sky. Relax your hand and let it hang from your higher elbow. |
| My hips don't add power. | Your hips are probably floating flat. Start in the side floating position, with your shoulder and your hip on the recovering side high. Each time you switch, make sure to achieve the side floating position with shoulders as well as your hips. |
| My kick stops when I switch sides. | Maintaining a continuous kick is important in this drill, and it is important in the full stroke. Blank spots can interfere with the pendulum effect. Use your kick to add power to the switch. |
Hip Skating
THE PURPOSE OF THIS DRILL
- Observing the role of the hips
- Learning to use leverage from the core
- Mastering switching from hip to hip
HOW TO DO THIS DRILL
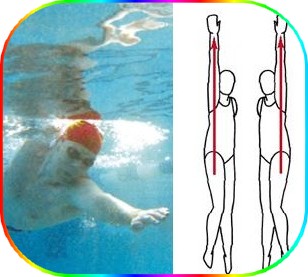
- Step 1 : - The rhythm of ice skating resembles the rhythm of swimming freestyle. As one side of the body balances, the other is applying force. To go faster, the ice skater does not do shorter, choppier movements. Instead, each stride is extended, using leverage from the hips to produce motion. Try it. Attach an imaginary ice skate to each of your hips on the bone you can feel at the highest and forward most points of your pelvis.
- Step 2 : - Now, push off the wall, face down in the water, preparing to do freestyle, firm core, aligned, floating downhill. Glide forward on the imaginary hip skates. As you get ready to take your first stroke with your right arm, shift your weight toward your right hip, so you are balancing on that skate only, then start the stroke. As the right arm approaches the end of the stroke, switch your weight to your left hip skate, allowing the right hip to rise, while the left arm starts its stroke, and the right arm recovers.
- Step 3 : - Continue skat- ing on your hips, right, then left, then right, then left. Notice how shifting your weight from skate to skate sends power upward through your core to your arm stroke.
DRILL FEEDBACK CHART
| Problem | Modification |
| I can't balance on my hips and float downhill at the same time. | The downhill position corrects your floating position. Start with that. Balancing on your hips drives your stroke. Focus on core stability in both ways. Be patient and keep practicing to achieve both skills. |
| My head is moving side to side with my hips, even when I am not breathing. | Relax the muscles in your neck. On the strokes when you are not breathing, allow your hips and shoulders to roll while your head remains still. Keep looking at the bottom of the pool. It is as if your head was an independent object, floating in front of your body. |
| If I glide too long I just stop. | Yes. So, your task is to identify the point just before you slow down and switch your weight to the other hip to start your next stroke then. This will make the most of your momentum. |