Integrating the act of breathing into the stroke is a challenge. By timing the breath to the natural roll of the stroke, a swimmer can breathe rhythmically while continuing the forward line of the stroke. The goal of the following freestyle breathing drills is to address issues of timing and alignment, and, to learn to use the core for better breathing technique.
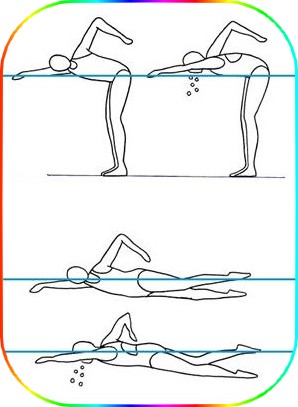
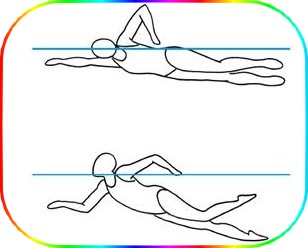
 Inhale Arm/Exhale Arm
THE PURPOSE OF THIS DRILL
- Learning the correct timing of the freestyle breathing
- Using a regular breathing pattern
- Maintaining a relaxed, rhythmic stroke with breathing
HOW TO DO THIS DRILL
- Step 1 : - Choose a side that you will turn toward for breathing. The arm on that side will be called your inhale arm. The other arm will be called your exhale arm.
- Step 2 : - Standing in waist deep water, bow forward until your face is submerged. Extend your arms forward, aligned with your shoulders to do the freestyle arm stroke in the standing position. Do several strokes, saying to your self inhale, as you are stroking underwater with the inhale arm, and saying, exhale, as you are stroking with the exhale arm.
- Step 3 : - Now try to actually get a breath. Stroke first with your inhale arm. As you begin to press back on the water, start turning your face to the side toward the inhale arm. Turn your face until your mouth clears the water, but keep your lower cheek in the water. Inhale as your hand reaches the back of the stroke. Inhale deeply through your mouth. Then, as the inhale arm returns over the water to the front, allow your face to follow it, arriving back into the water by the time the inhale arm passes your shoulder. Look at the bottom of the pool.
- Step 4 : - When your face returns to the water, begin stroking with the exhale arm. As you begin to press back on the water, look down at the bottom of the pool and exhale. Exhale through your mouth and nose. You should see an abundance of bubbles as you exhale. Continue exhaling throughout the length of the stroke, and as the exhale arm returns over the water to the front.
- Step 5 : - As your exhale arm passes your shoulder, again begin stroking with the inhale arm. Continue stroking rhythmically, inhaling with the one-arm stroke, and exhaling with the other. Maintain the full length of each stroke. Do a quick, deep inhale through your mouth. Do a long, thorough exhale from your mouth and nose, producing bubbles. Practice until you can breathe rhythmically with the rhythm of the stroke.
- Step 6 : - Now try breathing while swimming freestyle. Start slowly. Stroke several times saying to your self inhale and exhale as the designated arm strokes through the water. Then try turning your head toward the inhale arm as it strokes. Turn to the point that your mouth clears the water but your cheek remains connected to the water. Inhale as your arm reaches the back of the stroke. Then, allow your face to turn back into the water, following your inhale arm as it recovers back to the front. Exhale as the exhale arm strokes.
- Step 7 : - Practice several times then rest. Practice again. Be patient and set the rhythm of your arm stroke to your inhale and exhale.
DRILL FEEDBACK CHART
| Problem | Modification |
| I lose the rhythm after a few strokes. | It takes practice. Keep each stroke long. Cue your inhale and your exhale with the movements of the corresponding arm. Stop when you get off time. Rest, then start again. |
| I don't seem to have time to inhale. | Make sure you are exhaling thoroughly before you turn to inhale. There is not time to both exhale and inhale when you are turned to the side. If you spend the time exhaling, you will miss the opportunity to inhale. Exhale thoroughly while the exhale arm is stroking. |
| I run out of air before it is time to inhale again. | Make sure you are exhaling thoroughly before you turn to inhale. There is not time to both exhale and inhale when you are turned to the side. If you spend the time exhaling, you will miss the opportunity to inhale. Exhale thoroughly while the exhale arm is stroking. |
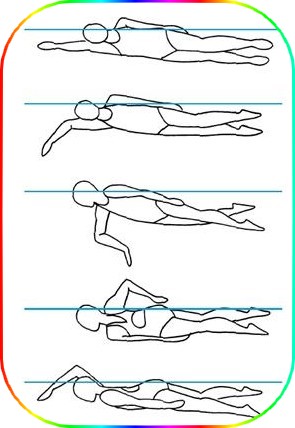
The Weightless Arm
THE PURPOSE OF THIS DRILL
- Maintaining the full length of the arm stroke while breathing
- Learning the correct timing of the freestyle breathing
- Using your core to breathe, not just your head
HOW TO DO THIS DRILL
- Step 1 : - Push off the wall for freestyle. Achieve a firm core and look at the bottom of the pool. Swim to the far end of the pool. Begin swimming freestyle. Establish a relaxed stroke and regular breathing rhythm. Inhale with one arm, exhale with the other.
- Step 2 : - When you have reached about the halfway mark to the other end of the pool, at the exact point when your mouth clears the water to inhale, freeze in that position. Identify precisely where the arm is that you are turned away from when breathing. Has it left the fully extended position? Is it under your chest? If the answer to either of these questions is yes, you have a heavy arm. As this heavy arm presses down on the water in an attempt to lift you up to breathe, it works like an anchor. When your arm sinks, you lose half of your next stroke that could have moved you forward in the water.
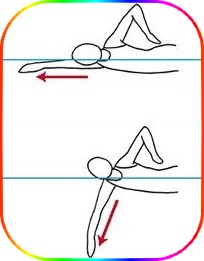
- Step 3 : - To avoid a heavy arm, float on your side, with your breathing side higher in the water. Extend your lower arm fully in front of you. Position the higher arm at your side. Begin a gentle flutter kick. Holding your core firm, roll your face, shoulder and hip as a unit back until your mouth clears the water. Inhale. Roll back down. Practice several times, maintaining the position of your extended position of your lower arm throughout your roll and inhale.
- Step 4 : - Now, try it while stroking. Again float on your side, breathing side high. Stroke through the water with your lower side arm, and recover over the water with your higher side arm. Once you have switched floating sides and switched arm positions, prepare to breathe on the next stroke. As your arms again begin to switch positions, hold your core firm, roll your face, shoulders and hips up in unison towards the stroking arm. By the time the stroking arm reaches the back of the stroke, you should be floating on your other side with your mouth clear of the water to inhale.
- Step 5 : - Notice the position of your lower arm. It should be fully extended throughout your breath, reaching toward the far end of the pool, fairly close to the surface of the water...as if weightless. Practice again. Continue practicing until you can inhale as the lower arm reaches forward, instead of pressing down.
- Step 6 : - Once you are comfortable with this breathing position, begin to swim regular freestyle. Go slowly and focus on reaching forward with your lower arm as you roll your face, shoulder and hip up to the high side for each breath. Keep reaching forward throughout your inhale. Practice until you achieve a weightless reaching arm.
DRILL FEEDBACK CHART
| Problem | Modification |
| My mouth does not clear the water to breathe. | Roll the low hip and shoulder down more. Keep kicking when you are breathing. |
| My reaching arm is still heavy. | Slow down your stroke. Practice the 12 Kick Switch and Catch Up drills to get comfortable with this floating position. |
| I don't seem to have time to fit the breath into my stroke. | Focus on initiating the roll early in the stroke. Keep practicing. This is a difficult skill. |
Temple Press
THE PURPOSE OF THIS DRILL
- Practicing the correct head alignment while breathing
- Learning to use a low profile breathing technique
- Experiencing the bow wave when inhaling
HOW TO DO THIS DRILL
- Step 1 : - Stand in waist deep water. Bow forward at the waist and submerge your face in the water. Look at the bottom of the pool. Extend your arms in front of you on the surface of the water. Bring one arm back toward your hip underwater, and turn to that side, as if breathing in freestyle. Freeze in that position. What parts of your head are connected to the water? Your jaw bone? Your cheek? How about your temple?
- Step 2 : - Adjust your head position so that your temple is pressing down on the water. Notice that by doing so your cheek and your jaw bone automatically connect to the water. Your mouth might not clear the water as much as you are used to. That is fine.
- Step 3 : - Now begin to swim regular freestyle. Roll up to breathe and reach forward with your lower arm. While turned for the inhale, press your temple into the water. Feel that your cheek and your jaw bone connect to the water as well. Notice that as you are moving forward during the breath, the water parts around your head, like it does at the bow of a moving boat. With your temple pressed into the water, this bow wave will create a sort of pocket of air for you to inhale, even if your mouth is very close to the water.
- Step 4 : - Continue swimming, using the low profile breathing technique by pressing your temple into the water, and breathing within the bow wave.
DRILL FEEDBACK CHART
| Problem | Modification |
| I can't get my temple down when swimming freestyle. | Work on your floating position. Start by looking at the bottom of the pool. Get your chest down and float downhill. |
| My face doesn't clear the water. | Roll the breathing side hip and shoulder up more, and the other side hip and shoulder down more. |
| I am getting water in my mouth. | Create more forward motion with a stronger kick. The more forward momentum you have, the greater that bow wave will be, making the water go around you, not in your mouth. |
Dead Arm Freestyle
THE PURPOSE OF THIS DRILL
- Feeling the core involvement in breathing
- Reaching forward while breathing
- Experiencing the correct timing of the breathing
HOW TO DO THIS DRILL
- Step 1 : - Push off the wall as if preparing to swim freestyle. Bring one arm to your side and hold it there motionless. Engage your core tension.
- Step 2 : - Swim freestyle with the other arm only. Before each stroke, focus on aligning your moving arm forward, directly in front of your shoulder. When you stroke, maintain a high elbow position, and use the full length of each stroke to accelerate through. Pull then push from front to back.
- Step 3 : - Breathe towards the side with the motionless arm. Without moving your head independently, turn to breathe using your hips and shoulders to initiate your roll to breathe. Time your inhale to begin when the moving arm is reaching for the front, just as your finger tips touch the water. Keep reaching forward throughout the inhale.
- Step 4 : - As you inhale, you should be able to see the shoulder on your breathing side out of the water. As you return your face to the water, feel that shoulder and same side hip roll down.
- Step 5 : - Continue swimming with one arm to the end of the pool, focusing on breathing with your body roll. Switch arms. Repeat. Continue practicing until you can achieve balanced breathing by rolling with a firm core.
DRILL FEEDBACK CHART
| Problem | Modification |
| I can't get a breath. | Roll the hip and shoulder down with the stroking arm. You won't be able to get a breath if you are flat. |
| I have to stretch my neck and raise my chin to get a breath. | Establish and maintain a downhill float. Accelerate your one arm pull toward your hip. Kick more. |
| It feels awkward. | This is an advanced drill! It will take time to master it. Practice more. |
 English